Most “beginner guides” to bobbin lace do the same thing: show you pretty bobbins, explain the history, then recommend five books.
You close the tab no closer to actually making lace.
This tutorial is different.
By the end of this page, you’ll know exactly what to buy (under $50), how to do the only two moves that matter, and you’ll complete your first project—a simple bookmark—in one afternoon.
No books required. No fluff. Just lace.
What we’ll cover:
The essential starter kit (and where to buy it globally)
Cross & Twist: the two moves behind all bobbin lace
Your first project: a Torchon bookmark, row by row
The 5 mistakes every beginner makes (and quick fixes)
Let’s get your bobbins moving.
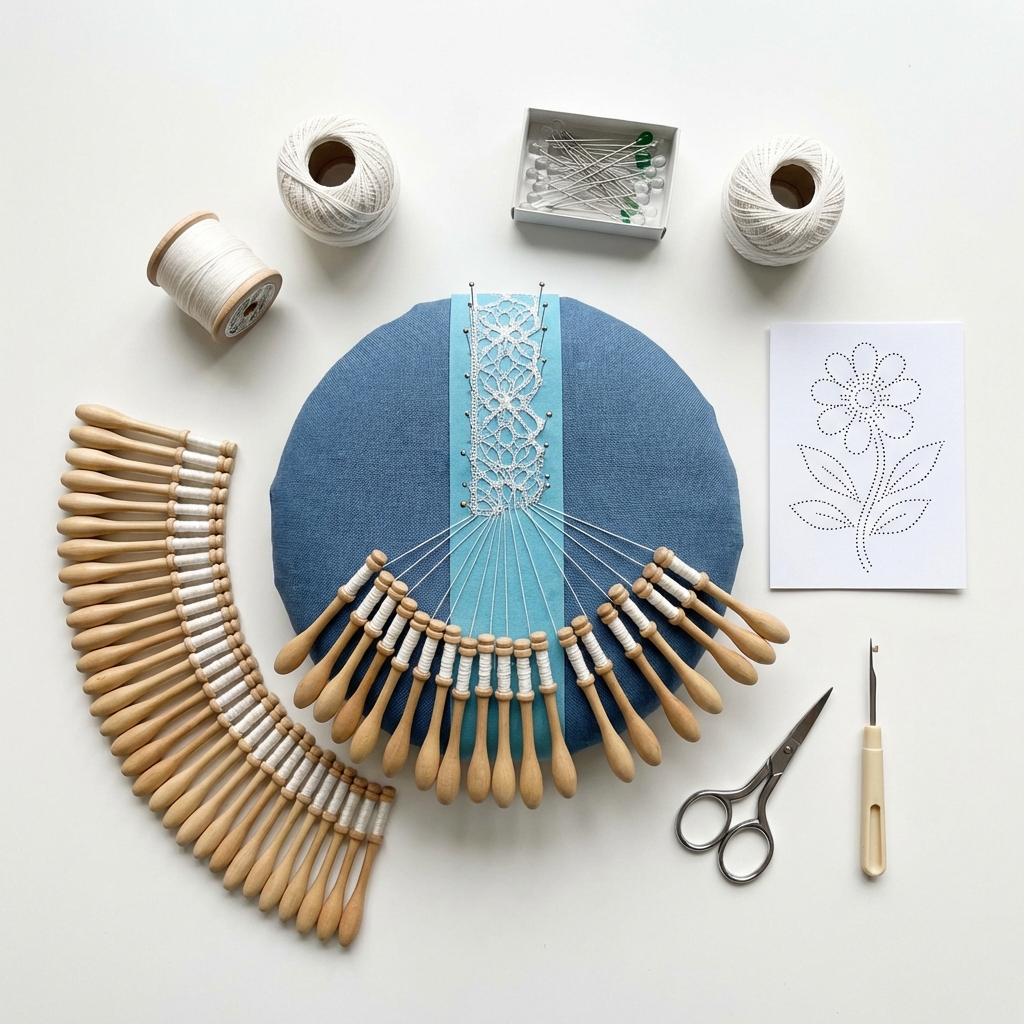
What You’ll Need: The Essential Starter Kit (Under $50)
You don’t need fancy hand-turned bobbins or an heirloom pillow to start.
Here’s what actually matters for your first project.
Bobbins: Which Type Should You Buy?
There are two main styles:
| Type | Shape | Best For | Price Range |
|---|---|---|---|
| Midland (Spangled) | Thin, uniform, beaded at bottom | Flat pillows, UK tradition | $1-3 each |
| Continental | Bulbous end, no beads | Bolster pillows, European tradition | $1-3 each |
Recommendation for beginners: Start with Midland-style bobbins. The spangles (beads) add weight and stop them rolling around. Much easier to manage.
You need 12 bobbins minimum for a simple bookmark. Buy 16 to have spares.
Your First Pillow: DIY or Buy?
Three options:
| Option | Cost | Pros | Cons |
|---|---|---|---|
| Buy a starter pillow | $15-30 | Ready to use | Limited size |
| DIY with foam board | $5-10 | Cheap, customizable | Takes 30 min to make |
| Temporary hack: firm cushion + cardboard | $0 | Free, instant | Not ideal long-term |
Best value: A 12″ flat foam pillow from Etsy or Amazon. Or make your own with layered foam board covered in fabric.
Thread, Pins & Pattern
| Item | Specification | Why It Matters |
|---|---|---|
| Thread | Cotton, size 10-20 (thicker = easier) | Thin thread is frustrating for beginners |
| Pins | Glass head or brass lace pins, 1″ | Must be thin enough not to split thread |
| Pattern card | Cardstock or pricking card | Holds pin holes without tearing |
Pro tip: Use different colored threads for your first project. It makes tracking pairs much easier.
Where to Buy (Global)
| Region | Recommended Shops |
|---|---|
| USA | Amazon, Etsy, Lacis.com |
| UK | George White Lace Supplies, The Lace Guild |
| Europe | Kantcentrum (Belgium), PPLaceSupplies |
| Worldwide | Etsy (search “bobbin lace starter kit”) |
Budget starter kit total: $30-50
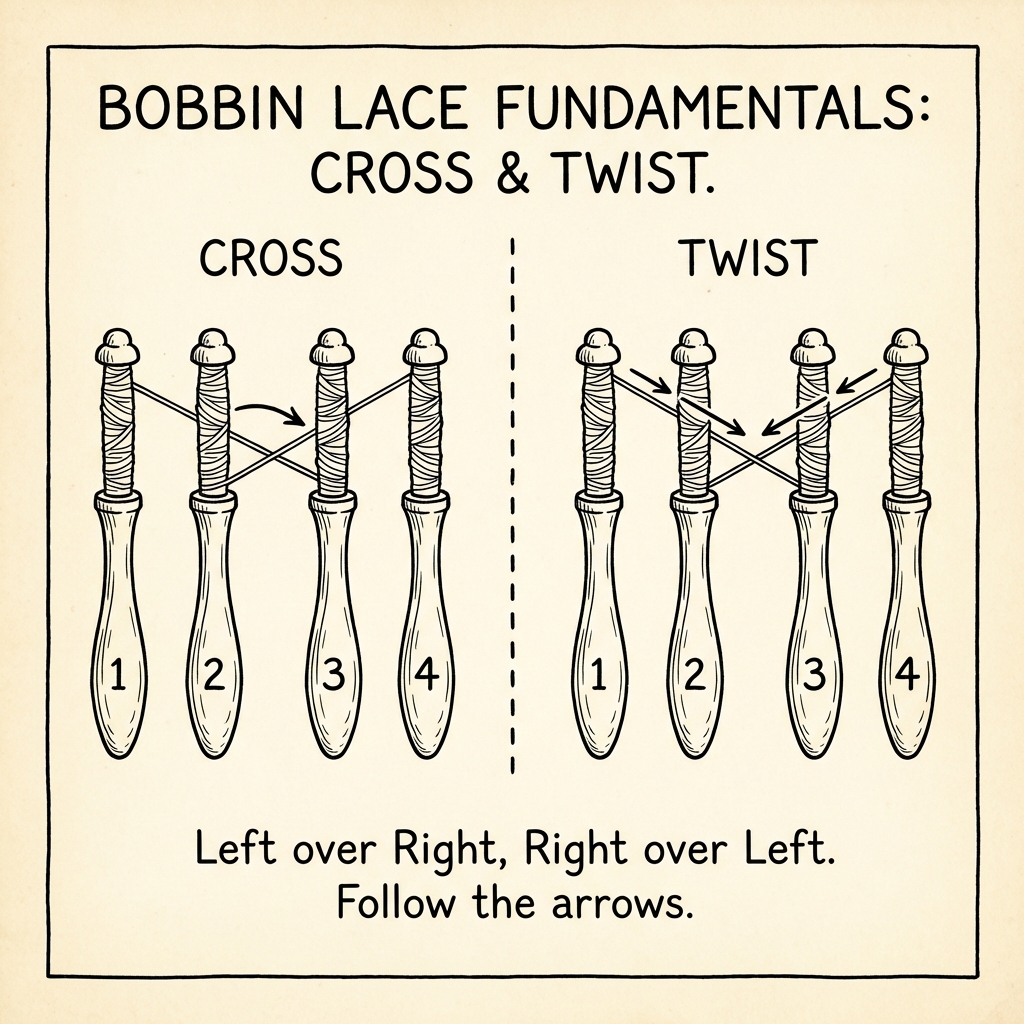
The Two Moves That Create All Lace: Cross & Twist
Here’s the beautiful secret of bobbin lace:
Every pattern—from simple edgings to cathedral-worthy masterpieces—uses only two moves.
Master these, and you can make anything.
How to Hold Your Bobbins
Before you cross or twist, get your grip right.
Sit with your pillow in front of you
Let bobbins hang naturally over the edge (for bolster) or lay flat (for flat pillow)
Hold bobbins between thumb and index finger, about 2 inches from the thread
Keep your hands relaxed—tension comes from bobbin weight, not your grip
Common mistake: Gripping too tightly. Let the spangles do the tensioning work.
The Cross Move (C)
A Cross happens between two pairs of bobbins.
Setup: Four bobbins in a row. Left pair (bobbins 1-2) and right pair (bobbins 3-4).
The move:
Take the right bobbin of the left pair (bobbin 2)
Lift it over the left bobbin of the right pair (bobbin 3)
Set it down between bobbin 3 and 4
Result: The two middle bobbins have switched places.
Think of it as: “Right over left, in the middle.”
The Twist Move (T)
A Twist happens within one pair.
The move:
Take the right bobbin of the pair
Lift it over the left bobbin of the same pair
Set it down on the left side
Result: The two bobbins in the pair have switched places.
Think of it as: “Right over left, same pair.”
Practice Drill: The C-T-C-T Rhythm
The most common combination in Torchon lace is: Cross – Twist – Cross – Twist (CTCT).
This creates what’s called a “whole stitch” or “cloth stitch.”
Practice exercise:
Set up 4 bobbins (2 pairs)
Do: Cross – Twist – Cross – Twist
Place a pin between the two pairs
Repeat 10 times until it feels automatic
When CTCT becomes muscle memory, you’re ready for your first project.
Your First Project: A Simple Torchon Bookmark
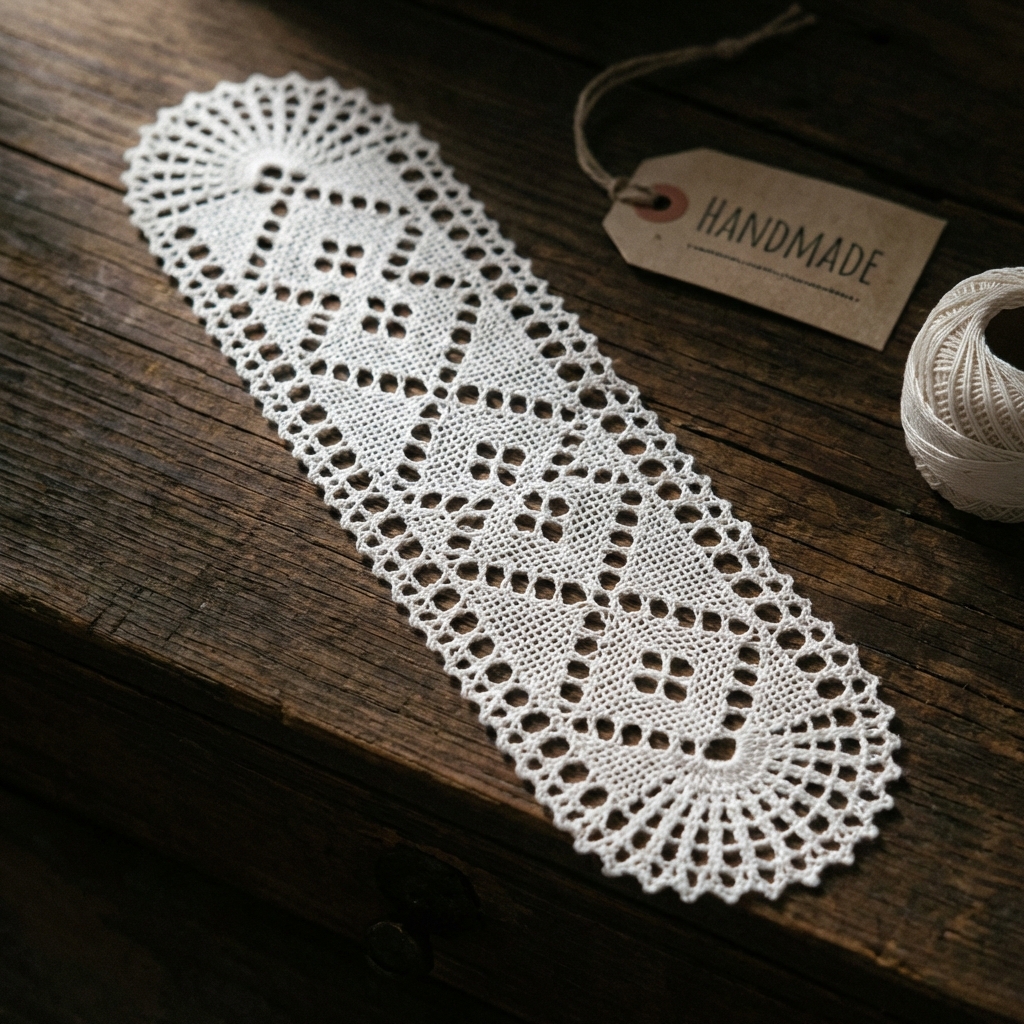
Torchon is the best style for beginners. The patterns use a simple grid, and the ground stitch repeats predictably.
This bookmark uses only:
8 bobbins (4 pairs)
The CTCT stitch you just learned
About 2-3 hours of your time
Step 1: Prepare Your Pattern
You need a “pricking”—a card with holes showing where pins go.
For this bookmark:
Draw a grid of dots on cardstock: 5 dots wide, 30 dots long
Spacing: 1 cm (or 0.5 cm for finer lace)
Angle: Dots should form a 45° diagonal grid
Or download a free beginner bookmark pattern from:
laceguild.org (free patterns section)
Pinterest (search “torchon bookmark pricking”)
Pin your pattern securely to your pillow.
Step 2: Wind Your Bobbins
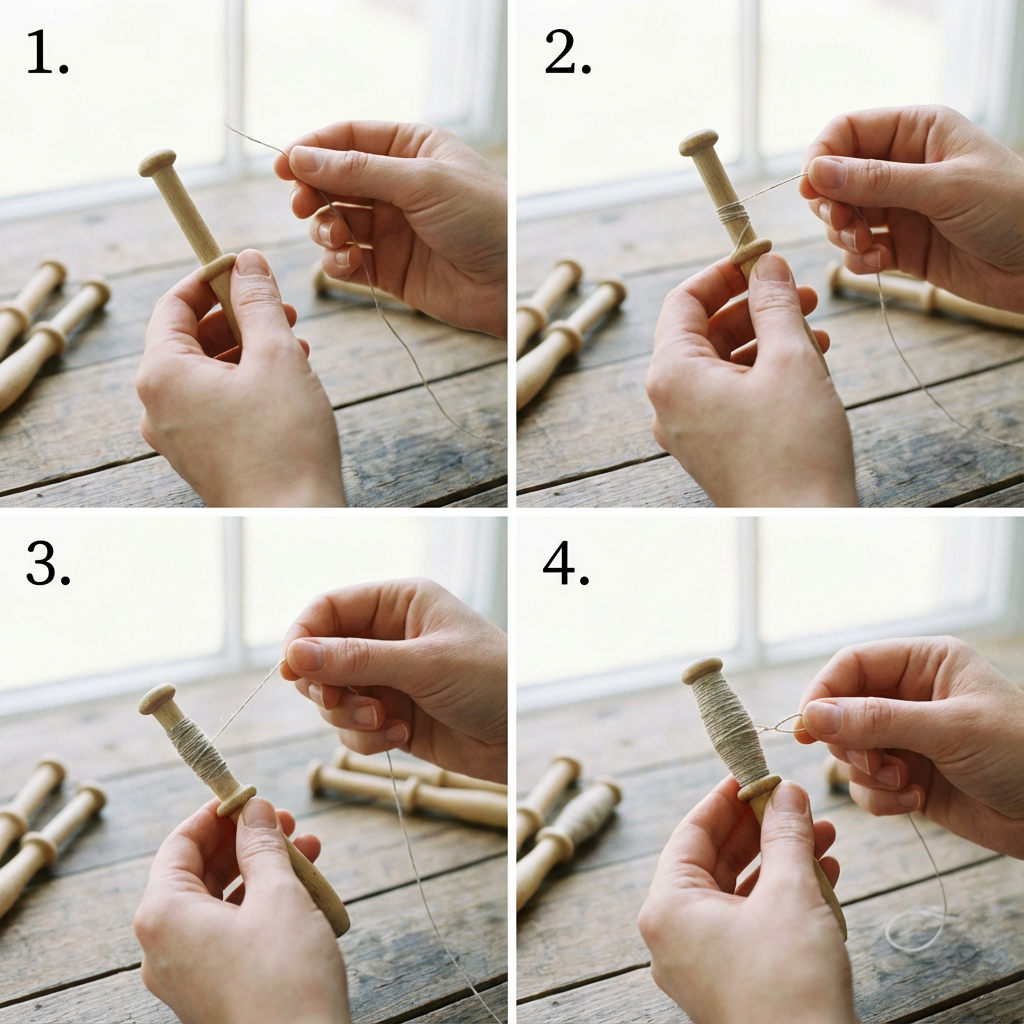
Each bobbin needs about 1.5 meters of thread.
How to wind:
Hold the thread end against the bobbin neck
Wind thread away from you, covering the loose end
Make a slip knot or half-hitch to secure
Leave about 15 cm of working thread hanging
Wind 8 bobbins total. Use 2 colors (4 bobbins each) to track pairs easily.
Step 3: Set Up Your Starting Row
Tie pairs of bobbins together at the top with a loose knot
Pin each knotted pair to the top row of your pattern
Arrange so you have 4 pairs hanging down
Number them in your mind: Pair 1, Pair 2, Pair 3, Pair 4 (left to right)
Step 4: Work the First Rows
Torchon ground moves diagonally. You’ll work from the outside edges toward the center.
Row 1:
Take pairs 1 and 2
Work CTCT (Cross-Twist-Cross-Twist)
Pin at the pattern hole between them
Take pairs 3 and 4
Work CTCT
Pin at the pattern hole between them
Row 2:
Now the center pairs have moved
Take the two middle pairs (previously 2 and 3)
Work CTCT
Pin at center
Row 3 and beyond:
Continue this zigzag pattern
Outside pairs work toward center
Center pair works outward
Pin at every pattern hole after completing CTCT
Step 5: Find Your Rhythm
After 5-6 rows, you’ll notice the pattern:
Work left edge pair with its neighbor → pin
Work right edge pair with its neighbor → pin
Work center pairs → pin
Repeat
Keep even tension. Not too tight, not too loose.
Check your work every few rows. The threads should form a neat diagonal grid.
Step 6: Finishing Your Bookmark
When you reach the end:
Option A: Simple knot finish
Work to the last row
Tie each pair in a secure square knot
Trim threads to 1 cm
Apply a tiny dot of fabric glue to each knot
Option B: Sewn finish
Use a fine needle to weave thread ends back into the lace
Trim close to the surface
No glue needed
Option C: Fringe
Leave 5 cm of thread
Tie decorative knots
Trim evenly
Congratulations. You’ve made lace.
5 Mistakes Every Beginner Makes (And How to Fix Them)
Don’t worry—everyone makes these. Here’s how to recover quickly.
Mistake #1: Tension All Over the Place
What it looks like: Some areas tight and puckered, others loose and loopy.
Why it happens: Gripping bobbins too hard, or uneven thread lengths.
Fix:
Let the bobbin spangles provide weight—relax your grip
Keep working thread lengths equal (adjust by unwinding from bobbin)
Pull gently after each stitch to even out
Mistake #2: Pins Keep Popping Out
What it looks like: Pins lean, fall over, or pull out when you work the next stitch.
Why it happens: Pillow too soft, or pins inserted at wrong angle.
Fix:
Push pins in vertically, not at an angle
Use a firmer pillow (add more foam layers if DIY)
Don’t pull threads directly away from pins
Mistake #3: Lost Track of Pairs
What it looks like: You can’t tell which bobbins belong together, or which pair to work next.
Why it happens: All threads look the same, and you got distracted.
Fix:
Always use colored threads for your first projects
Assign each pair a different color
If lost: trace threads back to the last pin
Some lacemakers put tiny rubber bands on bobbin necks to mark pairs
Mistake #4: Pattern Holes Don’t Line Up
What it looks like: Your lace drifts to one side, or stitches don’t land on pin holes.
Why it happens: Pricking was inaccurate, or you skipped a stitch.
Fix:
Print or trace patterns carefully—use a ruler
Count stitches at end of each row
If you’re off: unpin back to where it was correct, redo
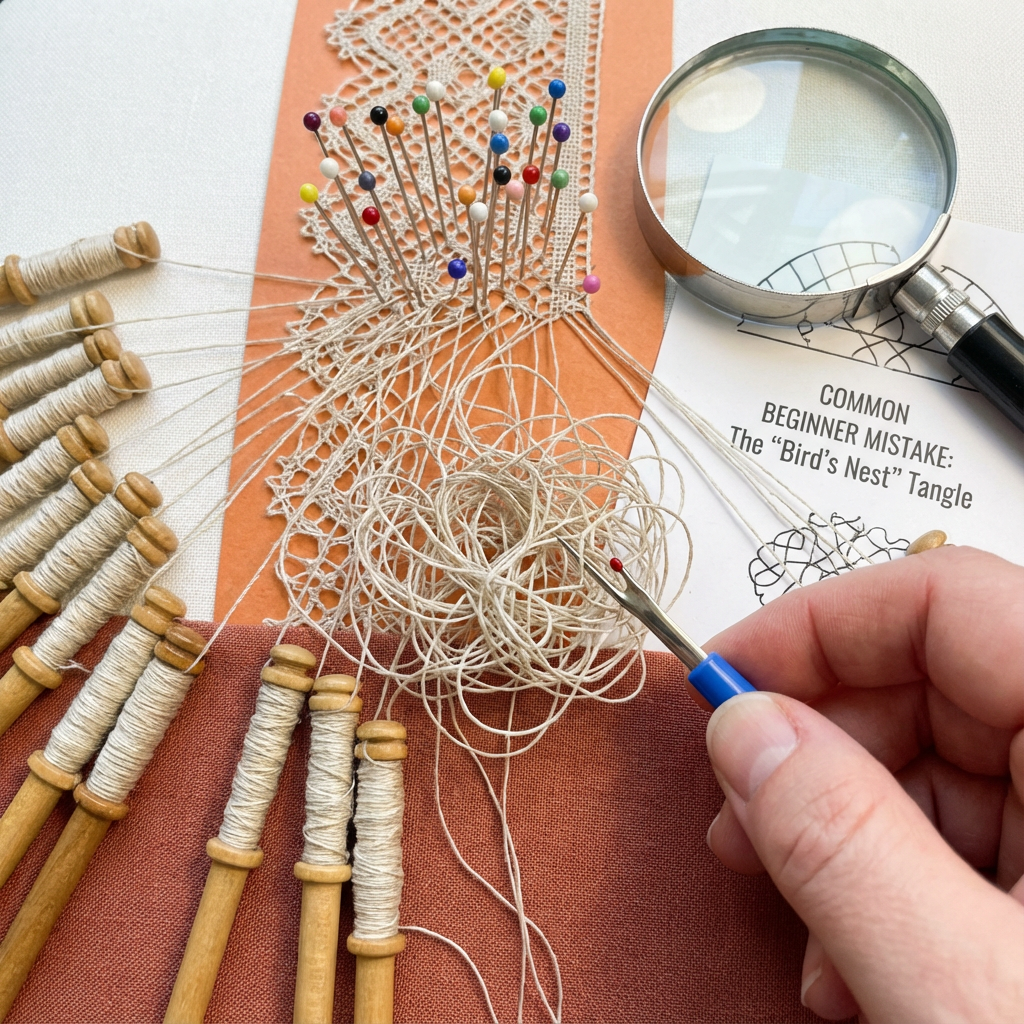
Mistake #5: Thread Keeps Tangling
What it looks like: Bobbins twist around each other, threads knot underneath.
Why it happens: Bobbins swing freely too much, or pairs cross paths incorrectly.
Fix:
Keep unused bobbins to the side, not dangling in the work area
After each stitch, lay pairs back in order
Use a “bobbin holder” (a piece of foam) to park inactive bobbins
Work slowly until you build the habit of tidiness
What’s Next? Your Learning Path After the First Project
You’ve made your first lace. Now what?
Free Patterns to Try Next
Progress in this order:
| Project | New Skill | Pairs Needed |
|---|---|---|
| Wider bookmark | Managing more pairs | 12 |
| Simple edging | Edge stitches (footside) | 8-10 |
| Small coaster | Working in rounds | 16 |
| Torchon mat | Complex grounds | 20+ |
Free pattern sources:
– Free beginner patterns
Pinterest – Search “free torchon lace patterns”
YouTube – Many tutorials include downloadable prickings
When to Upgrade Your Tools
Don’t rush to buy expensive bobbins. Upgrade when:
| Sign | Upgrade |
|---|---|
| Your wooden bobbins are splintering | Better quality bobbins |
| You’re working larger patterns | Bigger pillow |
| You want finer lace | Thinner thread (size 30-80) |
| You’re doing 5+ hours/week | Ergonomic setup (proper chair, lighting) |
The truth: Skill matters more than tools. Lacemakers in the 1600s made masterpieces with basic equipment.
Communities to Join
Lacemaking is better with others.
| Platform | Where to Find Lacemakers |
|---|---|
| “Bobbin Lace Makers,” “Lace Lovers” groups | |
| r/lacemaking | |
| YouTube | Louise West, Angela’s Lace Studio |
| Local | Search for lace guilds in your region |
Posting your work gets feedback. Watching others work solves problems faster than reading.
Frequently Asked Questions
How long does it take to learn bobbin lace?
You can complete your first simple project in 2-3 hours.
Basic competence (comfortable with common stitches, can follow patterns independently) takes about 20-30 hours of practice—roughly a few weeks if you practice regularly.
Mastery? That’s a lifetime pursuit. But you’ll be making beautiful pieces within months.
Can I use regular sewing thread?
Technically yes, but it’s frustrating.
Regular sewing thread (size 50) is too thin and twists too easily. Start with crochet cotton size 10 or 20—it’s thicker, smoother, and much easier to handle.
Once you’re comfortable, you can experiment with finer threads.
Do I need a pattern to start?
Yes, for structured lace.
Beginners should always use a pricking (pattern card). It tells you where to put pins, which determines your lace structure.
Free printable patterns are widely available online. Don’t try to “freestyle” until you understand how the grid system works.
What’s the difference between bobbin lace and needle lace?
| Aspect | Bobbin Lace | Needle Lace |
|---|---|---|
| Tool | Multiple bobbins | Single needle |
| Method | Weaving/twisting threads | Buttonhole stitches |
| Speed | Faster once learned | Generally slower |
| Look | Woven texture | Embroidered texture |
Both are “real” lace. Bobbin lace is generally considered easier for beginners because the movements are repetitive.
Is bobbin lace hard to learn?
The basics? No. There are only two moves (cross and twist).
The challenge is:
Patience: It’s slow, meditative work
Organization: Keeping track of multiple pairs
Precision: Consistent tension takes practice
If you enjoy knitting, crochet, or weaving, you’ll probably enjoy bobbin lace. If you hate repetitive handwork, this isn’t for you.
SEO Metadata
Title Tag: Bobbin Lace Tutorial: Your First Project in One Afternoon
Meta Description: Learn bobbin lace step-by-step with this beginner tutorial. Includes a $50 starter kit guide, the cross & twist technique, and your first bookmark project.
URL Slug: /bobbin-lace-tutorial-beginners
Image Prompts
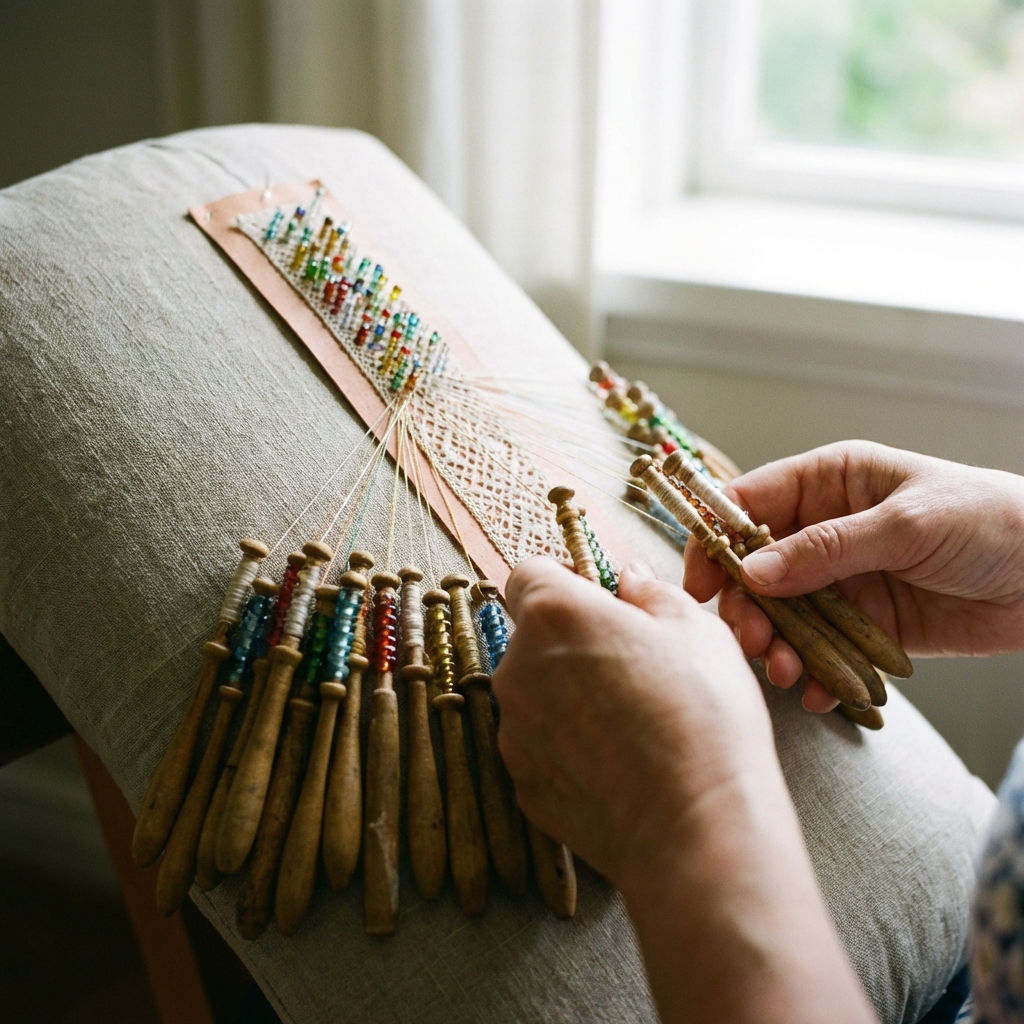
Hero Image: “Close-up of hands making bobbin lace on a flat pillow, multiple wooden bobbins with colorful spangles, soft natural daylight, shallow depth of field, craft photography style”
Starter Kit Flat Lay: “Flat lay photography of bobbin lace starter kit: wooden bobbins, lace pillow, pins, cotton thread spools, pattern card, white background, overhead view, clean minimal style”
Cross & Twist Diagram: “Instructional diagram showing bobbin lace cross and twist moves, numbered bobbins, arrows indicating movement direction, clean line art, educational illustration”
Finished Bookmark: