I downloaded twenty patterns in my first week of bobbin lace. Beautiful designs, promising projects. I couldn’t make a single one.
The problem wasn’t the patterns. It was me. I had no idea how to read them.
Those grids of dots and lines might as well have been ancient hieroglyphics. And here’s the thing — most pattern collections assume you already know what you’re looking at. They give you files to download but zero guidance on what those symbols actually mean.
This guide fixes that. You’ll learn to decode any bobbin lace pattern, find resources matched to your skill level, and understand why some “free” patterns are actually useless. By the end, you’ll look at a pricking and know exactly what to do.
How to Read Bobbin Lace Patterns (The Missing Guide)
Every bobbin lace pattern, no matter how complex, breaks down into three elements. Once you understand these, you can tackle any design.
The Anatomy of a Pattern
A bobbin lace pattern consists of a grid, pin holes, and thread paths. The grid establishes your working angle — typically 45 or 60 degrees. Pin holes mark where you’ll place pins to hold your work in position. Thread paths show how your bobbins travel across the pattern.
Most patterns come as a “pricking” — a card with holes punched where the pins go. You pin this to your pillow and work on top of it. The pattern diagram shows you which stitches to make at each pin position.
Understanding Common Symbols
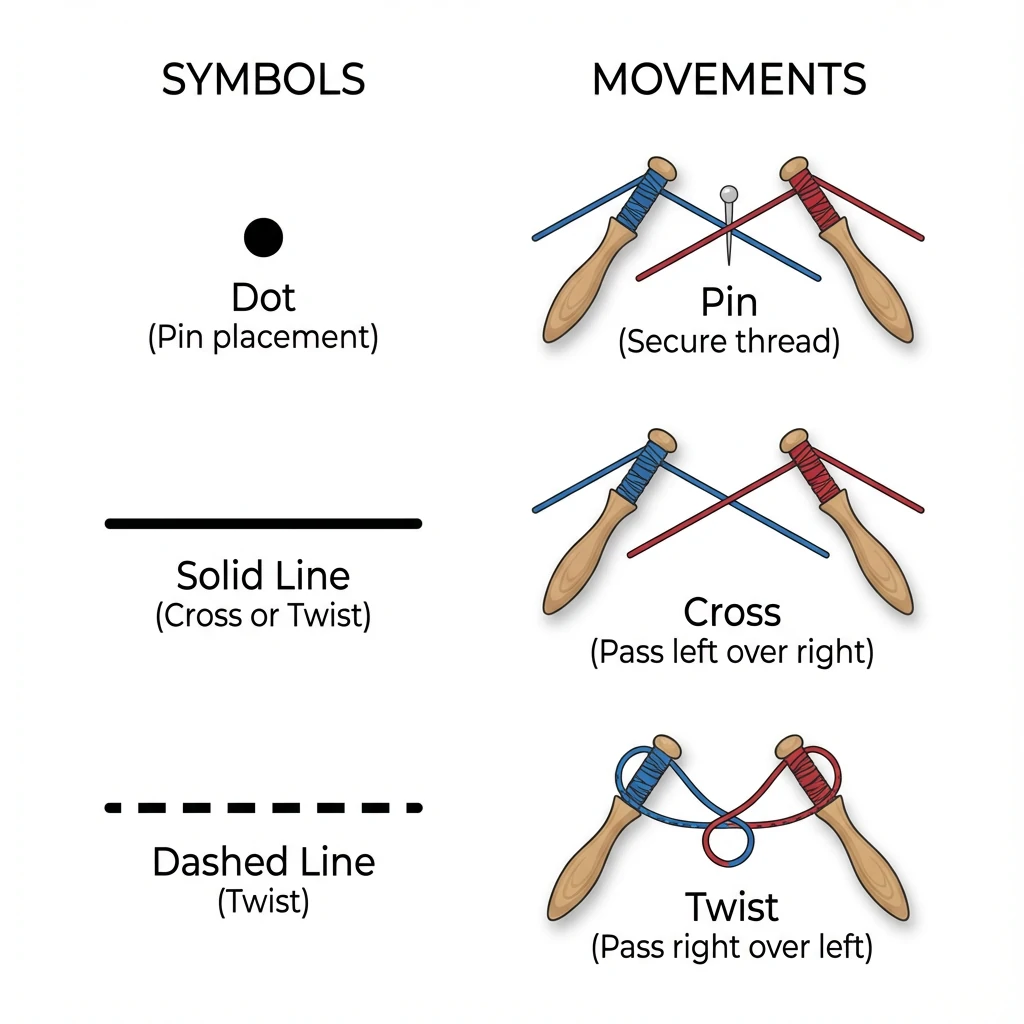
Pattern symbols vary between designers, but certain conventions appear almost universally. A solid line typically shows thread traveling over. A dashed line means the thread passes under. Circles or dots mark pin positions.
The most common stitches have standard representations. A cross (C) shows two pairs exchanging their inner bobbins. A twist (T) shows one pair’s bobbins switching positions. You’ll see these abbreviated as CT, CTC, CTCT — telling you the exact sequence of moves.
| Symbol | Meaning | What You Do |
|---|---|---|
| Solid dot | Pin position | Place pin here after completing stitch |
| C | Cross | Right-hand bobbin of left pair goes over left-hand bobbin of right pair |
| T | Twist | Right bobbin goes over left bobbin within same pair |
| Solid line | Thread path (over) | This thread travels on top |
| Dashed line | Thread path (under) | This thread travels underneath |
Color Coding Explained
Many patterns use colored lines to help you track thread pairs through the design. This isn’t decoration — it’s navigation. Each color represents one pair of bobbins traveling through the work.
When you see red threads crossing blue threads, you’re watching two pairs interact at that point. The color coding shows you which pair goes where after each stitch. Some beginners actually use colored threads matching the diagram while learning — it makes tracking much easier.
Reading Direction and Flow
Bobbin lace typically works from top to bottom. Your bobbins hang from pins at the top and gradually move downward as you complete each row of stitches.
But direction within each row varies. Some patterns work left-to-right, then right-to-left in alternating rows (like Torchon ground). Others spiral outward from a center point. The pattern diagram should indicate starting position and working direction with arrows.
When in doubt, look for the “head” of the pattern — the side with the most pins close together. That’s usually where you begin.
[→ New to the basic stitches? Our bobbin lace tutorial covers cross and twist from scratch.]
30+ Free Bobbin Lace Patterns (Organized by Skill Level)
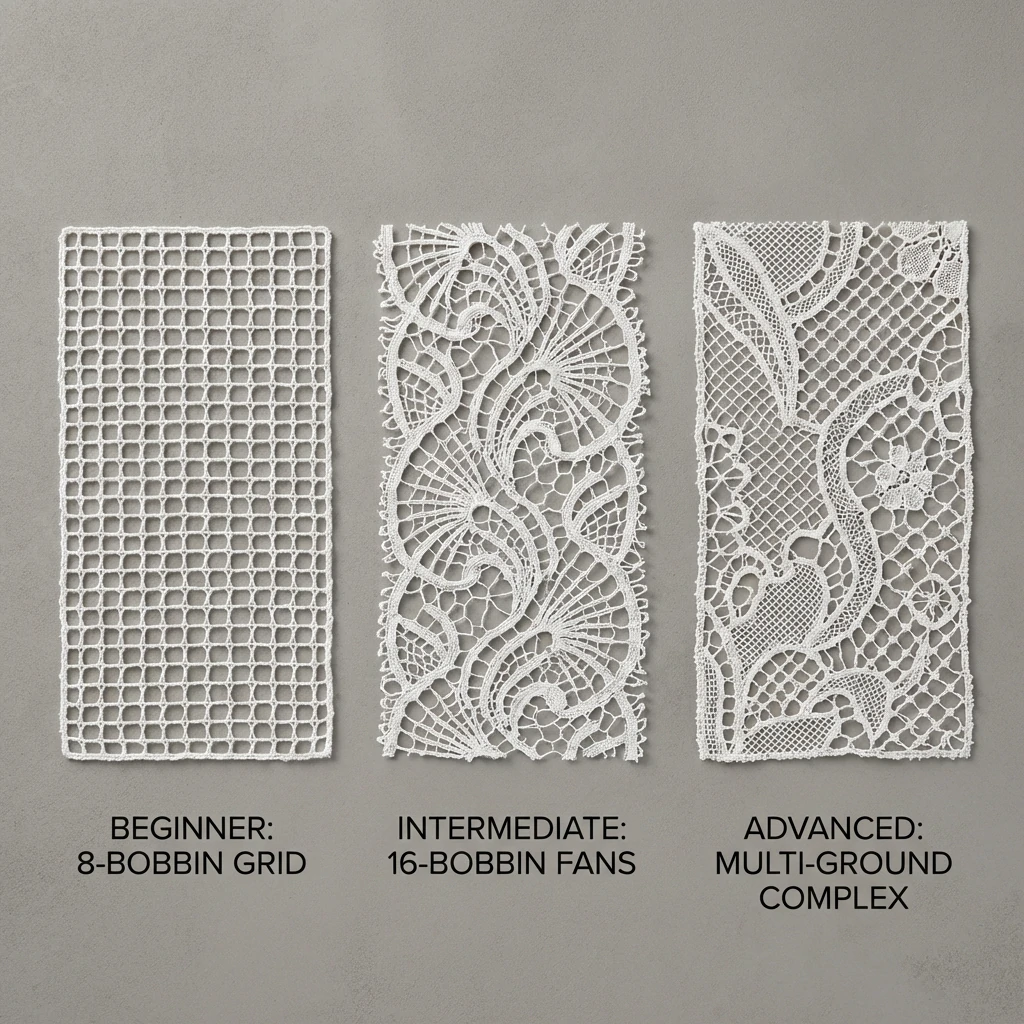
Not all patterns suit all skill levels. I’ve curated these resources by difficulty, so you can progress systematically instead of drowning in options.
Beginner Patterns (Your First 5 Projects)
Start here. These patterns use basic ground stitches, require minimal bobbins, and produce results you can actually finish.
| Pattern | Type | Bobbins | Source | Notes |
|---|---|---|---|---|
| Basic Torchon Bookmark | Ground practice | 8 | The Lace Guild | Classic first project |
| Simple Edging #1 | Straight edge | 6 | Jo Edkins | Minimal pairs, quick finish |
| Practice Ground Square | Sampler | 8-12 | Laceioli | Pure technique practice |
| Fan Bookmark | Simple fan motif | 10 | Bridget Cook Books | Introduces fan element |
| Corner Edging | L-shaped | 8 | Internet Archive | Learn to turn corners |
These patterns share key traits: consistent ground, few bobbins, and clear instructions. Don’t skip ahead. The muscle memory you build here matters.
Intermediate Patterns (Building Complexity)
Once your ground is consistent and your tension even, try these. They introduce new elements while staying manageable.
| Pattern | Type | Bobbins | Source | New Skills |
|---|---|---|---|---|
| Torchon Mat | Circular | 16-20 | The Edkins Collection | Working in rounds |
| Braid Insert | Decorative | 12 | Laceioli | Adding braids |
| Rose Ground Sampler | Alternative ground | 12 | Lace Guild Archive | Different ground texture |
| Spider Motif | Central element | 14 | Various | Creating focal points |
| Scalloped Edge | Shaped edge | 12 | Jo Edkins | Curved edges |
The jump from 8 to 16 bobbins sounds scary. It’s not. You’re doing the same stitches — just managing more pairs simultaneously.
Advanced Patterns (Where Art Begins)
These patterns assume fluency with multiple grounds, clean edges, and consistent tension. They combine techniques and require planning.
| Pattern | Type | Bobbins | Source | Challenge |
|---|---|---|---|---|
| Butterfly Motif | Part lace | 24+ | Specialized collections | Multiple sections joined |
| Bucks Point Edging | Traditional style | 20+ | Cowper Collection | Fine thread, dense ground |
| Collar Pattern | Wearable | 30+ | Various archives | Shaping for fit |
| Tape Lace Flower | Continuous tape | 14 | Modern designers | Following curved tape |
At this level, you’re often working from antique patterns or designing your own. The resources become scattered — museum archives, specialized books, lace guild collections.
Where to Download (Reliable Sources)
I’ve tested these sources. The patterns download correctly, include necessary information, and come from reputable makers.
| Source | URL | Speciality | Cost |
|---|---|---|---|
| Jo Edkins Collection | theedkins.co.uk | Torchon, beginners | Free |
| Laceioli | laceioli.wordpress.com | Modern designs | Free |
| The Lace Guild | laceguild.org | Traditional UK styles | Free/Membership |
| Internet Archive | archive.org | Historical patterns | Free |
| Pinterest Collections | pinterest.com | Visual inspiration | Free |
Avoid random Pinterest saves with no source information. They’re often incomplete — missing prickings, unclear symbols, or incorrect thread counts.
The Insider’s Edge — What Pattern Sellers Won’t Tell You
I’ve seen people waste money on pattern books they can’t use and hours on “free” downloads that frustrate more than help. Here’s what the pretty pictures don’t show you.
Why Some “Free” Patterns Are Unusable
A pattern image is not a working pattern. You need three things: the visual diagram, the pricking (with correct scale), and the working instructions. Many free downloads provide only the first.
Without a pricking at the right size, your pin spacing will be wrong. Without instructions, you won’t know which stitches to use where. That gorgeous design becomes expensive wall art.
Before downloading, check: Does this include a printable pricking? Are there written instructions or at least stitch abbreviations marked? Is the scale specified?
The Thread Count Trap
Patterns specify thread counts for a reason. That delicate antique pattern calling for 80/2 cotton won’t translate to your beginner-friendly size 10.
Thicker thread makes larger lace. That sounds obvious, but the implications aren’t. Your “small bookmark” becomes a table runner. The delicate ground looks chunky and crude. The proportions intended by the designer disappear entirely.
Match your thread to the pattern specifications. If you want to experiment with different weights, adjust your pricking scale proportionally.
Pricking Quality Matters
The pricking is your roadmap. A bad pricking derails everything.
Signs of quality: cleanly punched holes, consistent spacing, card thick enough to hold pins firmly. Signs of trouble: torn edges around holes, uneven spacing, paper too thin.
If you print your own prickings, use cardstock minimum — ideally pricking card from a lace supplier. Punch holes with a proper pricker, not a pin. The extra effort pays off in cleaner work.
When to Buy vs DIY
Free patterns cover most beginner and intermediate needs. You’ll hit a wall eventually.
Buy patterns when: you want a specific traditional design accurately reproduced, you need complete instructions for complex techniques, you’re working on a significant project worth investing in.
Books from established authors (Bridget Cook, Jan Tregidgo, Ulrike Voelcker) cost money but provide tested patterns with thorough instructions. For serious projects, they’re worth it.
How to Use Your First Pattern (Step-by-Step)
You’ve chosen a pattern. Now what? Here’s the bridge from download to first stitch.
Printing and Pricking
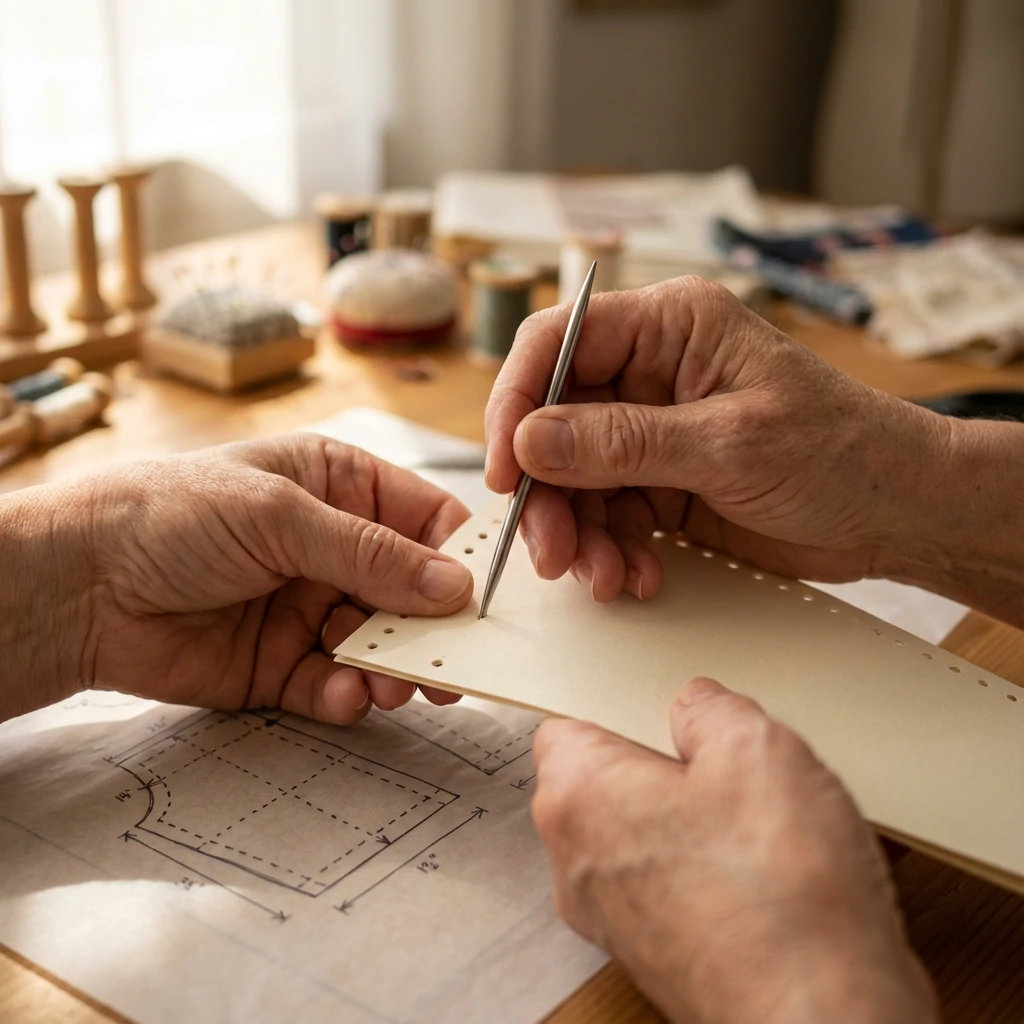
Print your pattern at 100% scale — no “fit to page” adjustments. The pin spacing is precisely calculated. Measure a few holes to verify scale if the pattern provides dimensions.
Mount the printed pattern on cardstock. Use spray adhesive or double-sided tape for a smooth bond. Then punch each pin hole with a pricker, working straight down through the card.
Take your time. Rushed pricking means crooked holes, which means frustrating work later.
Setting Up on Your Pillow
Pin the prepared pricking to your lace pillow. Use pins around the edges to hold it flat. The working area should be positioned so your bobbins hang comfortably.
Wind your bobbins according to the pattern’s pair count. If the pattern calls for 12 bobbins, you need 6 pairs — each pair sharing one continuous thread. Use colored threads if the pattern includes color coding.
Secure your starting pairs to the first row of pins. Arrange them in order from left to right, matching the pattern diagram.
Following the Path
Read the pattern from top to bottom, working each stitch in sequence. At each pin position, complete the specified stitch (CT, CTC, CTCT, etc.), then place your pin.
Move systematically. Complete all stitches in one row before moving to the next. Check your work against the pattern diagram every few rows — catching mistakes early saves painful undoing later.
Your first pattern will be slow. That’s normal. Speed comes with familiarity.
Frequently Asked Questions
How do you read bobbin lace patterns?
Start with the three core elements: grid angle, pin positions, and thread paths. Pin positions tell you where to anchor each stitch. Thread paths show which bobbins move where. Stitch abbreviations (C for cross, T for twist) tell you what to do at each junction. Color coding helps you track pairs through complex designs.
Where can I find free bobbin lace patterns?
The most reliable free sources are Jo Edkins’ collection (theedkins.co.uk), Laceioli’s blog, The Lace Guild’s pattern archive, and the Internet Archive’s historical lace books. Avoid random Pinterest saves without source information — they’re often incomplete.
How do I design my own bobbin lace pattern?
Start by modifying existing patterns — changing elements while keeping proven structure. Learn graph paper drafting to plan pin positions on a grid. Software like GroundForge helps visualize thread paths. Master traditional patterns before attempting original designs — understanding the rules makes breaking them effective.
What’s the easiest bobbin lace pattern for beginners?
A simple Torchon ground bookmark using 8 bobbins. It teaches the fundamental CTCT stitch, introduces pin placement, and produces a finished piece quickly. Look for patterns specifically labeled “beginner” or “first project” with clear step-by-step instructions.
How many bobbins do I need for a pattern?