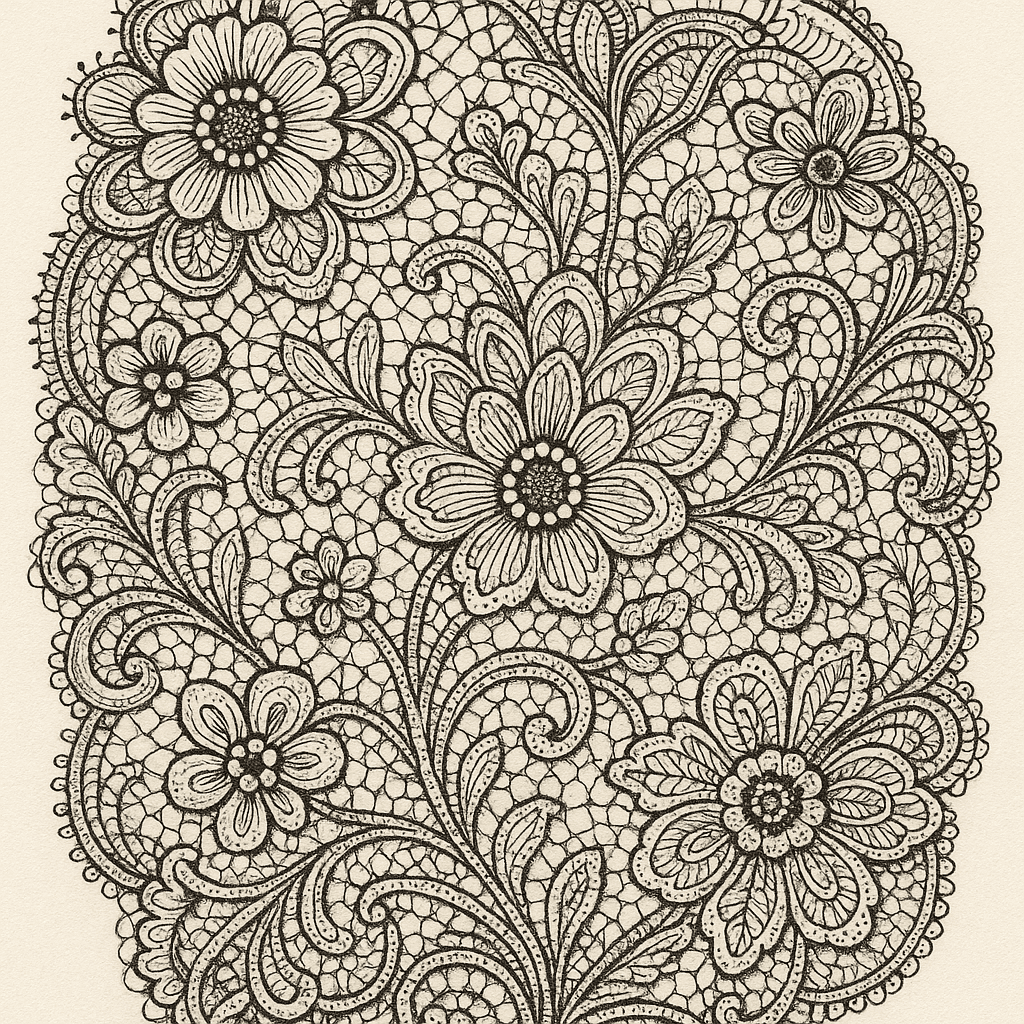
Drawing lace becomes manageable when you break it down into simple, repeatable steps. You can create stunning lace patterns using just a pen or pencil and some basic techniques. The secret lies in understanding that lace is essentially a series of repeated shapes connected by delicate mesh lines.
Materials and Preparation
- Drawing Tools: Fine-tipped pens (0.1-0.5mm) work best for intricate details. Micron or technical pens give you the control you need for tiny lines. A sharp pencil lets you sketch guidelines and add subtle shading before committing to ink.
- Paper: Smooth, heavyweight paper handles repeated fine lines without tearing. Bristol board prevents ink bleed and gives you a clean surface. The heavier the paper, the more erasing and reworking you can do without damage.
- Eraser and Ruler: A kneaded eraser lifts pencil marks gently without damaging delicate lines. A ruler helps you create evenly spaced patterns for your initial guidelines. French curves make drawing scalloped edges much easier.
- Reference Lace Patterns: Real lace fabric or detailed photos show you how patterns repeat and mesh looks in reality. Study how motifs connect and where the fabric appears most transparent. Having references nearby prevents you from guessing at details.
Step-by-Step Drawing Process
1. Plan the Design & Initial Outline
Start with a light pencil sketch that maps out your lace’s basic shape. Draw the overall boundary first—if you’re making a lace trim, sketch a scalloped border along one edge.
Add a parallel line following the same curve to create the thickness of the lace border. Keep these initial pencil lines extremely light since you’ll refine or erase them later.
2. Mark Pattern Repeats and Guides
Place small pencil marks at equal intervals along your outline to show where major motifs will go. Even spacing creates the balanced, repeating pattern that makes lace look authentic.
Draw faint helper lines or a light grid if your lace has symmetrical sections. Many lace patterns use an offset arrangement where motifs in one row fall between those in the previous row.
Slight variations in spacing actually add realism—real lace threads are never perfectly uniform.
3. Draw the Major Motifs (Floral or Geometric Patterns)
Create the main decorative elements at each marked point using simple shapes. Start with tiny circles or ovals as flower centers, then add petals or loops around them.
Use slightly wobbly lines rather than perfect ones to imitate the look of embroidered thread. Double up some outlines by drawing parallel lines around shapes to suggest thicker embroidery.
4. Refine and Ink the Motifs
Switch to pen once you’re happy with your motif placement. Vary your line width—thicker lines for outer contours suggest heavier embroidery, while thin inner details maintain delicacy.
Fill in strategic parts of each motif to create contrast. Blacken flower centers or shade one side of shapes to show where threads are denser.
Add small solid accents like tiny filled circles or teardrops to serve as decorative dots throughout your pattern.
5. Add Secondary Details and Embellishments
Fill gaps between major motifs with smaller connecting elements. Draw tiny loops or “U” shapes that bridge motifs together like threads connecting different parts of the pattern.
Add leaf shapes or small diamonds extending from edges and motifs. Create fringe by drawing wispy lines radiating outward from scalloped edges.
Outline shapes with dotted lines to suggest picot lace edging—these tiny dots instantly create that delicate lace feeling.
6. Create the Mesh (Transparent Netting)
Draw closely spaced diagonal lines across all empty regions to create the transparent mesh background. Start with lines going in one direction (like bottom-left to top-right), keeping them light and parallel.
Add a second set of diagonal lines crossing the first set in the opposite direction. This creates a grid of tiny diamond openings that mimics real lace netting.
Stop mesh lines when they reach solid motifs—never draw through filled areas. The mesh should appear to sit behind your decorative elements.
7. Emphasize and Clean Up the Details
Darken key outlines to make embroidered parts stand out. Trace over the outer border once more for definition, perhaps making it a double line for a corded edge effect.
Add tiny “X” marks inside scallops with the ends overshooting slightly past boundaries. Place dots near these marks to suggest knots or beads.
Carefully erase any remaining pencil guidelines if working in ink. Make sure everything is completely dry before erasing to avoid smudges.
8. Optional Shading and Finishing Touches
Lightly shade areas behind the lace to make white patterns pop against the background. This contrast makes your lace appear to float above the paper.
Add gentle shadow lines under thicker embroidered parts for a three-dimensional effect. A soft gray line beside dense motifs suggests raised thread casting shadows.
Check that your pattern remains consistent throughout and that transparent areas feel balanced across the entire design.
FAQs
What’s the biggest mistake beginners make when drawing lace?
Making lines too heavy or thick destroys lace’s delicate appearance. Keep your touch light, especially for the mesh background, and build up darkness gradually only where needed.
How long does it take to draw a piece of lace?
A simple lace trim might take 30-60 minutes, while an intricate doily could require several hours. Working in short sessions keeps your hand steady and prevents fatigue-related mistakes.
Can I use regular pens instead of technical pens?
Yes, gel pens or fineliners work well for lace drawing. The key is having a consistent fine tip that won’t skip or blob during detailed work.
Should every motif in my lace pattern be identical?
Small variations actually make lace look more realistic since real handmade lace has natural irregularities. Aim for consistency in style while allowing minor differences in execution.
What’s the best way to practice lace drawing?
Start by tracing photographs of real lace to understand pattern structures. Then try copying simple lace trims before designing your own patterns from scratch.
How do I draw lace on curved surfaces or clothing?
Warp your pattern to follow the form’s contours. The mesh lines should curve with the surface, and motifs should appear to wrap around folds naturally.