Real lace is created through two distinct methods: intricate handwork that takes months to complete, or specialized machines that can produce similar patterns in hours. Both processes transform simple thread into delicate, openwork fabric featuring elaborate patterns of loops, twists, and knots.
The fundamental difference lies in time and technique. Handmade lace requires skilled artisans working with bobbins, needles, or hooks to create each tiny loop by hand. Machine-made lace uses complex looms programmed to replicate these traditional patterns at industrial speeds.
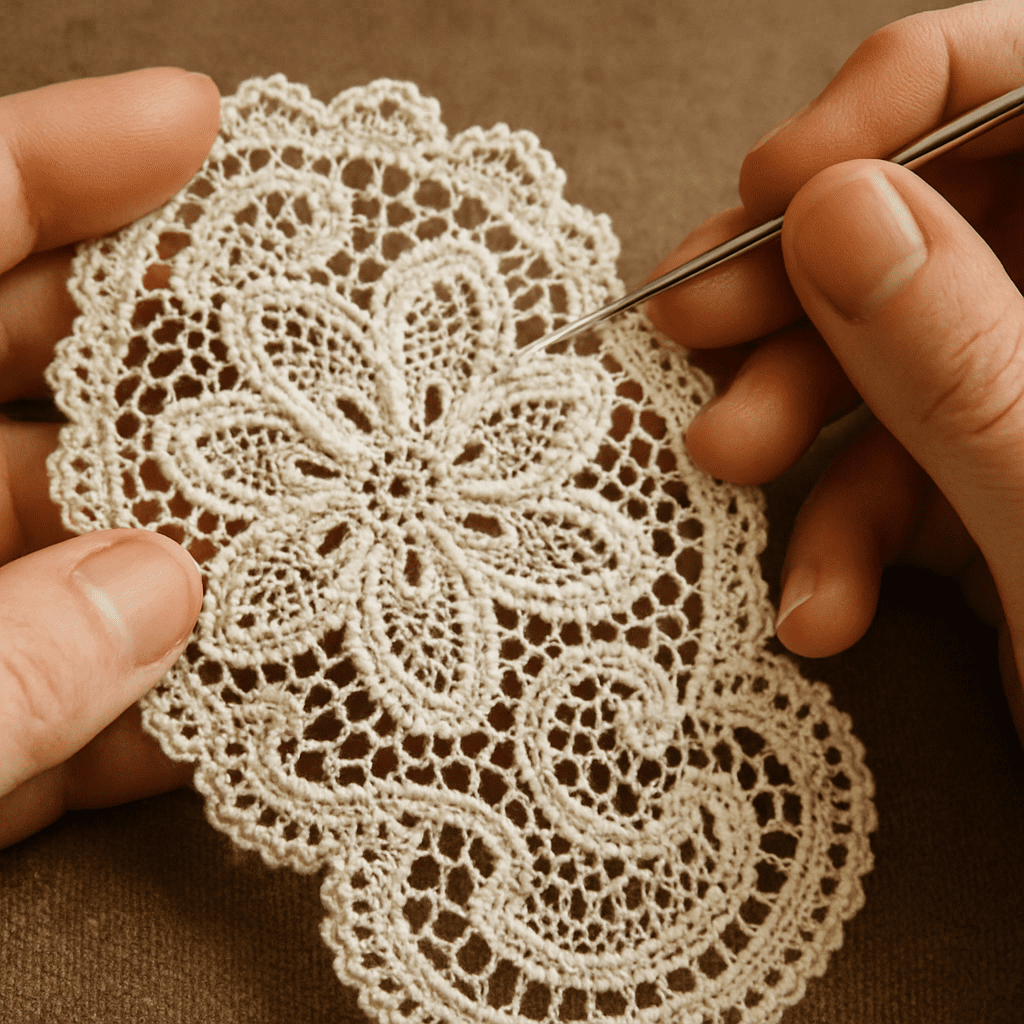
Handmade Lace
Creating handmade lace involves manipulating thread into patterns using one of three main techniques: bobbin lace, needle lace, or tatting. Each method produces distinct textures and designs, but all require exceptional patience and skill.
Bobbin Lace Method
Step 1: Prepare Your Materials
Gather a pattern card called a pricking, which shows exactly where each pin should go. You’ll need anywhere from a dozen to several hundred wooden bobbins, each wound with thread.
Step 2: Secure the Pricking and Insert Pins
Secure the pricking to a firm pillow and insert pins at marked points. These pins act as anchors that guide your thread placement and help form the pattern.
Step 3: Attach Threads to Starting Pins
Attach threads from pairs of bobbins to the starting pins to establish your foundation.
Step 4: Perform Basic Movements
Working with two pairs at a time, perform two basic movements: “cross” (passing the right bobbin over the left) and “twist” (passing the left bobbin over the right).
Step 5: Build the Pattern
Combine these simple movements by crossing and twisting threads around the pins in specific sequences. This gradually builds up the lace pattern from top to bottom.
Step 6: Remove and Reuse Pins
As sections complete, remove the pins from finished areas and reuse them further down the pattern. This continuous process creates the characteristic open meshwork of bobbin lace.
Needle Lace Method
Step 1: Prepare Your Pattern
Begin with a paper pattern covered in clear film to protect it.
Step 2: Create the Framework
Baste thick guide threads along the pattern’s outline, creating a temporary framework for your work.
Step 3: Fill with Buttonhole Stitches
Using just a needle and thread, fill the framework with tiny buttonhole stitches. Build each row on the previous one, varying the tension and spacing to create different textures and densities.
Step 4: Connect the Sections
Work section by section, connecting areas with bars or bridges of thread. These connections give needle lace its distinctive raised, three-dimensional quality.
Step 5: Release the Finished Lace
Once the entire pattern is complete, carefully cut the basting stitches to release the finished lace from its paper backing. The result is a piece that looks almost sculptural, with areas of dense stitching contrasting against open spaces.
Tatting Method
Step 1: Prepare Your Shuttle
Wind thread onto a small tatting shuttle (or use a tatting needle as an alternative).
Step 2: Form the Basic Double Stitch
Create a double stitch by making two half-hitches that transfer from the working thread to the core thread. This is the fundamental building block of tatting.
Step 3: Make Rings and Chains
After forming several stitches, pull the core thread to create rings. Continue making stitches without pulling to form chains.
Step 4: Add Picots for Decoration
Leave small loops (called picots) between stitches. These serve as decorative elements and provide joining points between different motifs.
Step 5: Combine Elements into Patterns
Arrange rings and chains in different configurations to create intricate lace patterns and designs.
Machine-Made Lace
Machine-made lace production revolutionized the textile industry by making decorative lace affordable and widely available. Modern lace machines can produce in hours what would take a skilled artisan months to complete by hand.

Leavers Lace Machine Process
Step 1: Program the Pattern
Set up the pattern using the jacquard system. Use punch cards or digital controls to program which threads should move and when, translating your lace design into mechanical instructions that the machine can follow.
Step 2: Load the Warp Threads
Mount the warp threads (lengthwise threads) onto large beams that stretch across the machine’s width, which can be up to 5 meters wide. These threads will form the structural foundation of the lace.
Step 3: Prepare the Bobbin Threads
Load hundreds of thin brass bobbins with fine thread and place them in carriages. Each bobbin moves independently according to the programmed pattern and will create the decorative elements of the lace.
Step 4: Start the Machine Operation
Begin the weaving process as the carriages swing back and forth across the machine. The bobbin threads twist around the warp threads in precise sequences according to the programmed pattern.
Step 5: Create the Lace Structure
Allow the twisting action to form the characteristic mesh background and pattern areas of the lace. The thousands of threads work simultaneously to build the intricate design.
Step 6: Monitor and Collect the Finished Lace
Watch as the completed lace emerges slowly from the machine at a rate of 1-2 meters per hour for complex patterns. A skilled operator must continuously monitor the process to spot and fix any problems immediately.
Raschel Knitting Process
Step 1: Mount the Guide Bars
Set up the Raschel machine by mounting multiple guide bars, each controlling a set of threads. These guide bars are the foundation for controlling thread movement during the knitting process.
Step 2: Position and Move the Guide Bars
The guide bars move sideways and forward to position the threads correctly. This lateral and forward movement prepares the threads to create loops around the vertical needles.
Step 3: Coordinate Needle and Guide Bar Movement
The needles move up and down while the guide bars shift position simultaneously. This coordinated movement wraps threads around needles in specific patterns, creating both solid and open areas in the lace.
Step 4: Form the Stitch Structure
Chain stitches form the base structure of the lace. Pillar stitches and other variations are added to create the decorative patterns. Different thread weights can be used simultaneously to add texture and dimension.
Step 5: Produce at High Speed
Modern Raschel machines operate at speeds of 5-10 meters per hour. Computer controls enable quick pattern changes and maintain consistent quality across long production runs.
Embroidered Lace Process
Step 1: Prepare the Base Fabric
Embroidered lace starts with a dissolvable base fabric, usually made from water-soluble material. This temporary foundation will support the embroidery work.
Step 2: Set Up the Embroidery Machine
Multi-head embroidery machines are programmed with the digitized pattern. Dozens of needles work simultaneously, with each needle threaded with different colors or thread weights for varied effects.
Step 3: Create the Lace Pattern
The machine stitches the design onto the base fabric. Dense stitching creates the main design elements, while lighter stitching forms connecting bars and background texture. The key is ensuring enough thread coverage to maintain structure once the base dissolves.
Step 4: Dissolve the Base Material
After embroidery completes, the fabric goes into a washing solution that dissolves the base material. Only the embroidered threads remain, creating an open lace structure.
Step 5: Press and Finish
The final step involves pressing and finishing the lace. Heat-setting ensures the lace maintains its shape and pattern clarity during use.
FAQs
What’s the difference between real lace and synthetic lace?
Real lace uses natural fibers like cotton, linen, or silk and features intricate construction techniques that create genuine openwork. Synthetic lace often uses polyester and may be simply printed or cut rather than properly constructed.
How long does it take to make handmade lace?
A skilled lacemaker can produce about one square inch of complex bobbin lace per hour. A small doily might take 40-60 hours, while an elaborate collar could require 200+ hours of work.
Can you tell the difference between handmade and machine-made lace?
Handmade lace has slight irregularities and often features finer thread with more complex patterns. Machine-made lace shows perfect repetition and uniformity, though high-quality Leavers lace can closely mimic handmade pieces.