
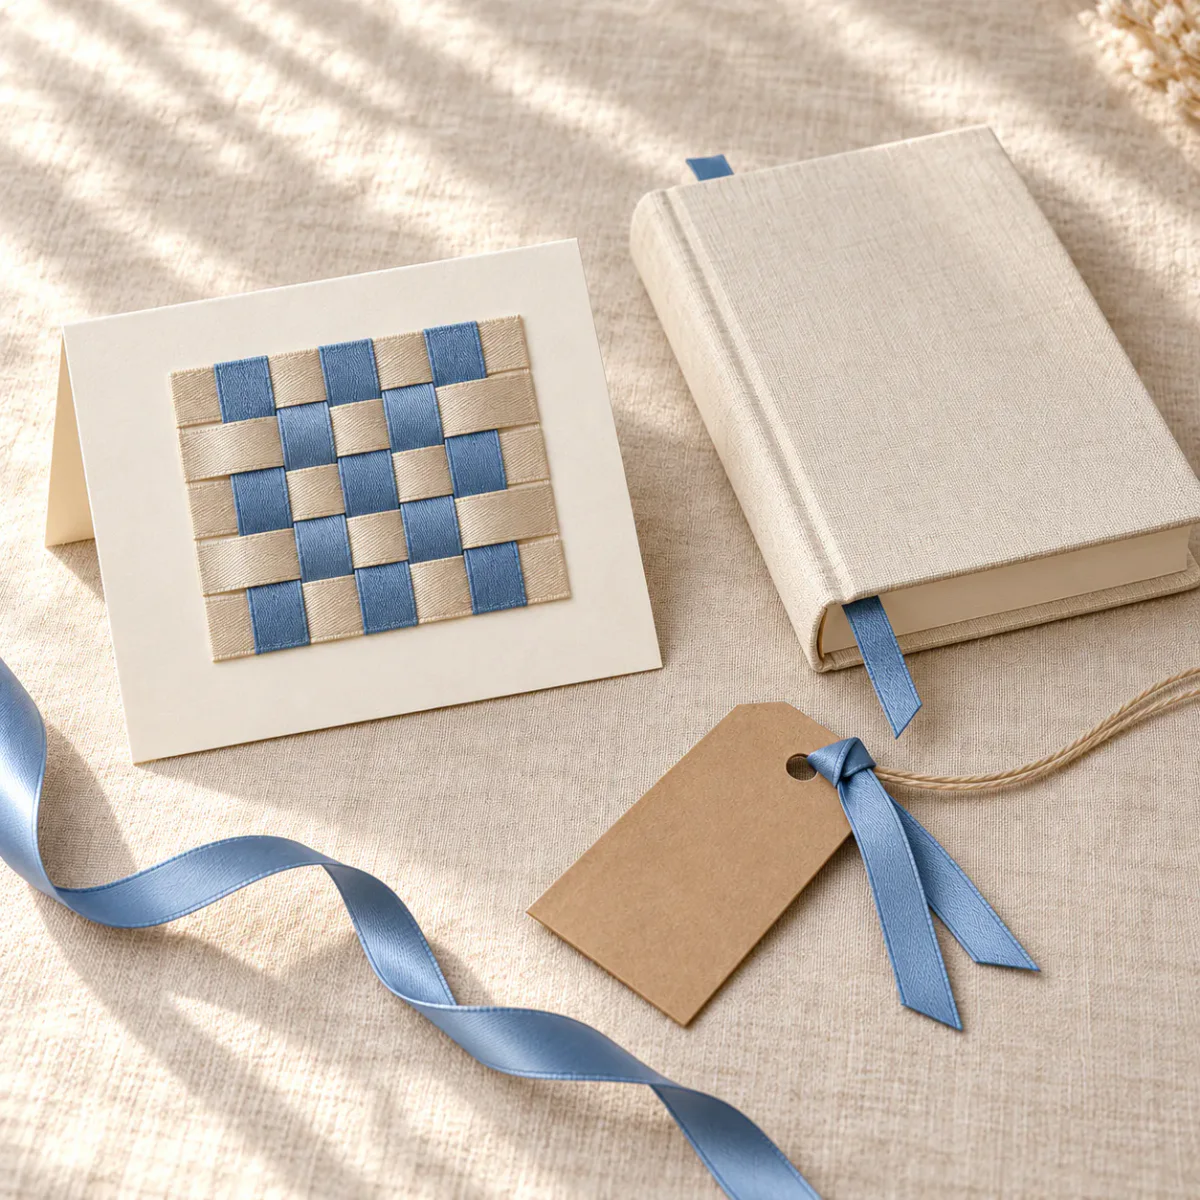
Introduction
A ribbon saved from a gift can become part of the next one. A few narrow strips make a woven card; one longer piece can mark a page; shorter lengths can decorate a tag or a small hoop.
These six projects use simple folds, weaving and fastening. Start with the materials you have, and keep the unfinished piece beside the instructions as you work. Each project includes a check before you cover the back or make the final join.
Choose a project
What you have | Try this | The key skill |
|---|---|---|
Narrow ribbons of similar width | Woven ribbon card | Alternating over and under |
One smooth ribbon longer than a book page | Flat bookmark | Keeping folded ends outside the pages |
Soft narrow ribbon and a punched tag | Ribbon-fringe gift tag | Passing two tails through a folded loop |
Ribbon and slightly wider flexible cardstock | Ribbon-covered napkin ring | Covering a flat strip before joining it |
Short ribbon lengths and a smooth hoop | Mini ribbon wreath | Securing a folded strip around the hoop |
Short lengths in several sizes | Ribbon tree ornament | Arranging the shape before gluing |
Start with the bookmark if you want one simple project. Choose the woven card to learn a new technique, or the gift tag to practice a loop fastening before moving on to the wreath.
Keep scissors, a ruler and a pencil nearby. For the paper projects, use craft glue or double-sided tape suitable for the materials, and test it on scraps first. Let adhesive dry as directed before handling the piece.
In the instructions, front means the side you want to display; back means the side where you hide the ends. A loop is the folded middle of a ribbon, and the tails are its two free ends. When a project is turned over, keep its top edge at the top so the directions stay easy to follow.
The hand-position sequences are teaching illustrations. Use them to see how to hold and move the materials, then use the close-up diagrams for crossings, hidden layers and dimensions. In those diagrams, orange arrows show movement, pale blue marks the ribbon reverse in labelled folding views, and dashed ribbon lines show hidden sections.
Cut one trial piece before cutting a batch. The ribbon types guide can help you distinguish satin, grosgrain and sheer ribbon.
Choose ribbon for the job
Project | A useful starting choice | Check on a scrap |
|---|---|---|
Card and tree | Flat, opaque ribbon with an even width | The cut edge stays manageable and adhesive does not show through |
Bookmark | Thin, smooth, unwired ribbon | No bulky trim, loose glitter or visible colour transfer onto paper |
Gift tag and wreath | Soft narrow ribbon that folds without resisting | A doubled strip passes through the opening and its knot stays snug |
Napkin ring | Flat ribbon narrower than the card strip | The covered card bends without the ribbon lifting |
For paper-to-paper joins, double-sided craft tape can avoid wet glue while you learn the layout. For ribbon-to-paper or folded ribbon ends, choose an adhesive labelled for those materials. Try a small amount on scraps and let it set before bending or pressing the join. A glue stain is easier to prevent than hide.
About the measurements: use these cutting layouts as starting points, and size the bookmark and napkin ring to the objects you have. Try one piece before cutting a batch. Dimensions are in millimetres (10 mm = 1 cm); the illustrations are not to scale.
1. Make a woven ribbon card
A small woven panel gives a plain card texture. Use two contrasting colors for your first attempt so you can see each crossing clearly. The teaching diagram uses blue vertical strips and yellow horizontal strips.
You need: a blank folded card, a smaller cardstock panel, backing paper, two colors of ribbon of similar width, and suitable glue or tape.
Worked layout: a 40 × 50 mm woven panel. Use 10 mm-wide ribbon: four blue vertical strips, each 80 mm long, and five yellow horizontal strips, each 70 mm long. Each cut length includes 15 mm at both ends for fastening behind the panel. Cut a 40 × 50 mm backing paper and choose a card front larger than the panel.
Four widths cover 40 mm; five widths cover 50 mm. If your ribbon is a different width, lay the strips together and measure that group before sizing the panel. Do not stretch or overlap them just to make the numbers fit.
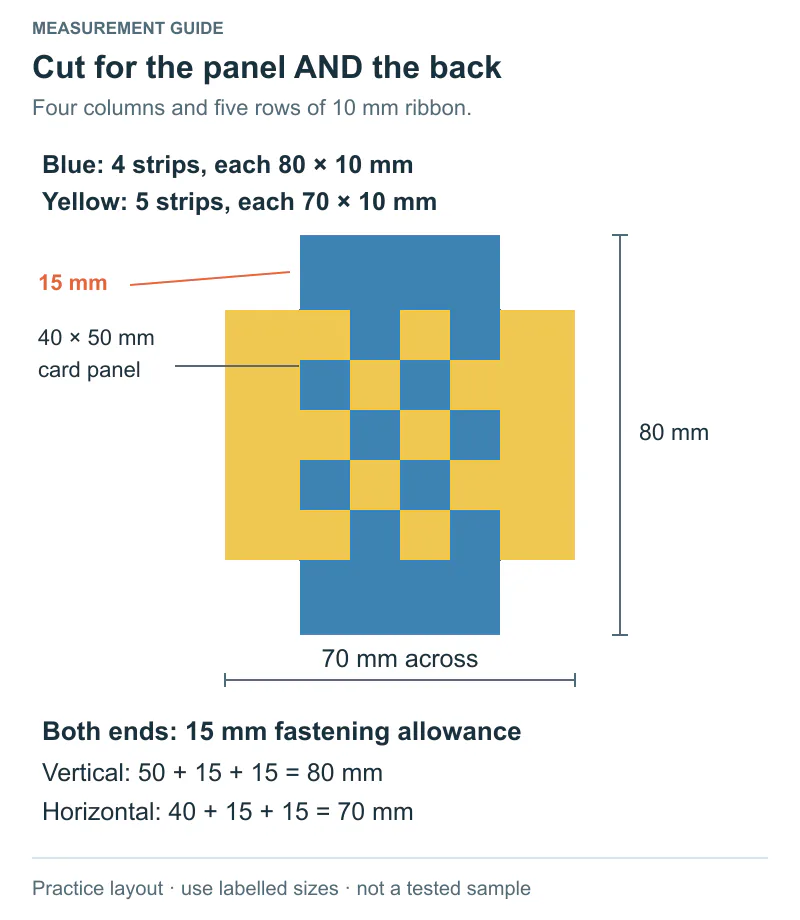
Use the written dimensions, not the displayed size of the diagram.
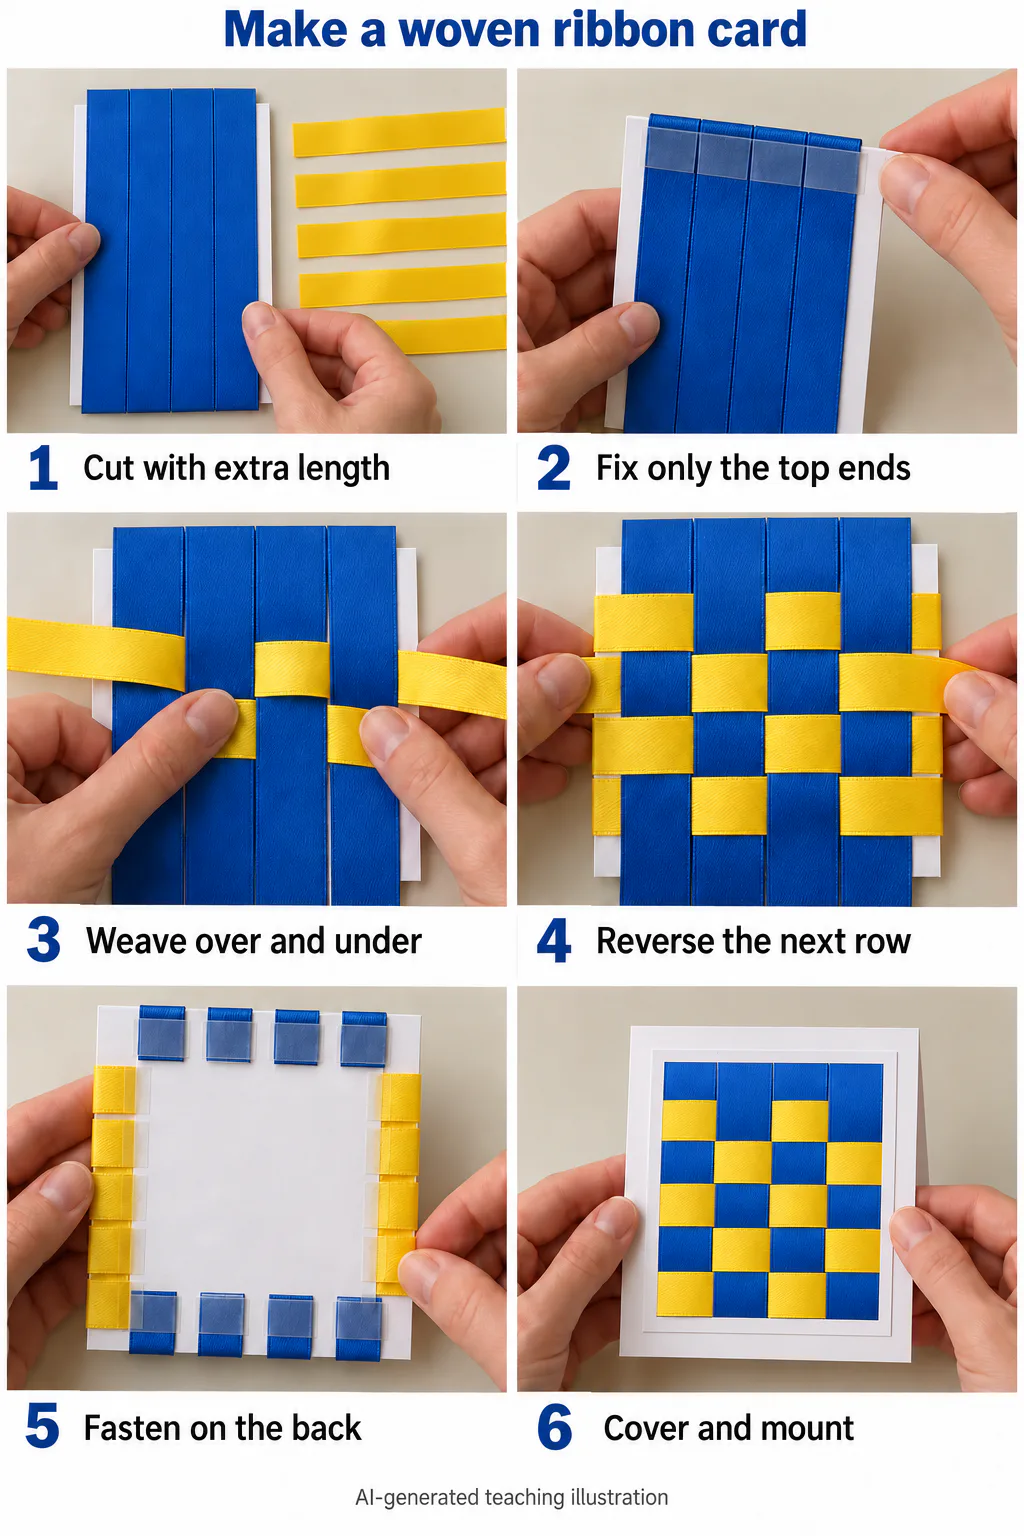
Hand-position overview. Complete all five yellow rows before turning the panel over in view 5. The crossing diagram below shows the over-under path.
- Size the panel. Place it on the card and leave a paper border around it. Cut the vertical ribbons longer than the panel height and the horizontal ribbons longer than its width, leaving enough at both ends to fold onto the back.
- Anchor only the top ends. Lay the vertical strips side by side on the panel front. Fold each top end over the top edge and tape it to the back. Leave the lower ends loose. You must be able to lift each strip away from the panel.
- Weave the first row. Starting at the left, lay a yellow strip over blue strip V1, lift blue strip V2 and pass the yellow strip underneath it, then continue over V3 and under V4. Push this row gently toward the top of the panel.
- Reverse the next row. Start the next yellow strip under V1, then over V2, under V3 and over V4. Look at one blue strip: the yellow rows should alternate between appearing above it and disappearing beneath it.
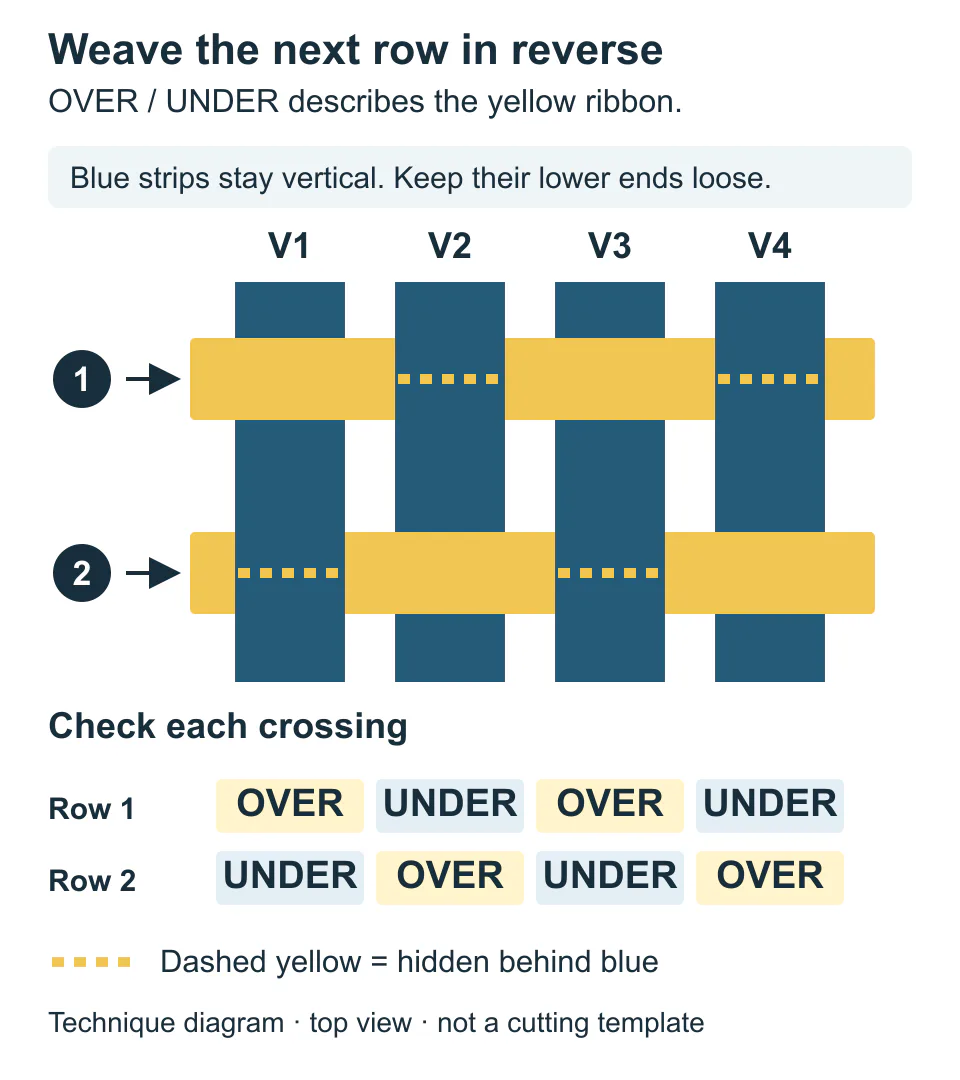
Weaving diagram: keep the blue strips in place and reverse the over-under sequence on every new yellow row.
- Finish the weave. Add rows using the same alternating pattern. Adjust the spacing while the ends are still loose. The panel should lie flat.
- Secure the remaining ends. Fold the horizontal ends and then the lower vertical ends onto the back. Tape them down without pulling the front tight enough to bow the cardstock.
- Cover and mount. Add backing paper over the secured ends, then attach the finished panel to the card front.
Check: if two neighboring yellow rows pass over the same blue strip, undo the newer row and reverse its crossings. Fix this before covering the back.
2. Make a flat ribbon bookmark
A favorite ribbon can stay with a favorite book. Keep the part between the pages as a single smooth layer; the small folded ends belong beyond the top and bottom of the pages.
You need: smooth unwired ribbon, scissors, fabric-compatible glue, and the book you will use it in. Choose ribbon without loose glitter or obvious color transfer; try it against scrap paper before placing it in a book.
Measure three things: page height H, the finished overhang O at each end, and the fold depth F at each end. Cut length = H + 2O + 2F. Choose O greater than F so the entire fold stays outside the pages.
For a 210 mm page, 15 mm overhangs and 10 mm folds, cut 260 mm. After folding, the bookmark is 240 mm long. Center it on the page: each 10 mm fold lies within a 15 mm overhang. A starting ribbon width of 10–15 mm leaves room to handle the fold without covering much of the page.
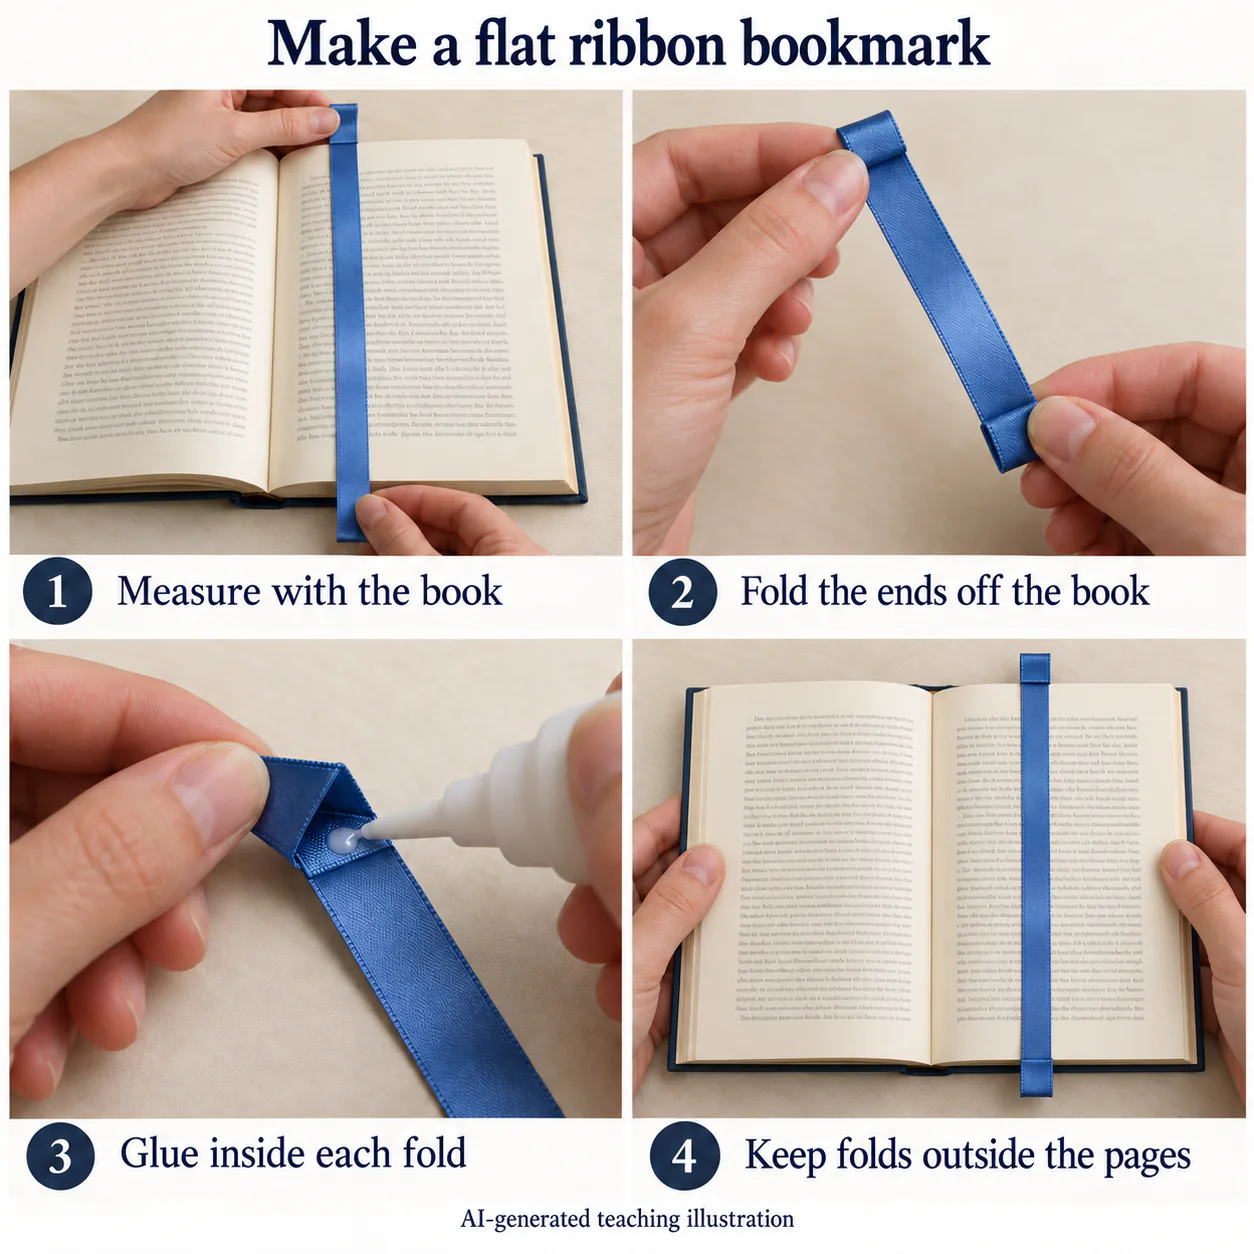
Fold and glue away from the book. Let the adhesive dry before checking the fit; both thickened ends stay outside the pages.
- Measure against the book. Lay the ribbon vertically on an open page. Leave a visible overhang at both ends, with extra length for the folds, then cut.
- Fold the ends. Take the ribbon off the book. Turn each cut end a little way onto the back, keeping both folds on the same side.
- Fix the folds. Apply a small amount of suitable glue inside each fold. Press flat and leave to dry as directed, away from the book.
Check the fit. Once dry, place the ribbon on the page again. Both folded areas must sit beyond the page edges. Close the book gently and look at the side: no fold should be trapped between the pages.
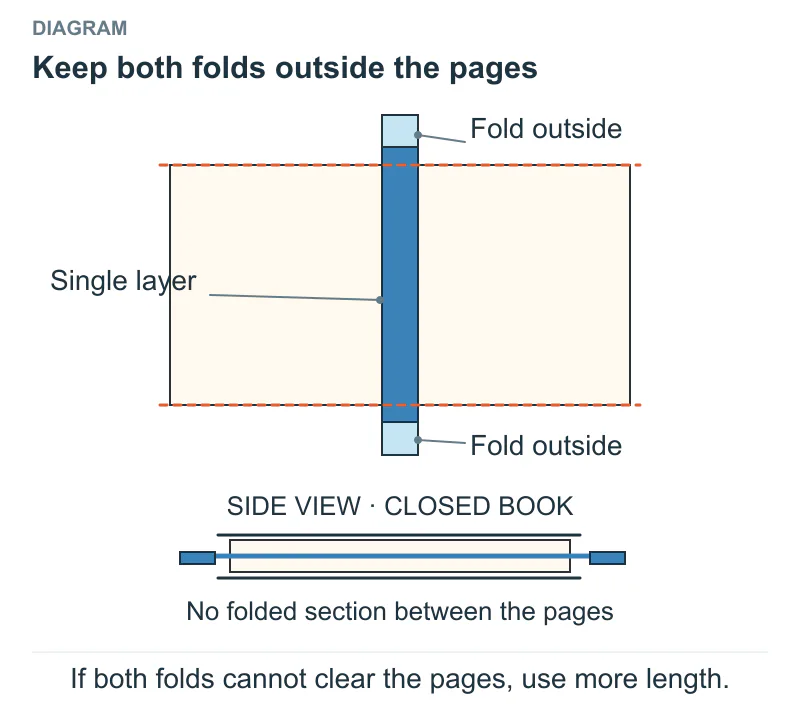
If both folds cannot clear the pages, use more length.
Check: this version has no beads or decorative knots. If an end sits inside the page area, adjust the ribbon position; if both ends cannot clear the pages, use a longer piece.
3. Add ribbon fringe to a gift tag
A few soft ribbon tails can sit beside a name on a plain tag. Start with one ribbon so you can see how it fastens around the small bridge of card between the hole and the top edge.
You need: a sturdy punched gift tag, soft narrow ribbon, a thin hanging cord and scissors.
Practice setup: a 60 × 90 mm sturdy tag, one 6 mm punched hole with its center 12 mm below the top edge, one 200 mm strip of soft 3 mm ribbon, and a separate thin hanging cord. This leaves about 9 mm of card between the hole and the top. Test the folded loop in the hole with the cord already in place; a stiff or thick ribbon may need a larger hole or a narrower strip. Do not enlarge the hole so far that its paper bridge becomes weak.
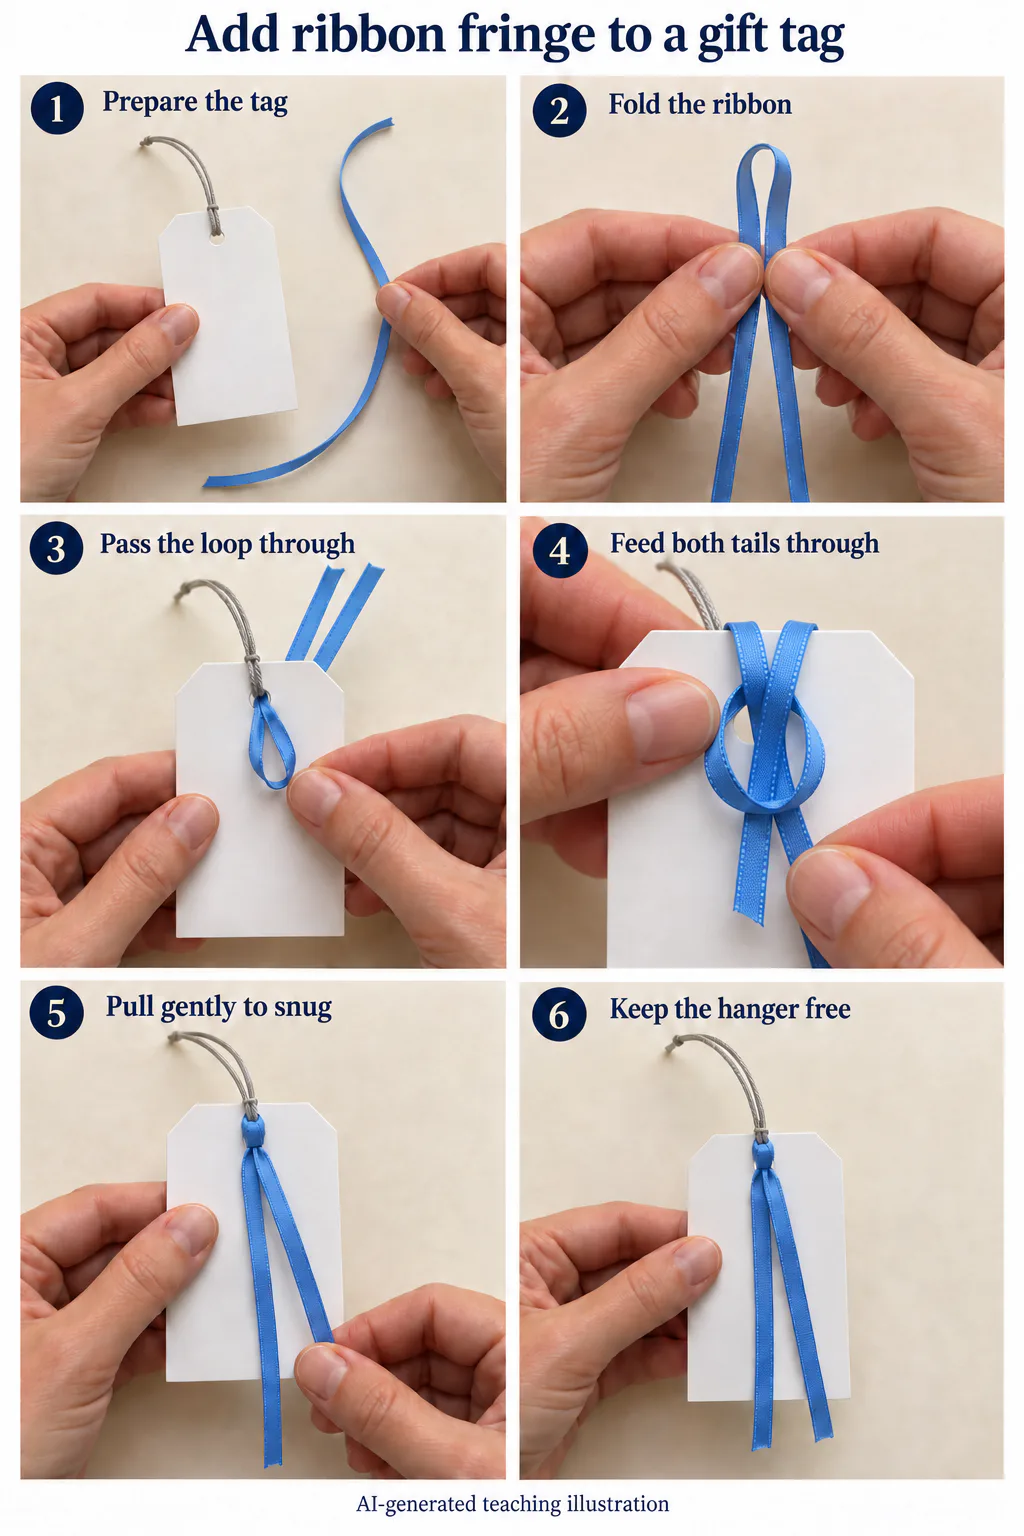
Keep the gray hanger separate. In view 4, both blue tails travel over the card top and through the ribbon loop; the side-view diagram below makes that path clearer.
- Prepare the tag. Place it front up, with its hole near the top. Pass the hanging cord through the hole first and move its ends to one side.
- Fold one ribbon. Bring its two ends together. The folded middle is the loop; the two loose ends are the tails. Check that the loop fits through the space left in the hole.
- Push the loop through. Feed only the folded loop from the back of the tag to the front. Leave the two tails behind the tag for now.
Pass the tails through the loop. Bring both tails up and over the tag's top edge, then feed them together down through the loop on the front. Do not push them through the punched hole again.
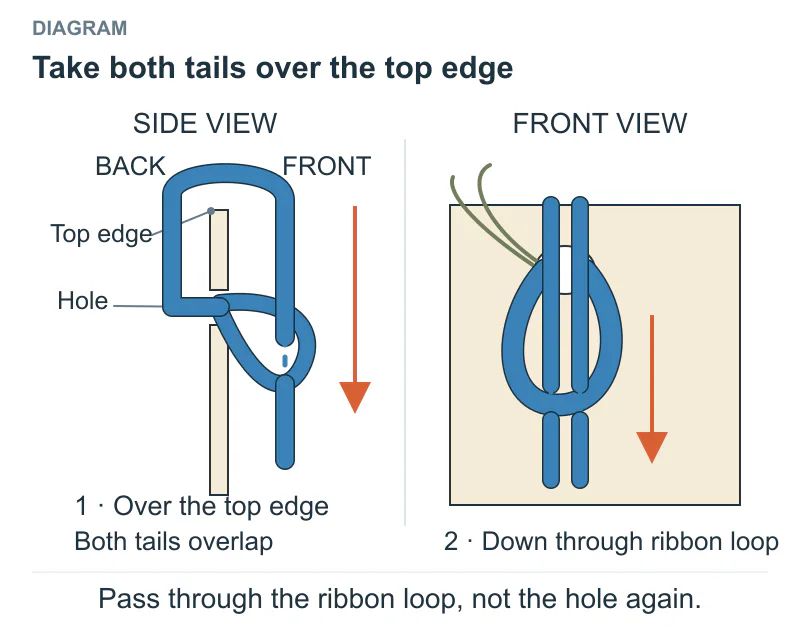
Pass through the ribbon loop, not the hole again.
- Draw the knot snug. Support the card near the hole and pull the tails gently downward. The ribbon should now wrap around the card bridge above the hole, with both tails on the front.
- Finish the tag. Add another ribbon only if there is room beside the cord. Trim the tails as you like, then tie the hanging cord to the gift bag.
Check: stop adding strips if the hole starts to bend or the cord becomes trapped. One neat attachment is enough; the reader should still be able to see the name.
4. Make a ribbon-covered napkin ring
Covering a flat strip is easier to see and handle than feeding a long ribbon repeatedly through a small ring. This version uses ribbon on the outside and a cardstock strip to hold the shape.
You need: flexible cardstock, ribbon slightly narrower than the card strip, suitable glue or tape, a pencil, scissors, clips, and the actual napkin.
Fit example: first find the length that wraps loosely around your rolled napkin with the ends just meeting. Call it C. Add a 15 mm joining tab: card length = C + 15 mm. Start with a 25 mm-wide card strip and 15 mm-wide ribbon, leaving 5 mm card borders on both long edges.
If your measured C is 150 mm, cut the card 165 × 25 mm. The ribbon covers 150 mm of card; allowing 5 mm folds at both ends means cutting 160 mm of ribbon. The last 15 mm of card stays bare. Check the dry layout against the actual napkin before using adhesive.
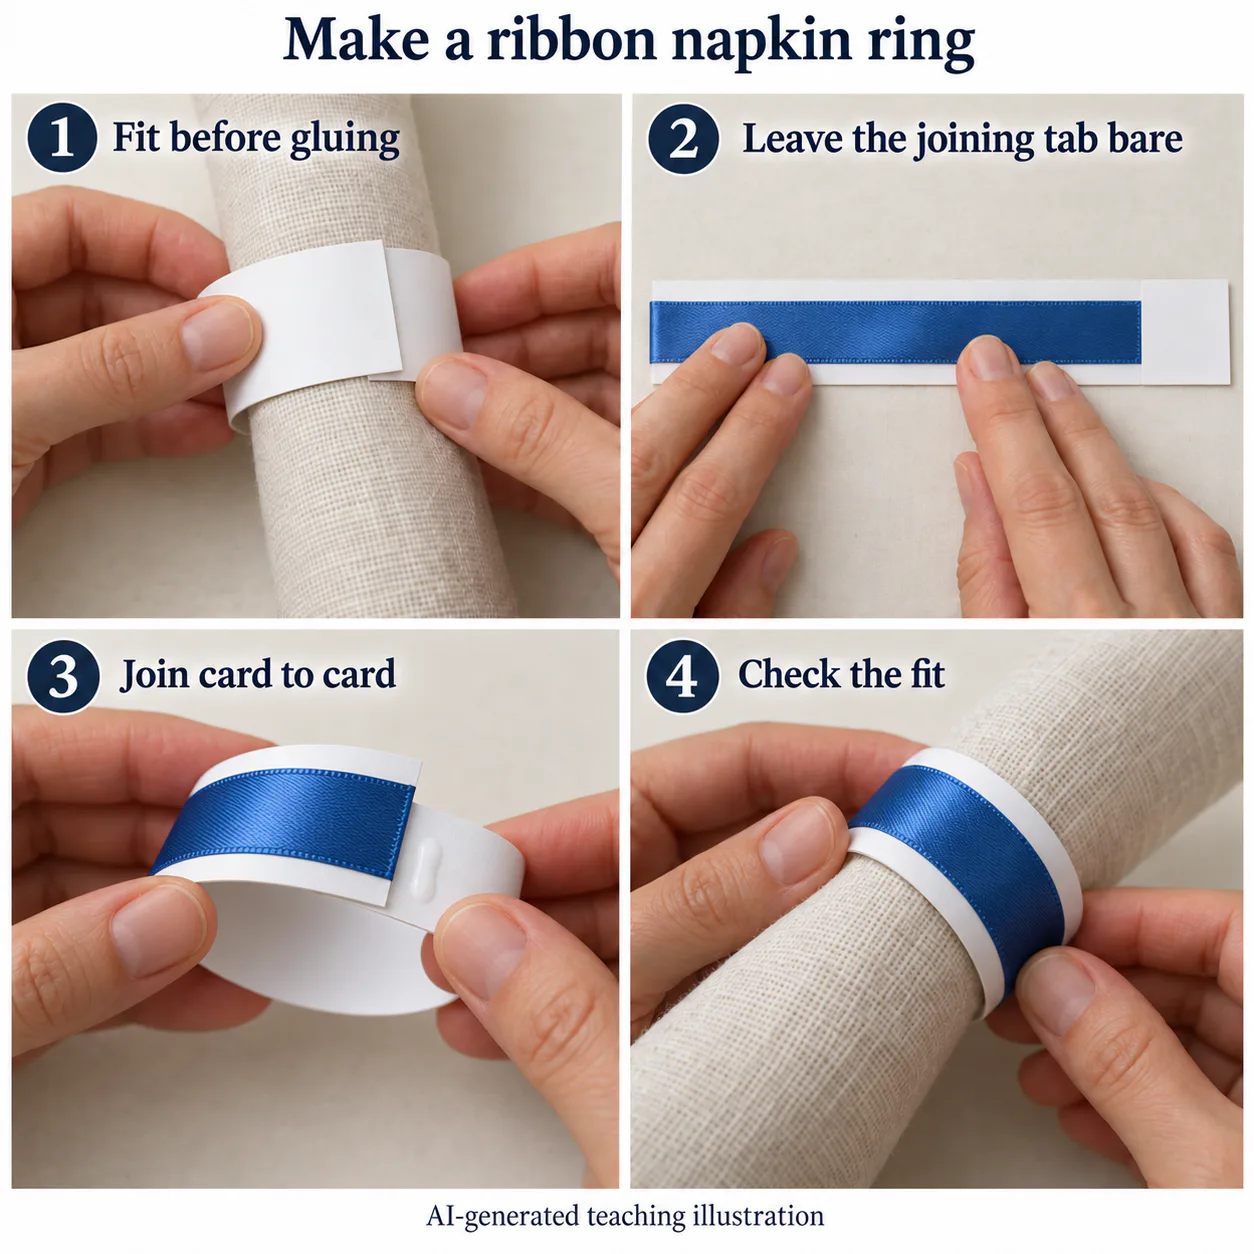
The four views summarize the seven steps below. View 3 shows the bare tab going under the decorated end; clip the card-to-card join while the adhesive sets.
- Fit a paper ring. Roll the napkin as you will use it. Wrap a card strip around it with enough room to slide the napkin out. Let the card ends overlap, mark the overlap and trim the strip. Do not glue the ring yet.
- Mark the joining tab. Open the strip flat. Mark the end that will sit underneath the other end as the joining tab. Keep this tab free of ribbon so the final join can be card to card.
- Prepare the ribbon band. Lay ribbon along the outside face, stopping at the start of the joining tab. Leave a narrow card border along both long edges. Cut the ribbon slightly longer than this display area so its two short cut ends can fold underneath.
- Fix the ribbon to the flat strip. Fold the two cut ends onto the ribbon's back and secure them. Lay the ribbon in place again, then glue or tape it flat to the card. Leave the joining tab and the whole inside face uncovered.
Curve the strip again. With the ribbon outside, bring the two ends together along the marks. Tuck the bare joining tab under the decorated end.
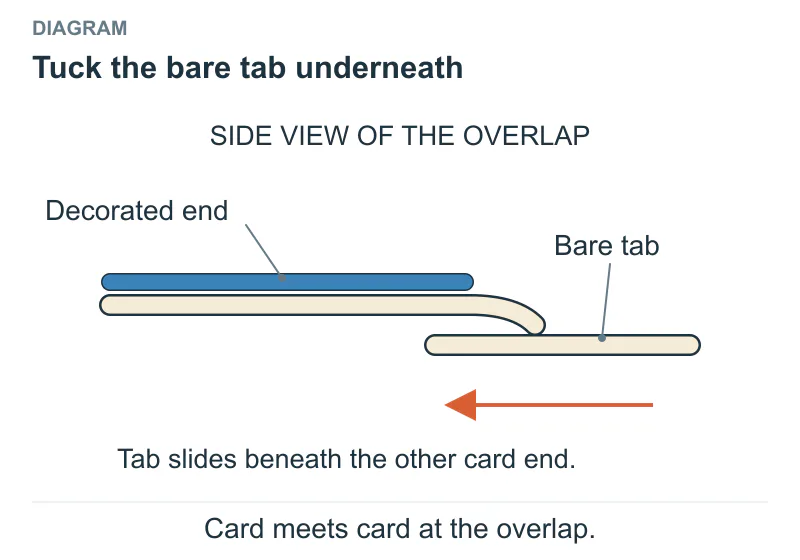
Card meets card at the overlap.
- Secure the join. Glue or tape the overlapping card faces together, and hold the join with a clip while the adhesive sets as directed.
- Check the fit. Remove the clip and slide the ring onto the napkin. It should come off without dragging or creasing the napkin.
Check: the ribbon decorates the outside; the card borders and inside face remain visible. Before gluing the final join, confirm that the bare tab meets the inside cardstock. Keep the ring for dry table decoration.
5. Tie a mini ribbon wreath
Short ribbon pieces can fringe a small hoop. Use one color while learning the knot, then add other textures. The tails will fall differently when the hoop is hung, so leave final trimming until then.
You need: a small smooth closed hoop, ribbon scraps, scissors and a hanging cord.
Start with one knot: try a smooth hoop about 100 mm across and one 240 mm strip of soft 6 mm ribbon. This is a trial length, not a promised tail length; the knot and the hoop thickness consume some of it. Hang the trial knot, adjust its tails, then untie it and measure the full strip before cutting more.
To estimate quantity, measure the circumference where the knots sit and divide it by the spacing occupied by one snug knot. For example, a measured 314 mm circumference and an 8 mm knot spacing give 314 ÷ 8 = 39.25, or about 40 strips. Check several adjacent knots before committing to that count. The sparse diagrams show the path and gravity, not a required number of knots.
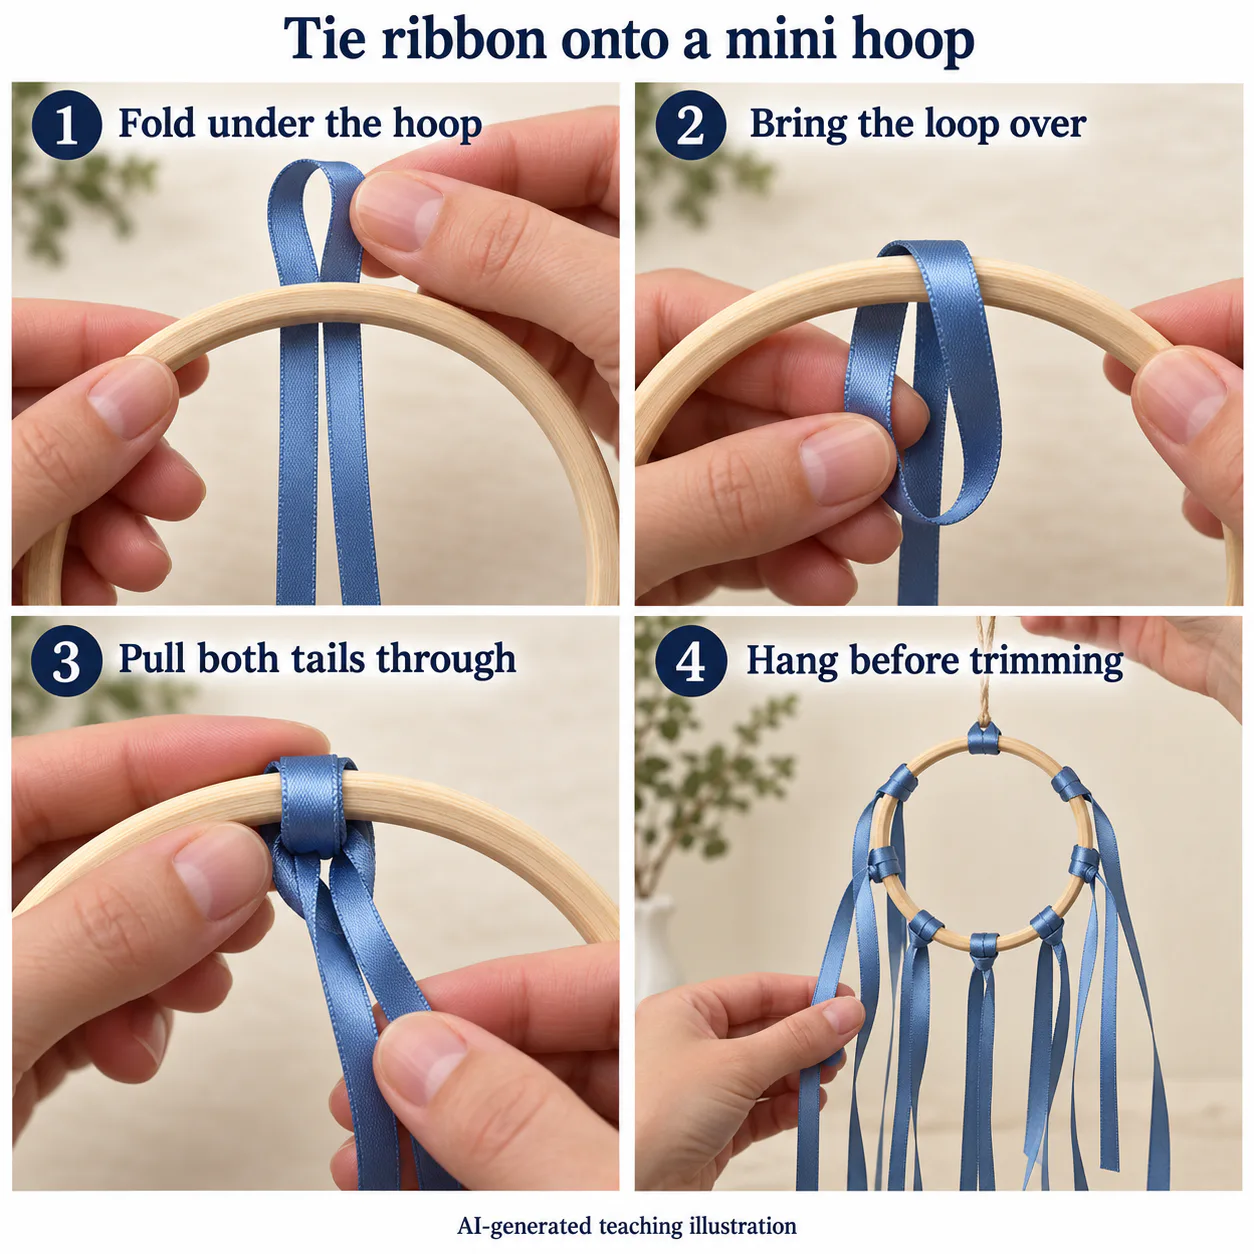
Views 1–3 show one knot. Check that trial strip, then repeat before the hanging check in view 4. The spaced knots expose the construction rather than specify a finished count.
- Set up one knot. Lay the hoop flat. Fold one ribbon in half and place it under the top section of the hoop: the folded loop points outside the hoop, and the two tails extend into the opening.
- Bring the loop over the hoop. Lift the loop and fold it forward over that same section of hoop, toward the opening. The loop now lies above the hoop's front face; the ribbon wraps around the hoop itself.
Pass both tails through. Lift the two tails together through the loop, then pull them gently toward the center of the hoop while holding the hoop still. Stop when the knot grips the hoop.
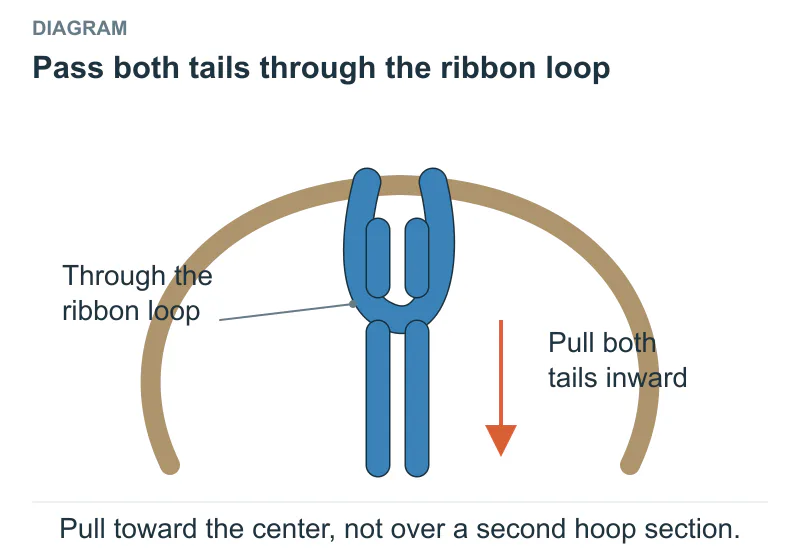
Pull toward the center, not over a second hoop section.
- Check this trial piece. Open the knot again if the tails are too short to handle or much longer than you want. Once it works, use the unfolded piece as a cutting guide for more of the same ribbon.
- Repeat around the hoop. Rotate the hoop so the next working section is at the top, and repeat the same knot. Slide neighboring knots together gently. Try a new sample if the next ribbon is much wider or thicker.
- Hang before trimming. Add the hanging cord, hold the wreath upright and let the tails settle. Trim only after you can see their hanging shape.
Check: each knot must wrap around the hoop. If the ribbon simply slips out of the opening when pulled, return to the starting position and check the path around the hoop.
6. Make a ribbon tree ornament
A cardstock backing supports soft ribbon while shorter rows build a tree shape. This is a flat ornament: the card remains part of the finished piece.
You need: cardstock, short ribbon lengths, a pencil, scissors, a hole punch, suitable glue or tape, and a hanging cord.
Five-row layout: start with a 120 × 120 mm card and 10 mm-wide ribbon. For finished rows of 100, 80, 60, 40 and 20 mm from bottom to top, cut 110, 90, 70, 50 and 30 mm. Fold 5 mm at each end: every strip loses 10 mm of visible length.
Center all five rows and leave about 3 mm between them. Keep space above for a hanging hole and below for a short trunk; the card must support both. The five rows occupy 5 × 10 + 4 × 3 = 62 mm vertically, before the trunk and hanging area are added.
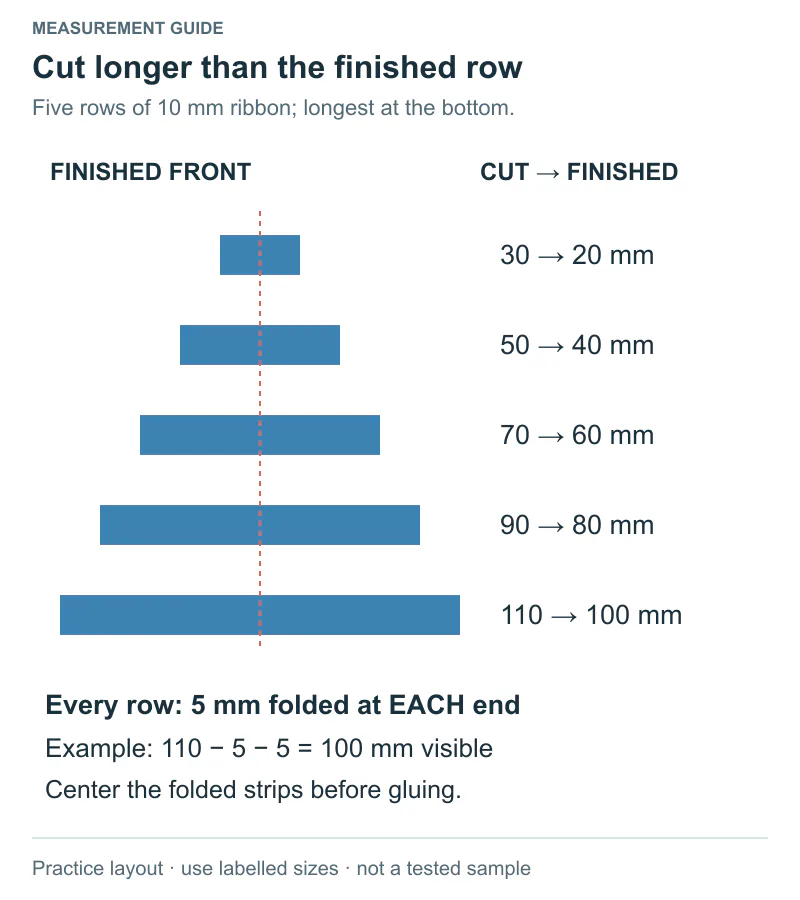
Cut length includes the folds. Compare the finished lengths before gluing.
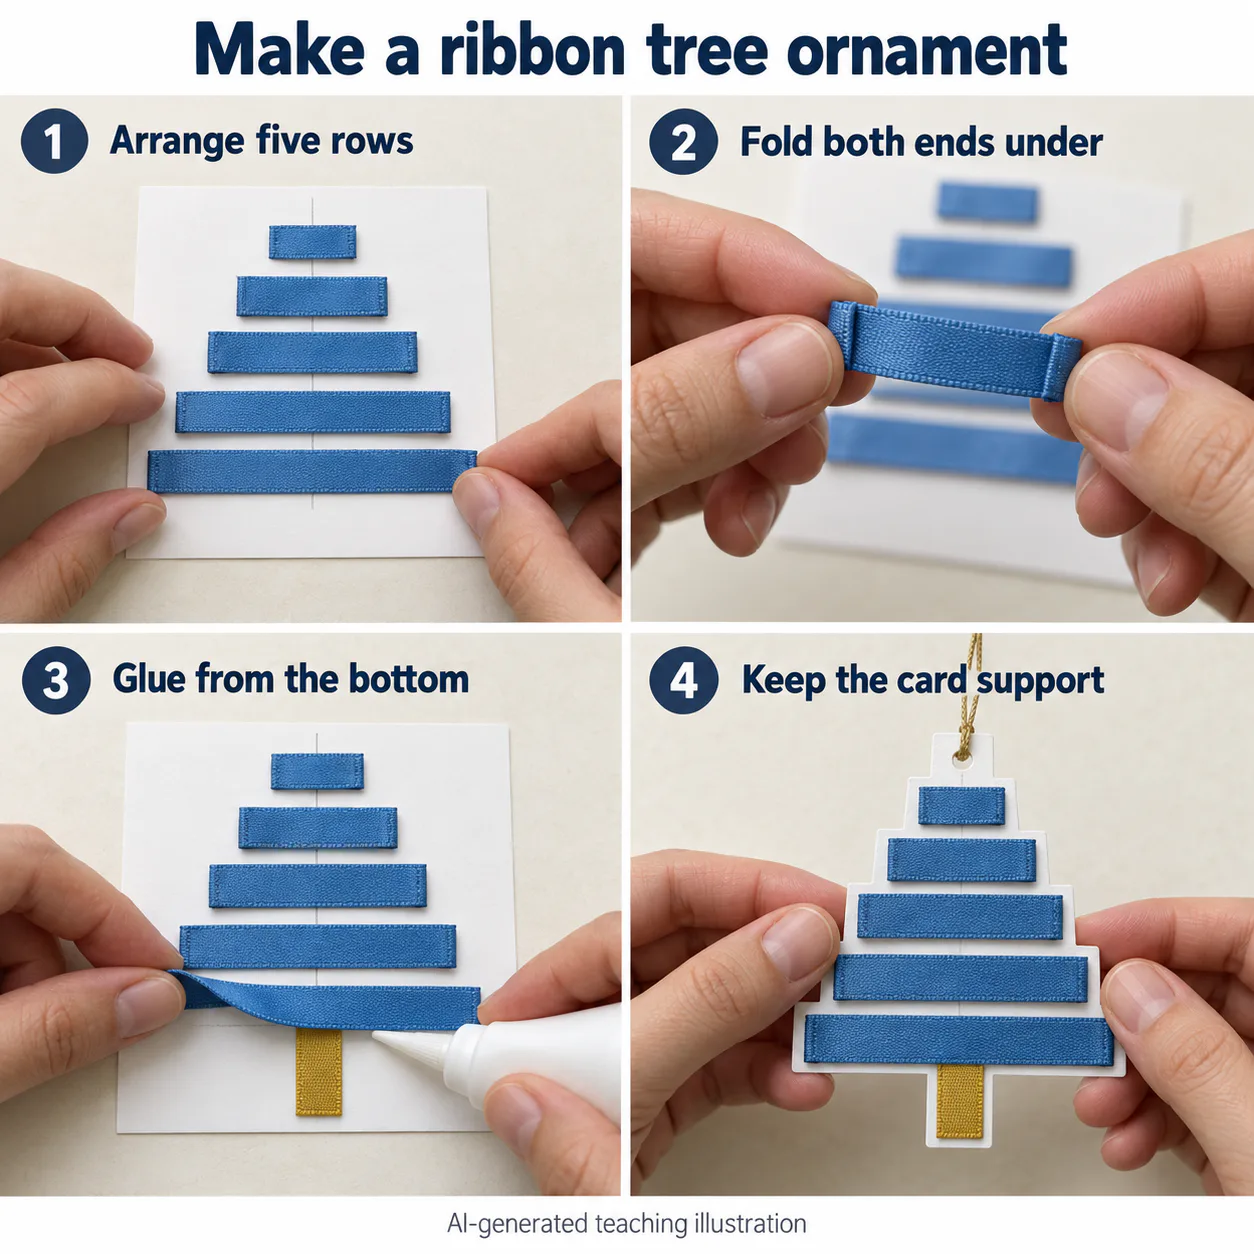
Check the folded lengths before gluing. Keep cardstock behind the trunk and the hanging hole when you cut the outline.
- Mark the center. Draw a light vertical line on the cardstock. Mark a space above the tree for the hanging hole and below it for the trunk.
- Arrange the rows. Place the longest ribbon across the lower part of the line. Add progressively shorter ribbons above it, centering each one. Do not glue yet.
- Finish the cut ends. If you want hidden ends, fold each ribbon end onto its back. Return the strip to the layout and check its finished length before cutting the next piece.
- Fix the rows. Starting at the bottom, lift and glue one strip at a time in its marked position. Add a short vertical ribbon for the trunk.
Trim the card outline. Let the adhesive set. Cut the cardstock around the tree, leaving a visible border and the reserved hanging area intact. Do not cut through the ribbon rows.
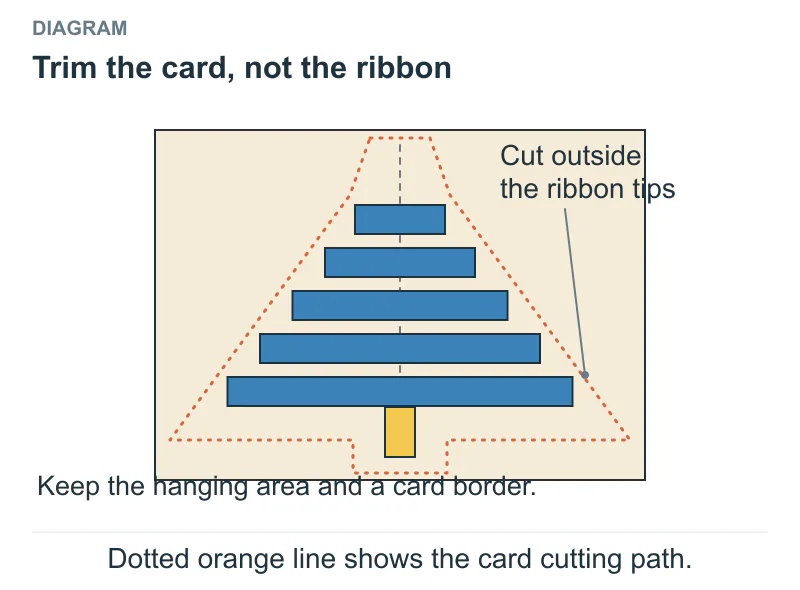
Dotted orange line shows the card cutting path.
- Add the cord. Punch the hole in the reserved card area, thread the cord through and tie its ends together. Lift the ornament to check that it hangs straight.
Check: compare the left and right ends before gluing. If a folded strip has become too short, reposition or replace it while the layout is still loose.
Fix the problem before hiding the join
What you notice | What to check | What to change |
|---|---|---|
Woven panel bows | Ends may be fastened under tension | Release the latest fastening, flatten the panel and secure without pulling |
Glue marks the ribbon face | Too much adhesive or a porous ribbon | Test a different compatible adhesive or less of it on a spare strip |
Tag hole bends | Too many strips or a forceful pull | Use one narrower strip and support the card while tightening |
Napkin ring springs open | The tab may touch ribbon instead of bare card, or adhesive may not have set | Recheck the card-to-card overlap and hold it until the adhesive sets |
Wreath knot slides loose | The strip may be too stiff or slippery for this fastening | Try a softer strip and recheck the path around the hoop |
Tree rows become too short | Finished length was used as cut length | Add both fold allowances before recutting |
Keep the working trial piece and write down its ribbon width, cut lengths and fastening method. Those details make a matching second piece much easier.
Check the back before you use it
Turn the piece over before you put it on a gift or table. Look for an unsecured ribbon end, an exposed sticky patch or a join that lifts when you handle it. Then try it in its actual place: close the book, slide out the napkin, open the card or lift the ornament by its cord.
Once the structure works, change the colors to suit the person or occasion. The ribbon colors article offers ideas for gifts and everyday decoration. Keep the first finished piece nearby if you want to make a matching set.
Discuss a real requirement
Turn the reading into a practical next step.
Send a short note, product reference, photograph, swatch or tech pack. Technical feasibility, sampling, documentation and production terms are confirmed after review.
Start an inquiry