
Introduction
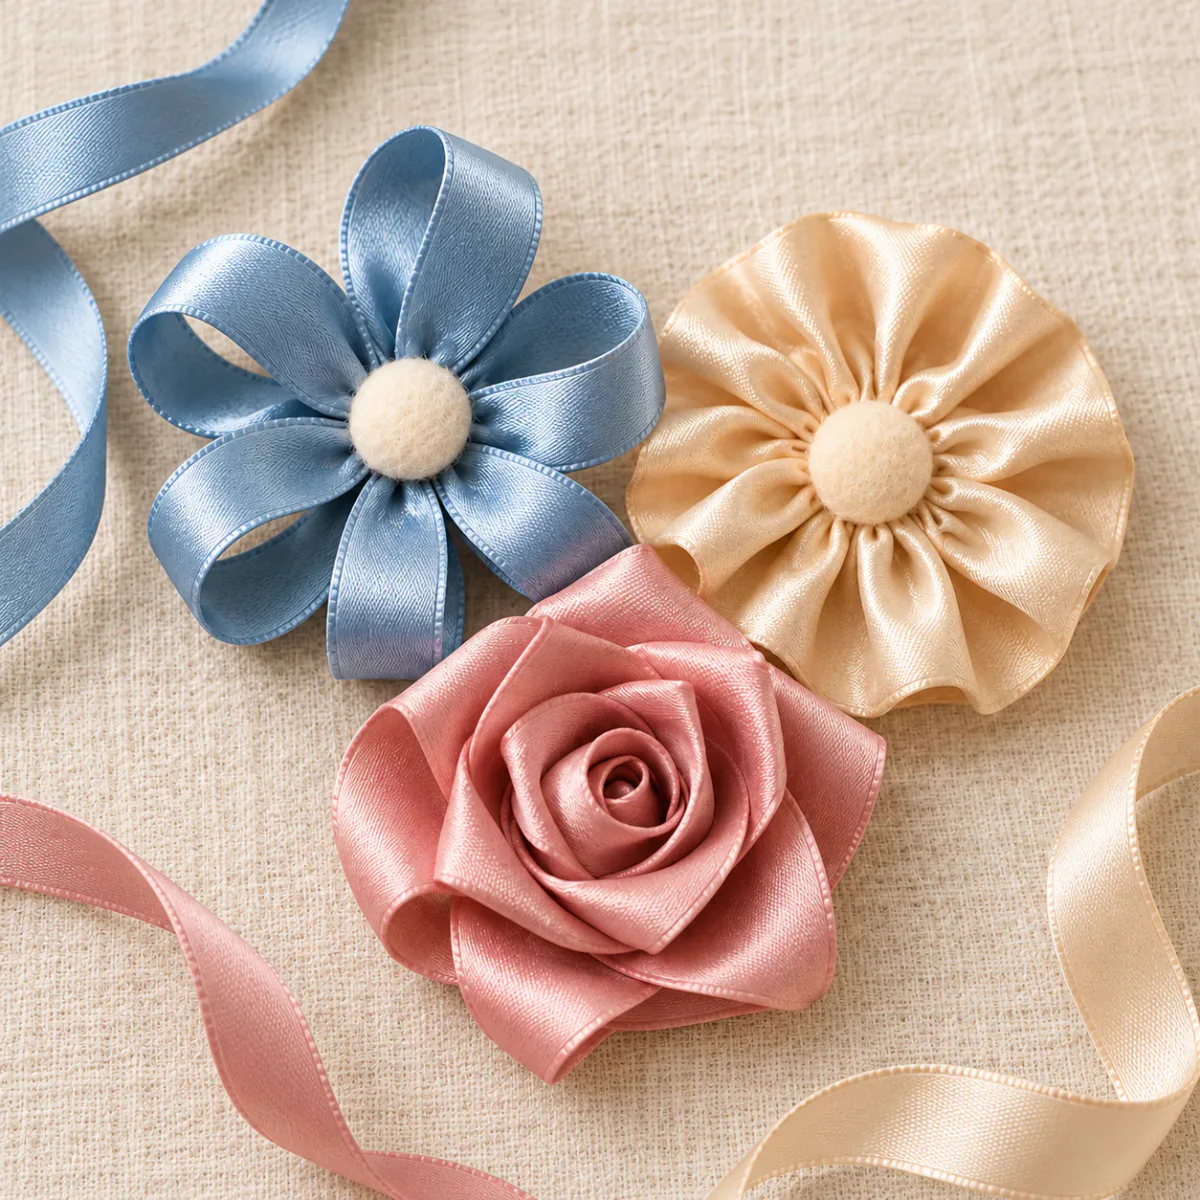
A small ribbon flower can sit beside the knot on a gift box, decorate a card or become a removable brooch. The same strip looks quite different when you loop it, gather one edge or fold it around a center.
This guide covers three constructions. Start with a loop-petal flower to practice joining short pieces. Try a gathered flower to see how a running stitch changes the shape of a strip. Leave the folded rose until you are comfortable holding the center while you work around it. Each method includes the underside, where the flower is held together.
Choose a flower to make
Method | How it takes shape | What to watch |
|---|---|---|
Loop-petal flower | Separate ribbon loops are sewn to a felt base | Both cut ends must be caught by the stitches |
Gathered flower | One stitched long edge draws inward; the opposite edge opens outward | Keep the working thread free until the gathers are adjusted |
Folded ribbon rose | A continuous length folds and wraps around a small center | Make the fold first, wrap it around the center, then secure the base |
For a first attempt, use one color and one layer. Extra layers can hide the joins you need to see while learning. Change the colors after you understand how the flower holds together.
Materials and terms
You will need unwired ribbon, scissors, a hand-sewing needle, thread, a few small clips and felt for the backing and optional flower center. Choose a ribbon the needle can pass through without forcing it. Use a contrasting thread for a practice piece so you can see the stitch path; switch to a matching thread for the final flower. See our ribbon types and uses guide if you are comparing satin, grosgrain and sheer ribbon.
Set up one practice flower
Use the sizes below as a starting point. Keep to one ribbon type while learning, and check one petal or one gathered strip before preparing a batch.
Method | Starting ribbon and amount | Backing and first check |
|---|---|---|
Loop petals | Soft 10 mm ribbon; one 80 mm trial strip, then five matching strips if it works | Start with a 25 mm felt base; all six joins must fit on it and remain hidden from the front |
Gathered flower | One 400 mm length of soft 25 mm ribbon | Size the felt after forming the ring; it must support the inner stitches without covering the outer ruffle |
Folded rose — practice after the other two | Pliable unwired ribbon about 20–25 mm wide, still attached to its reel | Make a center and two petals first; choose the backing and measure the used length after the flower holds |
The loop example uses 480 mm for six petals, before spare practice pieces. Overlap, tension, stiffness and petal spacing affect the finished diameter, so measure your first flower before making a matching set.
The short-loop practice size is adapted from The Ribbon Retreat's measured loopy-flower example, which uses a different layered assembly. The 400 mm strip is a single-layer adaptation of Ribbonly's gathered-flower method, whose example stacks three strips. Carol Daisy's folded-rose tutorial shows 20 mm and 25 mm ribbon examples.
The hand-position sequences are teaching illustrations. They show the handling sequence; close-up diagrams below explain the folds and stitch paths that hands can hide. View numbers on a sheet identify its pictures, while the written steps give the full method.
A few terms keep the directions clear:
- Ribbon face: the side you want visible on the petals. Ribbon reverse: the other side. These refer to the ribbon, even when the flower is turned over.
- Flower front: the side with the open petals. Underside: the base where the ends and stitches are secured.
- Working length: the ribbon that has not yet been folded into the rose. Working thread: the loose thread coming from the last stitch.
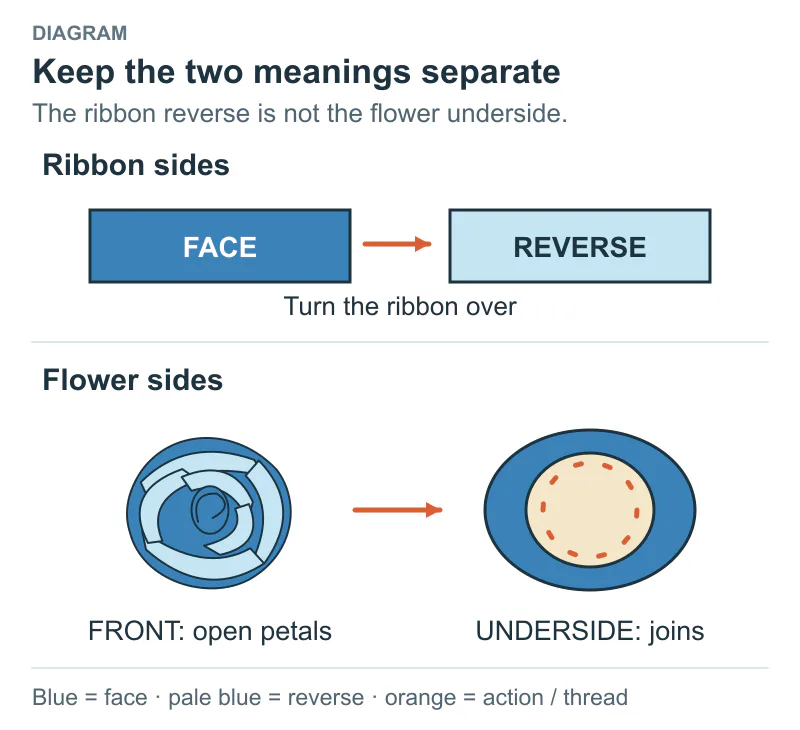
Distinguish the ribbon face and reverse from the flower front and underside.
Thread the needle and knot the far end of the thread. To finish a seam, take a small stitch through the secured underside, leave a thread loop, pass the needle through that loop and draw it snug before cutting. Keep knots on the underside and avoid catching the open part of a petal.
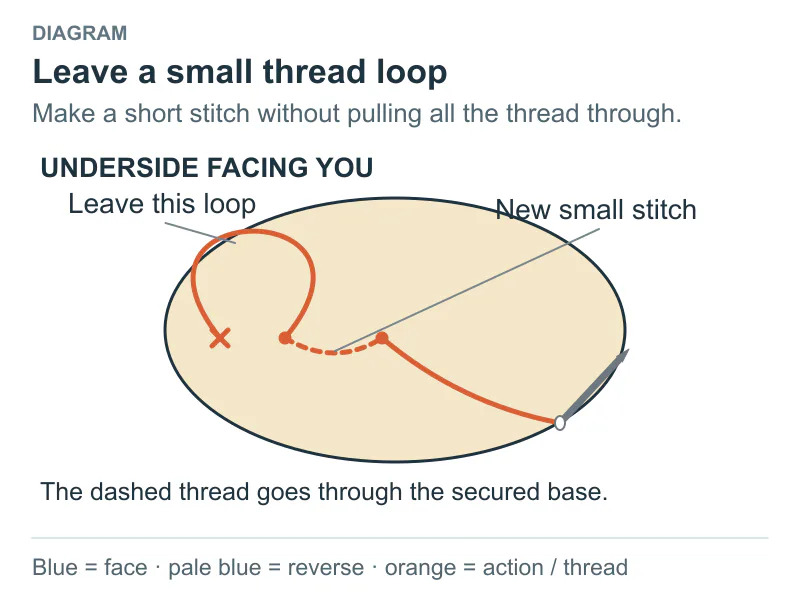
Leave a small thread loop.
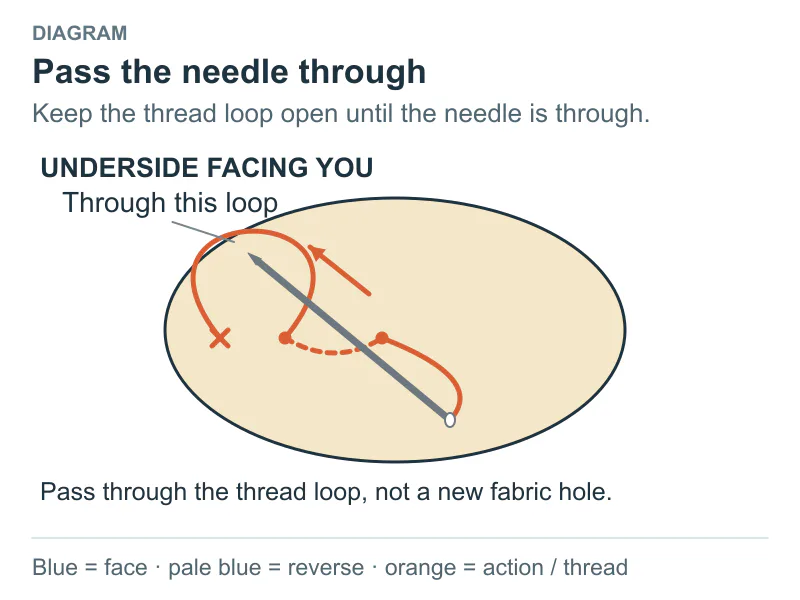
Pass the needle through the loop.
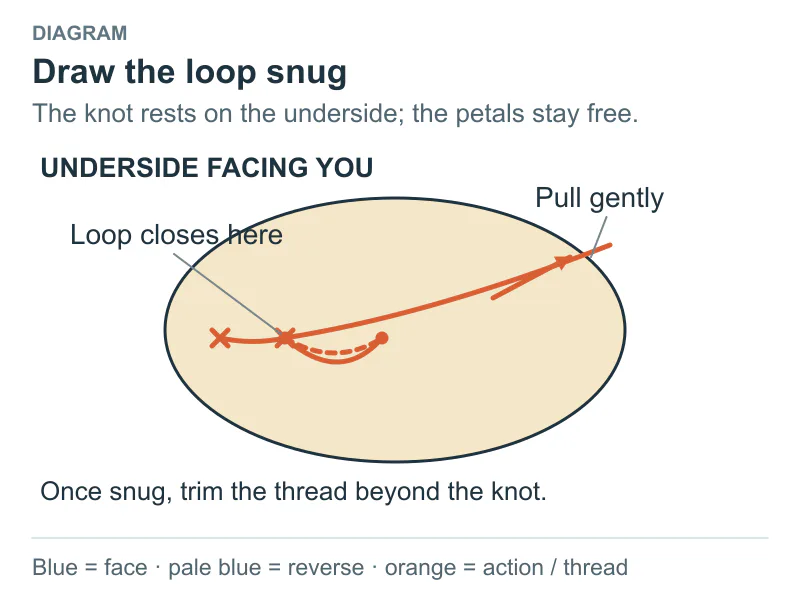
Draw the loop snug before trimming.
Do not cut a whole batch at once. Make a trial loop or a short row of stitches first. Ribbon width, stiffness and the amount folded under all affect the finished size. Once a shape works, keep that piece as your cutting guide.
1. Make a loop-petal flower
Each petal is a short strip bent into a loop. The curved end points outward; the two cut ends meet at the center. A felt base supports the row of petals.
Keep the overlap measurable. On the 80 mm trial strip, mark a 5 mm zone at each end. Bring those two zones together so they overlap; do not fold each one back separately. Stitch through both layers inside the overlap. If 5 mm is too small to sew securely with your ribbon, increase it, then use that revised overlap for every petal.
The length available around the open loop is the cut length minus the shared overlap: 80 − 5 = 75 mm. This is not the petal height or the flower diameter. Once the first petal works, cut the other five and keep both cut length and overlap the same.
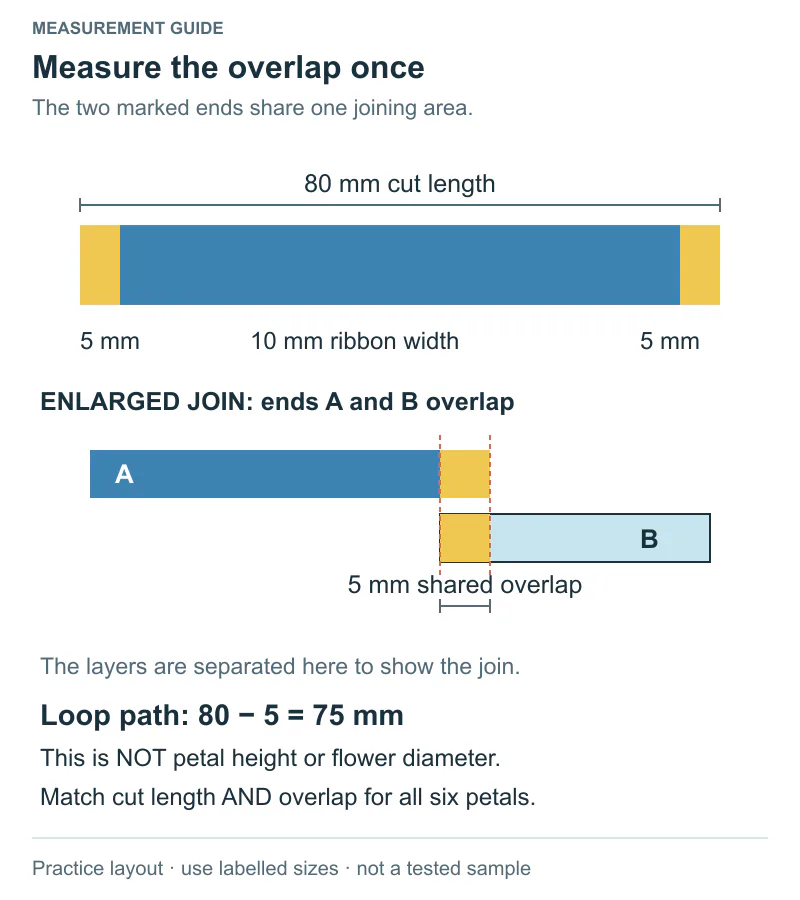
Two marked ends share one overlap. Measure before sewing.
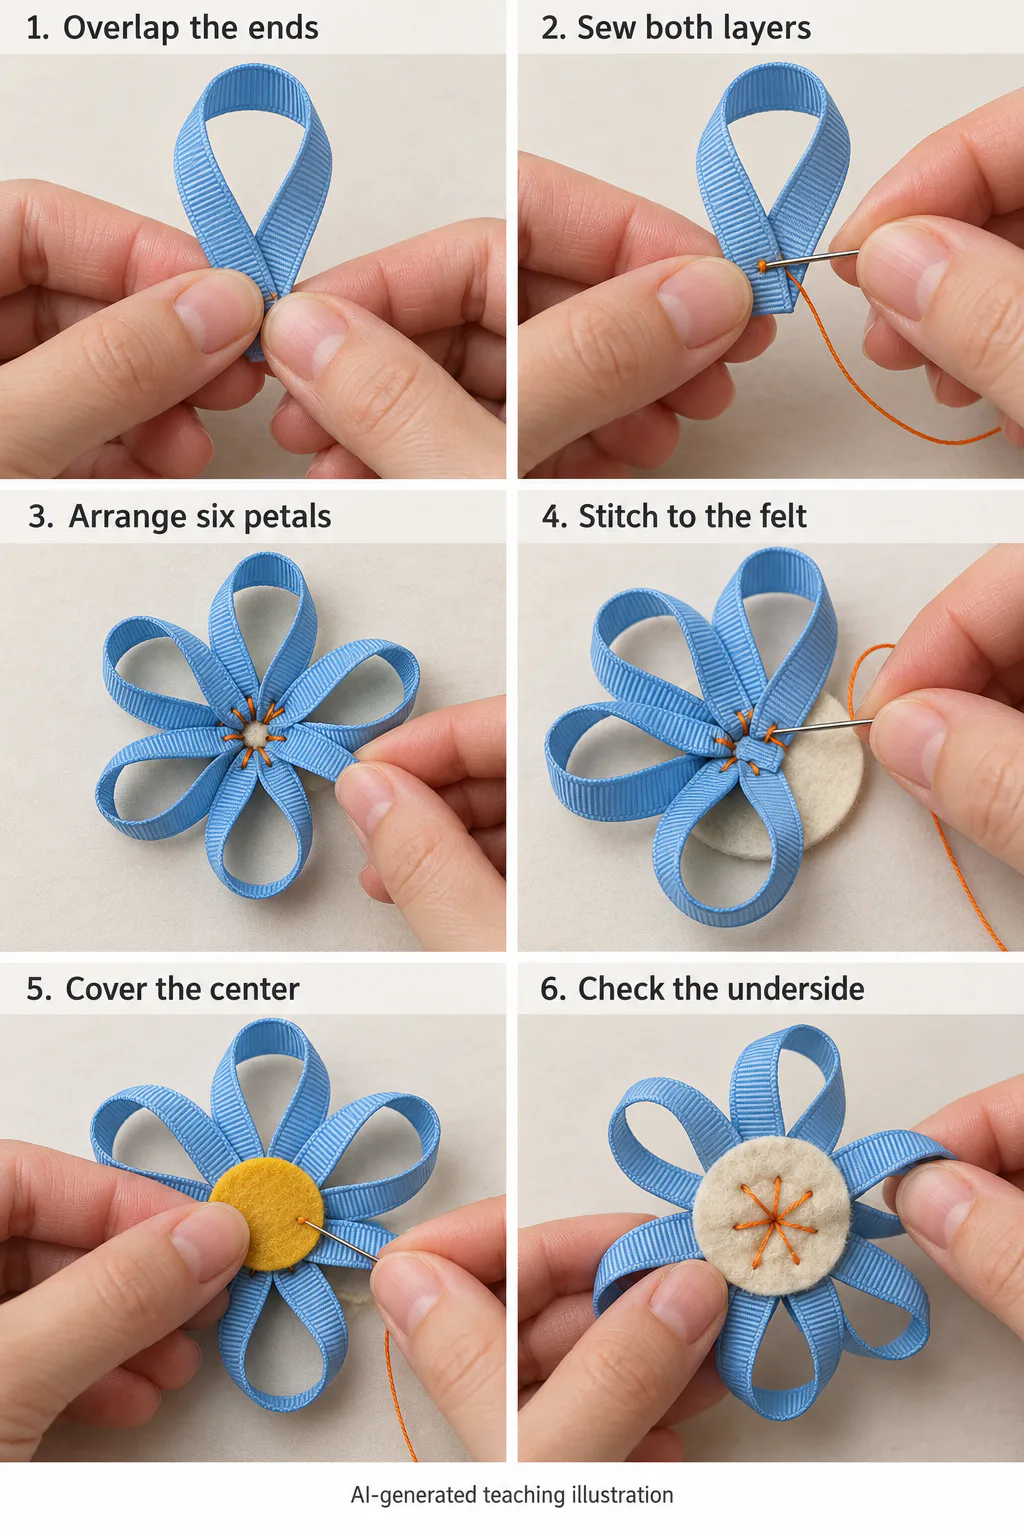
Arrange all six petals before sewing them to the felt. View 4 shows attachment in progress; sew every petal base before adding the center cover.
- Shape one petal. Bring the two ends of a trial strip together, with the ribbon face on the outside of the loop. Overlap the cut ends slightly and hold them flat. Adjust the loop until you like its size. Do not crease the rounded end.
- Sew the overlap. Pass the needle through both overlapping ends. Add a few small stitches across that overlap, then secure the thread. The stitches should join the ends without closing the open loop.
- Make matching petals. Use the first strip's cut length and overlap as the guide for the other petals. The diagrams use six petals. Lay them in a circle on a piece of felt, with the overlaps toward the center and the loops pointing out. Adjust their spacing before sewing.
Attach each petal to the base. Starting from the felt underside, bring the needle through the felt and one petal's overlapped ends. Take it back through the overlap and felt. Repeat to secure that petal, then attach the next. Keep the curved parts clear of the needle.
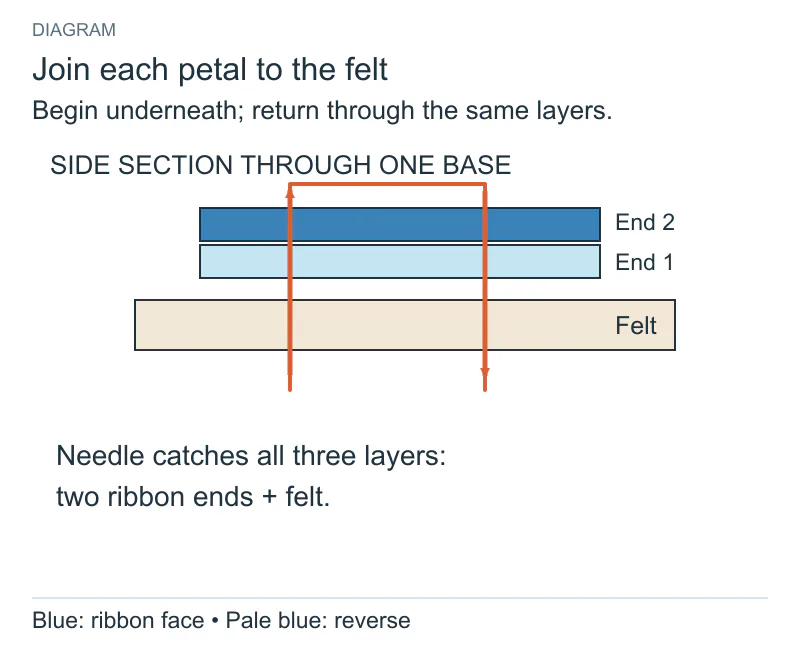
Sew through felt, both ribbon ends, and back through all three layers.
- Cover the center. Cut a small felt circle that covers the visible ribbon ends. Sew around its edge through the secured center and base. Keep these stitches inside the circle of loops so the petals remain open.
- Finish underneath. Turn the flower over, secure the thread and trim it. Check each petal by holding its sewn base. If the backing shows beyond the petals, trim only the exposed felt, keeping clear of all stitches.
Check before continuing: the loops should remain hollow, and neither cut end should slide out of its join. Uneven petal sizes often come from different overlap lengths. Adjust that overlap before attaching the petal to the backing.
2. Make a gathered ribbon flower
This flower starts as one strip. A running stitch goes along one long edge. As that edge gathers, it becomes the inner circle; the unstitched edge spreads outward as a ruffle.
Prepare the 400 × 25 mm practice strip. Turn 5 mm at each short end to the reverse; the folded strip is now about 390 mm long. Try a running-stitch line about 3 mm from one long edge, with small, even stitches around 3 mm long. Those are practice marks: move the line inward if the ribbon edge frays or the needle misses sound fabric.
Pass through the folded layers at the beginning and end. Leave at least 150 mm of free working thread before gathering so you can hold and adjust it. Test a short stitched section first; the ribbon must slide along the thread. Do not knot the working end while it still needs to move.
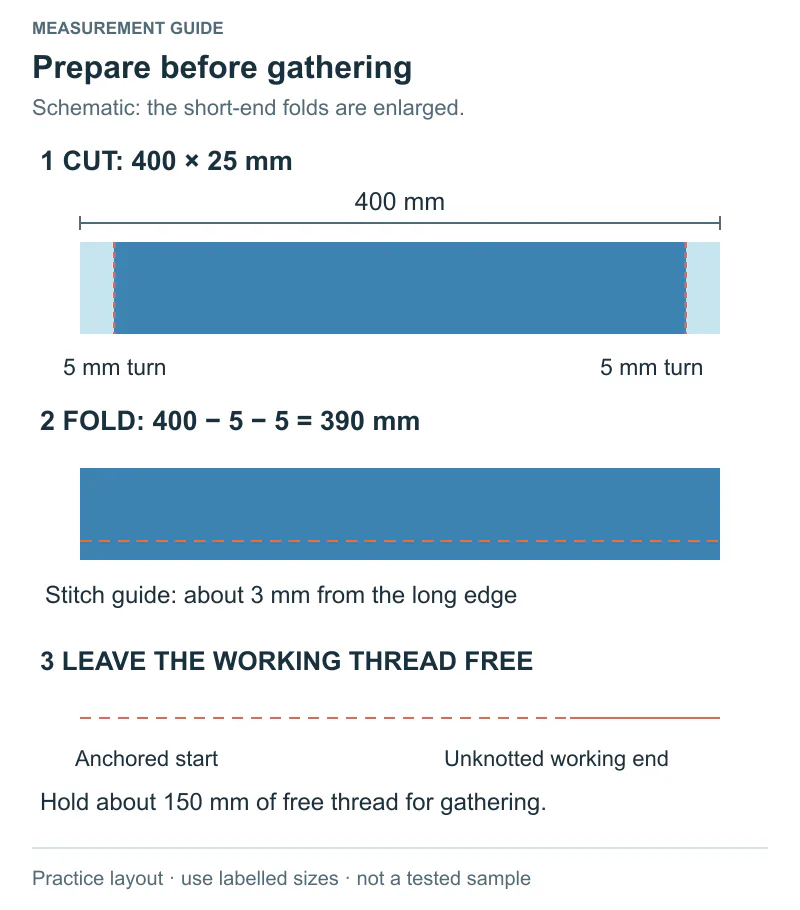
Secure the starting thread; leave the working end free until the ring is adjusted.
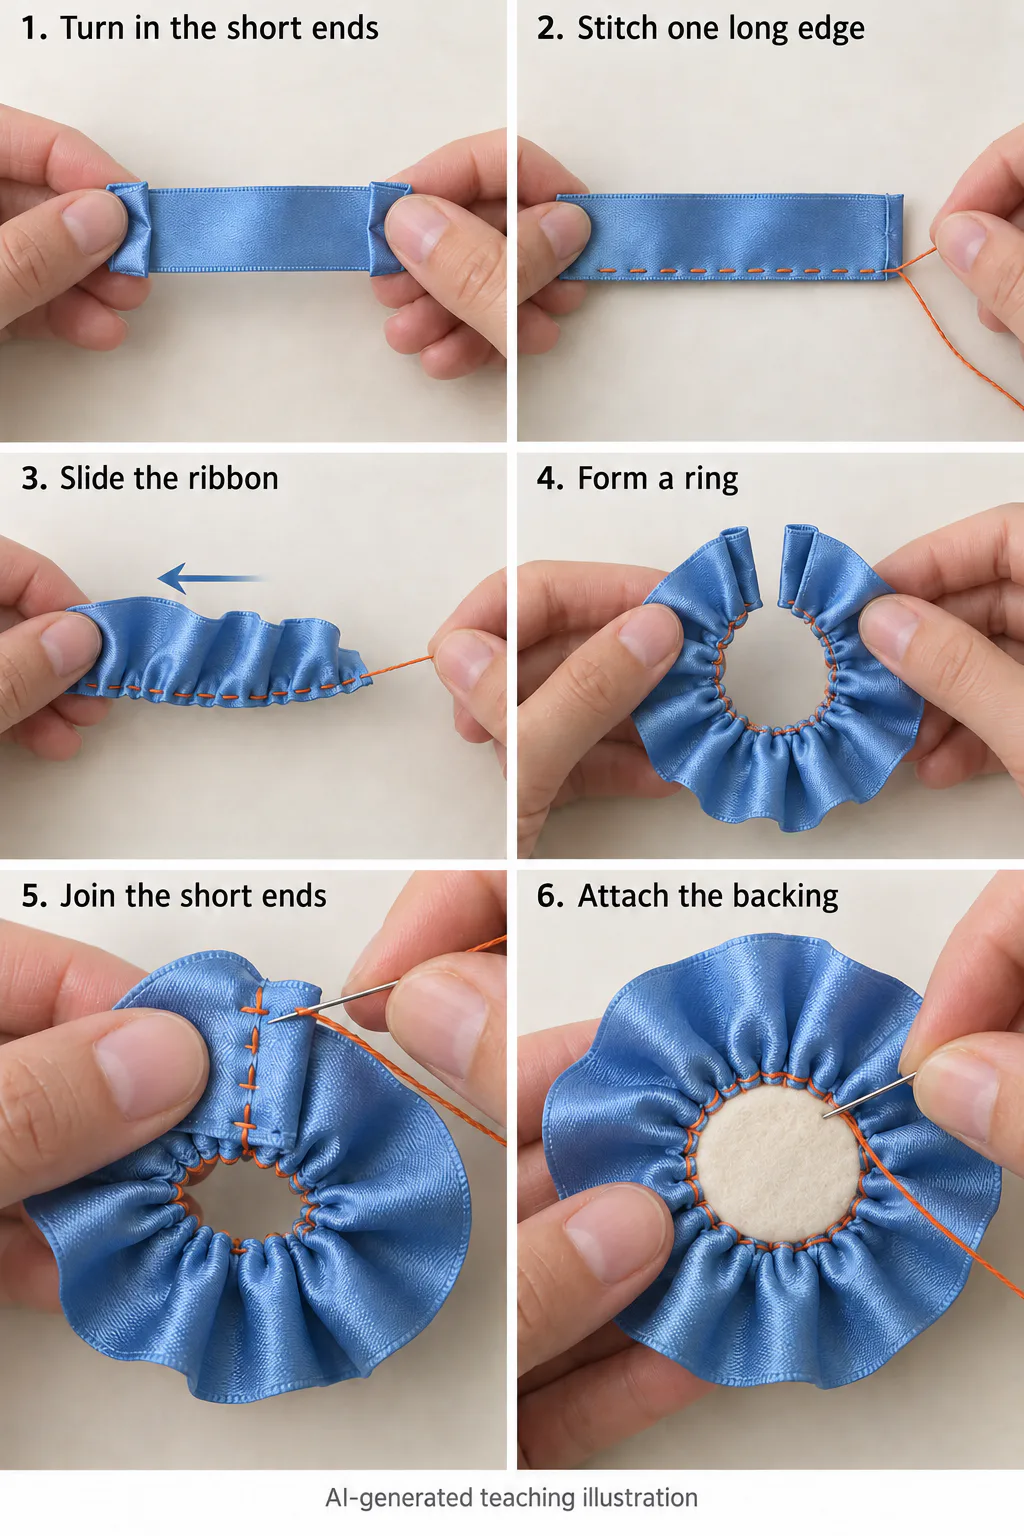
Views 1–2 expose the reverse so the short-end folds are visible. Lock the adjusted gathers before sewing the end seam in view 5. View 6 attaches a solid felt backing at its edge.
- Turn in the cut ends. Lay the ribbon face up. Fold each short cut end to the reverse, leaving enough fabric for the needle to catch the fold. Hold the folds with small clips.
- Sew along one long edge. Start at the left folded end and anchor the thread. Work a row of running stitches toward the right: bring the needle to the face, take it to the reverse, then bring it to the face again. Keep a small, consistent margin from the same long edge. At the far end, leave the working thread loose; do not knot it yet.
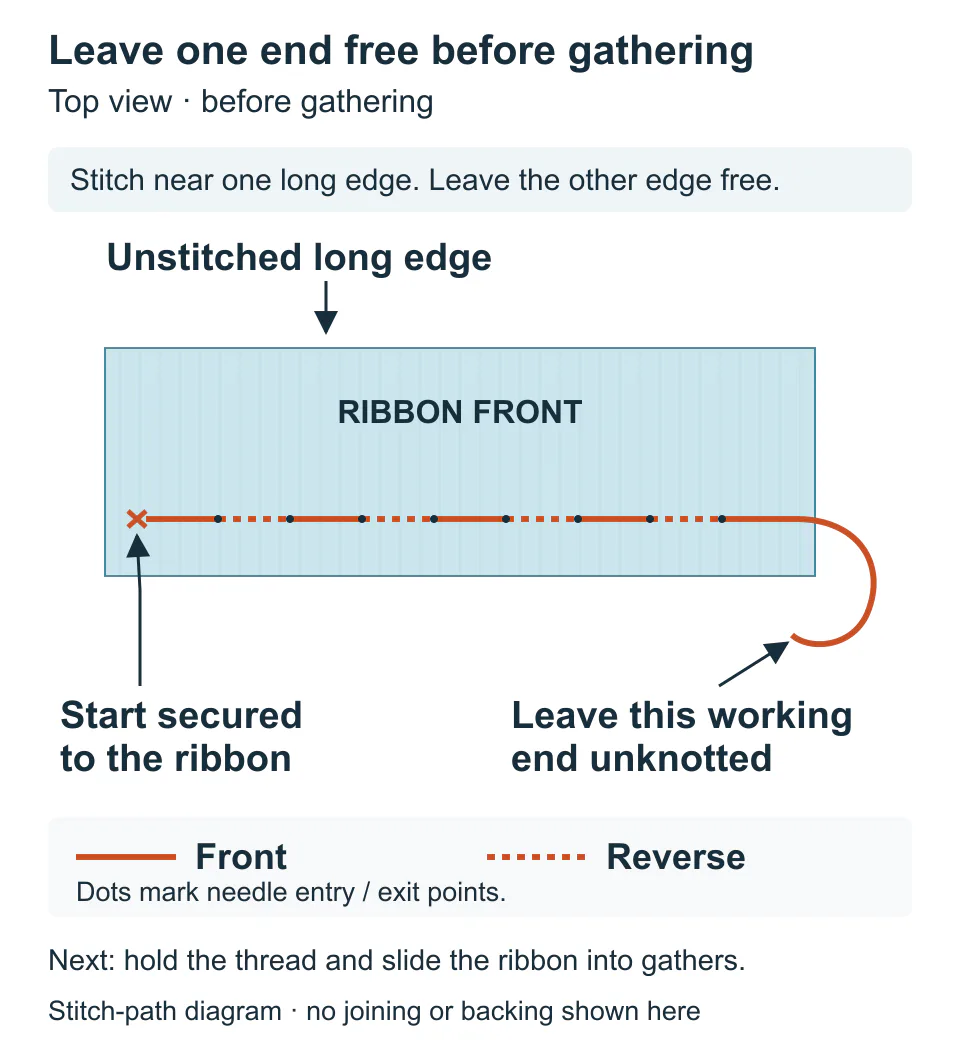
Running-stitch diagram. Solid thread is on the ribbon face; dashed thread passes behind it. The free working thread must remain unknotted while you adjust the gathers.
- Slide the ribbon along the thread. Hold the loose thread at the right end. With your other hand, slide the ribbon away from that free end toward the anchored start. Spread the small folds along the stitched edge instead of bunching them all at one point.
- Bring the short ends together. Curve the strip so the stitched edge faces the center. Bring the two folded short ends together to form a ring. Loosen or tighten the gathers until the ends can meet and the outer edge opens out.
Lock the gathers, then close the seam. Hold the shape and make small securing stitches at the end of the gathered edge. Sew the two folded short ends together with a slight overlap. Secure the thread on the underside. Check that the seam is closed rather than merely hidden under a fold.
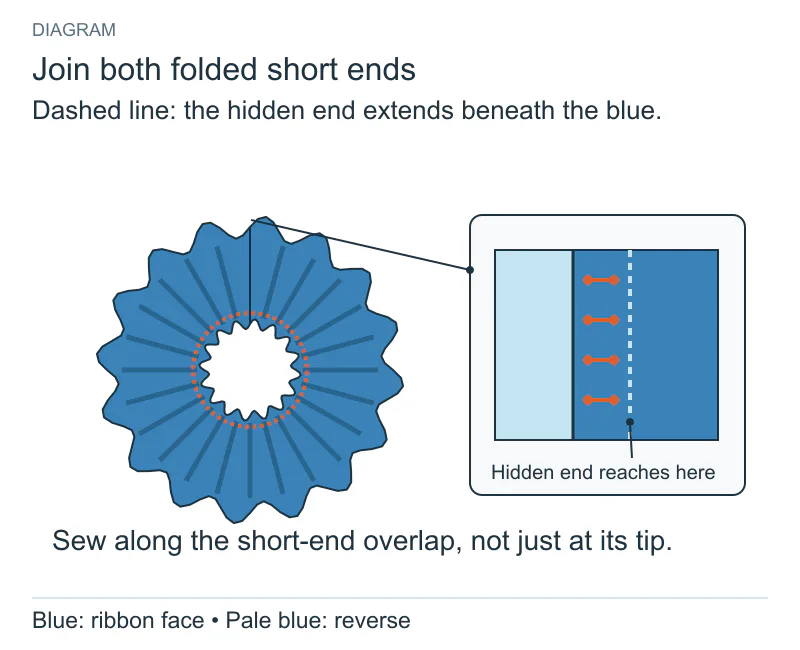
Sew through both folded ends along their overlap and secure underneath.
- Add the backing. Put a felt circle under the center and sew the gathered inner edge to it. If you want to cover the center opening, add a small felt circle on the front and sew around its edge into the inner gathers and base. Keep stitches away from the outer ruffle.
Check before securing the gathers: the stitched edge sits inside the circle and the unstitched edge remains free. If the flower forms a tight cone, release some gathering before locking the thread. If the thread will not slide, stop and look for a knot or a stitch caught in a thick edge; do not pull harder to force it through.
3. Make a folded ribbon rose
A folded rose takes more coordination than the first two flowers. Work slowly enough to see each new fold. Keep holding the base until the new layer is secured.
First practice target: a center and two secure petals. Keep the ribbon on its reel rather than cutting a guessed flower-length. Pull out a comfortable working length and move the reel aside. For each petal, stop after the base stitch and ease your grip: the new fold must stay in place before you add another. These diagrams explain orientation and joins, not an exact finished rose shape.
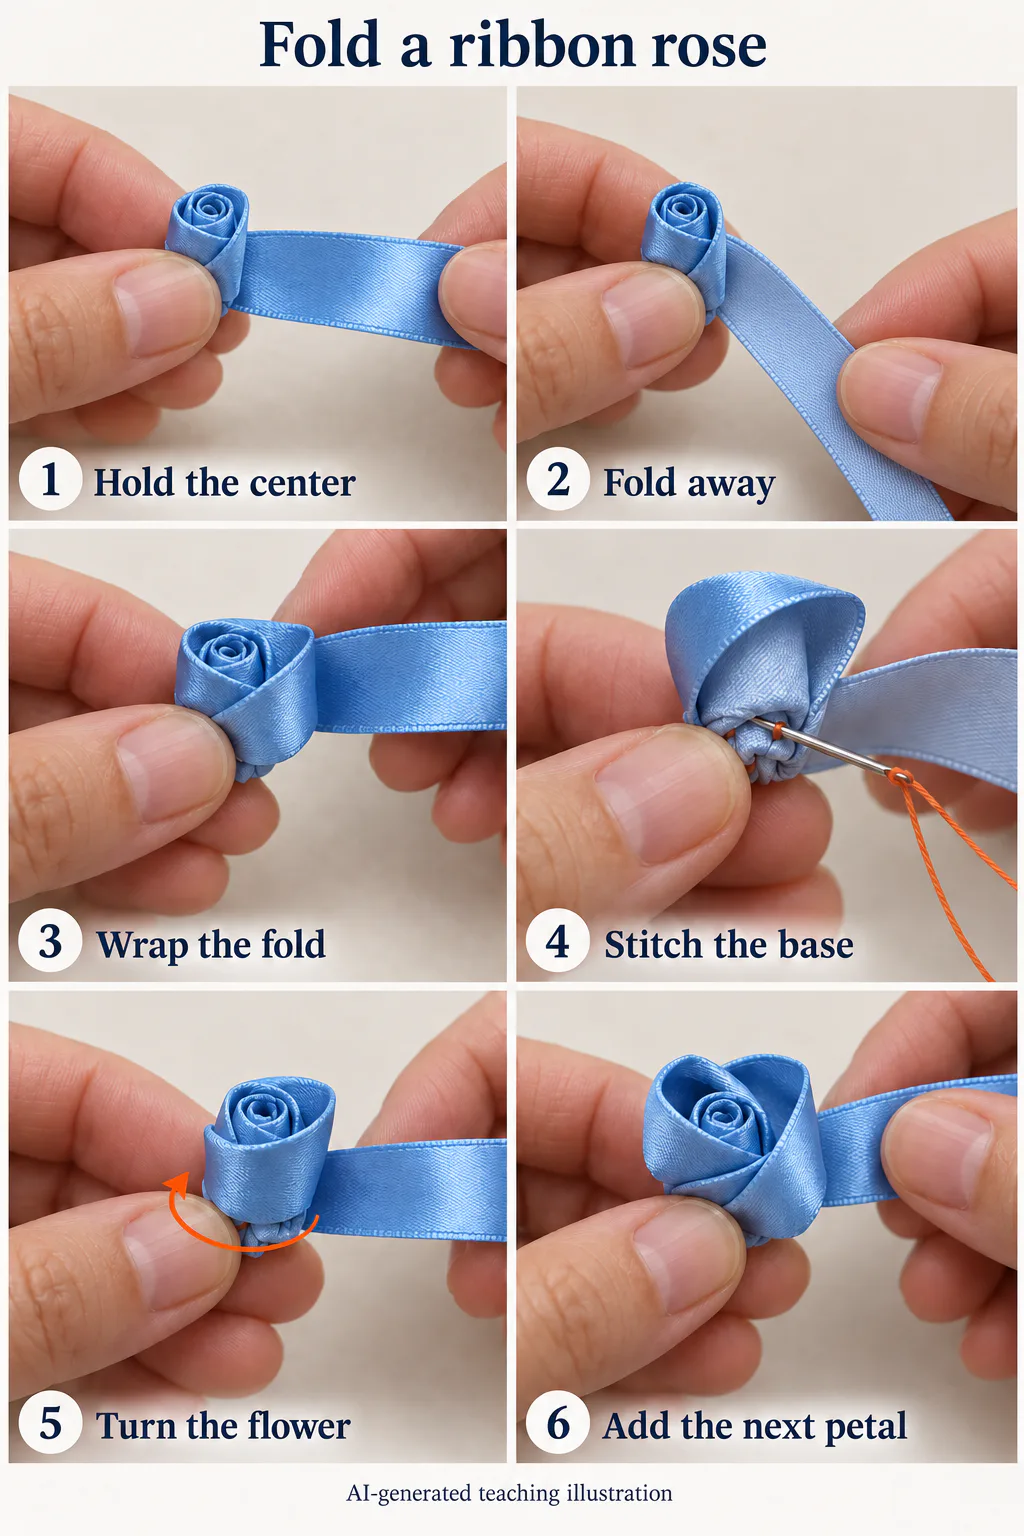
These views begin with a small rolled center. Follow step 1 to make it, then fold, wrap and secure each layer. Turn the whole flower for the next fold. Steps 7–8 explain the tail and backing.
- Make a small center. Turn the starting cut end inward and roll it into a firm little bud. Pinch the lower edge and sew through the lower layers to hold the roll. Leave the top of the bud open and unflattened.
- Set your view. Hold the bud in your left hand, with its top pointing up. Let the unused working length extend to your right. Keep its face toward you and its reverse away from you. The next two actions happen from this same view.
Make the fold. Turn the working length diagonally away from you, toward the ribbon reverse. The folded working length now points downward, with its reverse visible. Hold the diagonal crease beside the bud. Do not wrap it around the bud yet.
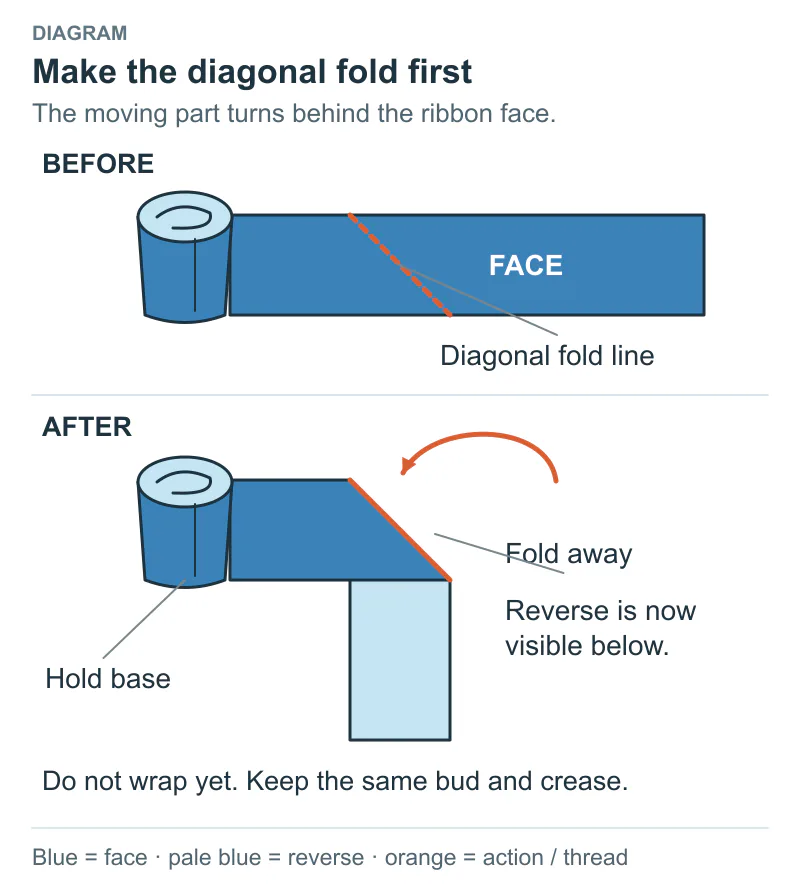
Fold the working ribbon diagonally away before wrapping.
Wrap that fold. Bring the folded section around the outside of the bud. Keep its lower edge level with the base you are pinching. The folded upper edge becomes the rim of a petal. Keep it slightly open instead of pulling it tight against the center.
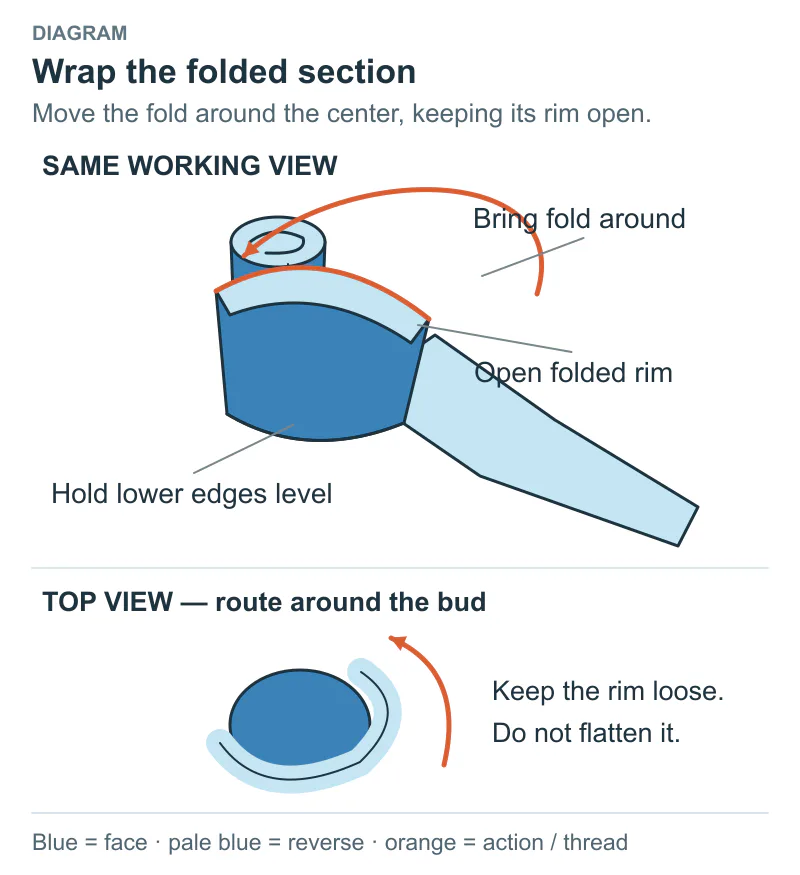
Wrap the folded section around the bud, then align the lower edges.
Secure the new layer. While holding the shape, sew through the new lower edge and the existing bud base. Keep the needle below the open petal rim. The new layer should stay in place when you ease your grip.
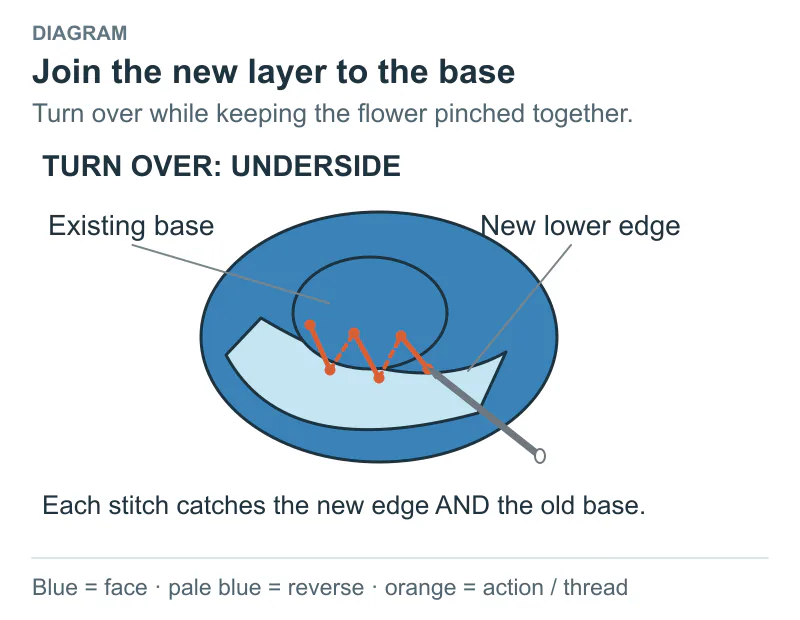
Stitch the new lower edge to the existing base.
- Reposition, then add another petal. After securing the first petal, keep your left fingers on the sewn base. Turn the whole flower in those fingers until the unused ribbon is again easy to hold on your right. Move the flower and its attached ribbon together; do not twist only the loose tail to make its reverse face you. The first petal stays sewn in place while your viewing angle changes. Make the next diagonal fold in the unused length, wrap it outside the previous petal and stitch its lower edge to the base. Look down from above: the new fold should begin farther around the center, not directly over the last fold.
Finish the tail. When the rose is the size you want, leave enough ribbon to fold under the base, then cut it. Tuck the cut end underneath and sew it to the secured layers.
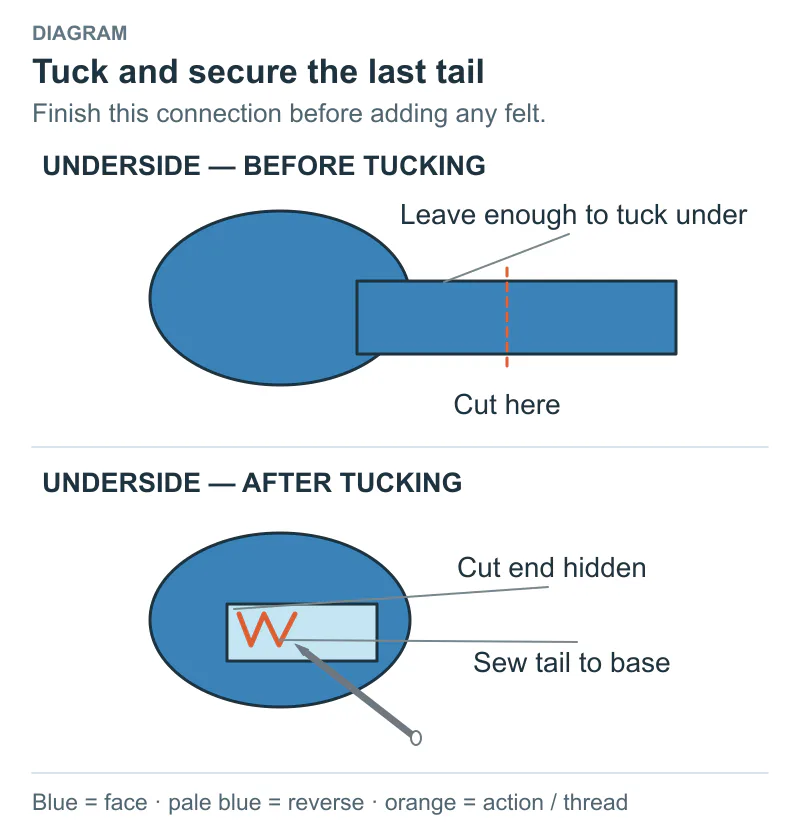
Tuck the cut tail under and sew it to the secured base.
Cover the underside. Add a small felt backing and sew around its edge into the secured base. The backing covers the joins; it does not replace the stitches holding the rose together. Secure the thread and gently arrange the outer petals.
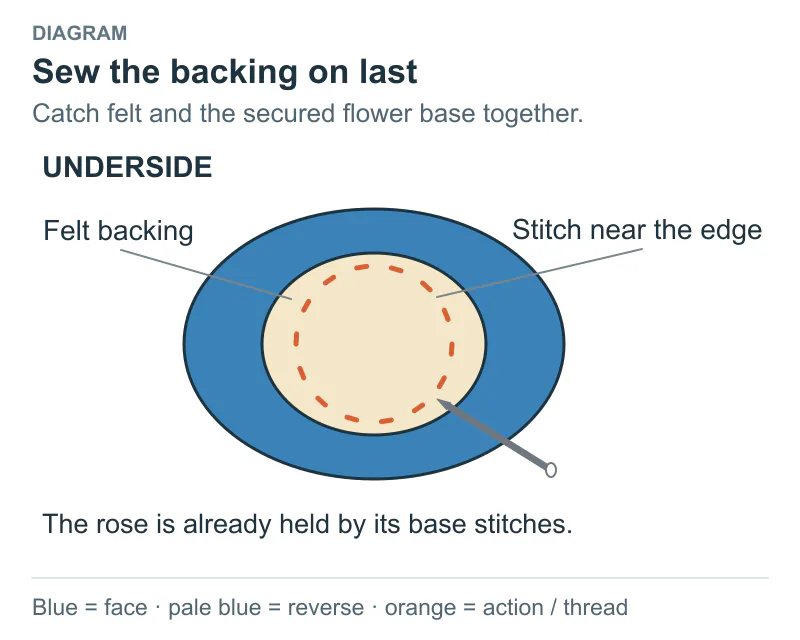
Sew the felt backing to the already-secured rose base.
Two-petal pause: set down the needle and support the base. Check that both petal rims remain free, both lower joins hold when you ease your grip, and the second fold begins at a different point around the center. If any check fails, repair that one layer before continuing. As the flower grows, the lower ribbon may need a small tuck to fit the base; catch that tuck in the base stitch without sewing the open upper rim shut.
Check each layer: the upper petal rim is free and its lower edge is attached to the center. If the flower looks like a narrow tube, undo the latest wrap and make the diagonal fold more distinct. If it unrolls when you release it, repair the base join before adding another petal.
Read the problem before adding another layer
Symptom | Likely check | Next adjustment |
|---|---|---|
Loop petals differ in size | Cut lengths match but overlaps do not | Compare both measurements before sewing to the base |
A cut end pulls free | A stitch caught only one ribbon end | Unpick the weak join and stitch through both overlapping layers |
Gathering will not slide | Working end is knotted, thread is snagged, or stitches catch a thick edge | Free the obstruction; test a short section before pulling the full strip |
Gathered flower stays tightly cupped | Too much gathering or ribbon that resists opening | Ease the gathers first; try a softer practice strip if it still resists |
Rose becomes a tube | Ribbon wraps tightly without an open diagonal fold | Undo the newest layer, make the fold visible and loosen its upper rim |
Rose opens when released | The new lower edge is not joined to the existing base | Repair that base join before adding more ribbon |
After completing a flower, record ribbon width, actual used length, overlap or stitch margin, and the widest finished diameter. Keep a front and underside photograph with those measurements. That record is the starting point for a matching second flower.
Attach the flower through its base
Turn the finished flower over and check that the ribbon ends and thread knots are secured. Hold the backing when moving it. Choose an attachment that suits the surface you are decorating.
Use | Attachment | Check |
|---|---|---|
Gift-box ribbon | Sew the flower base to a separate ribbon tie, then tie that ribbon around the box | The box can still open and the tie can be undone |
Card or gift tag | Use craft glue compatible with the felt and paper; try it on scraps first | Glue does not show through and the card supports the flower |
Fabric-covered headband | Sew the base to a part of the fabric cover that the needle can pass through | Stitches hold the base and do not catch the petals |
Brooch with a sew-on backing | Stitch through the backing's sewing holes and the felt base | The pin and clasp open freely |
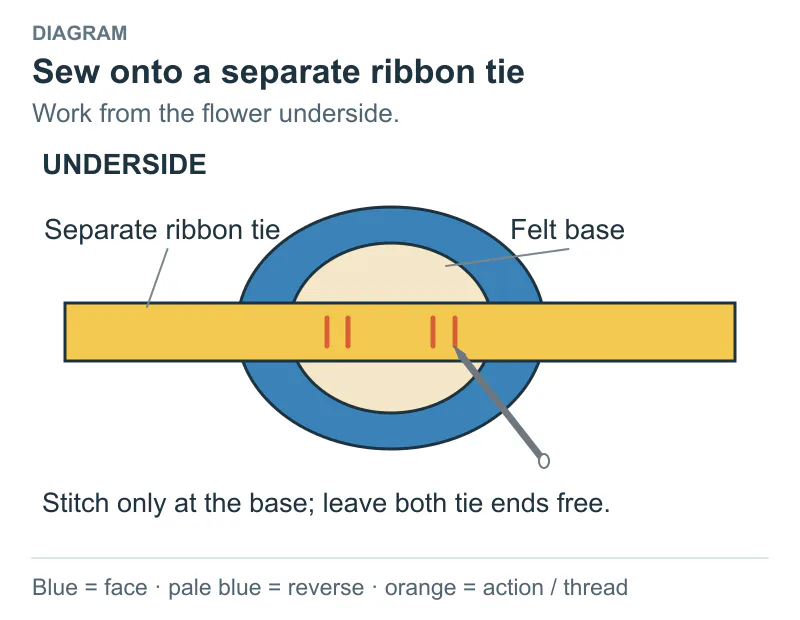
Sew the flower base to a separate ribbon tie.
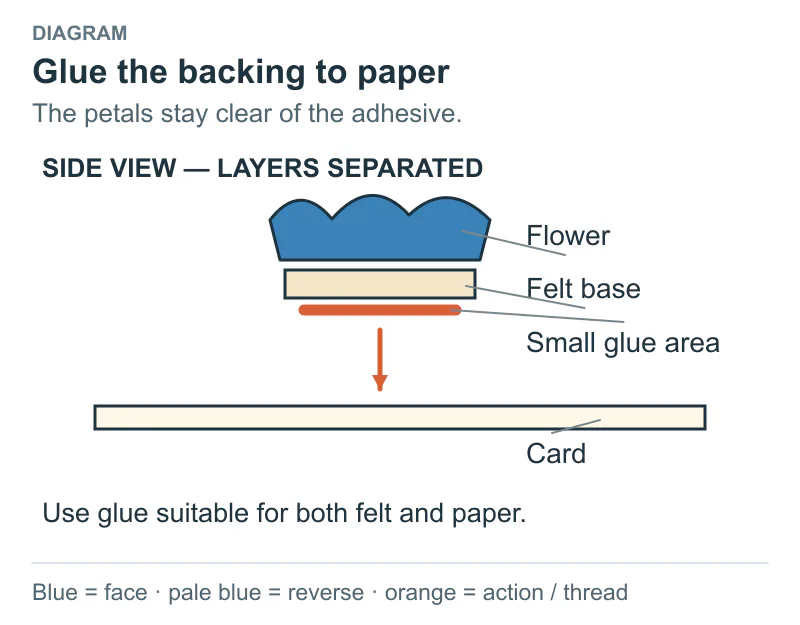
Use compatible glue between the felt backing and paper.
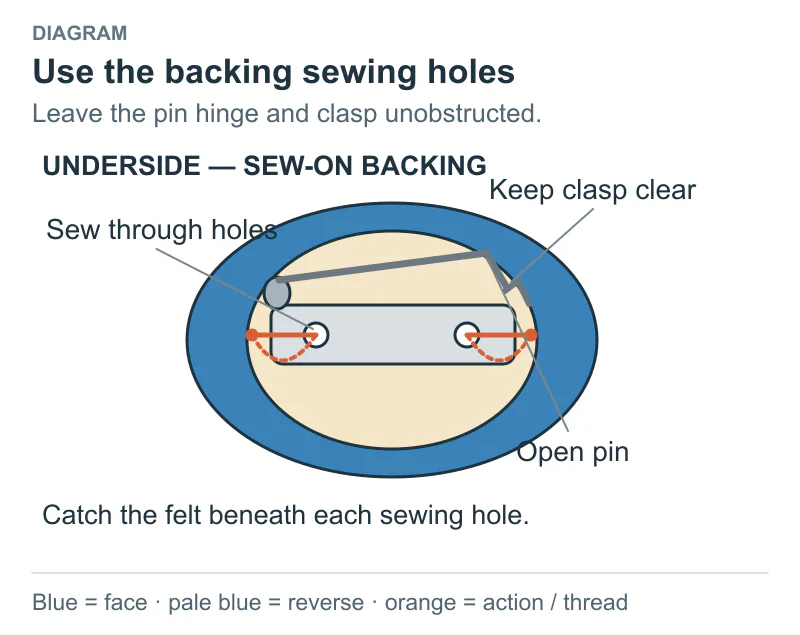
Stitch through the brooch backing holes and felt.
For a garment that will be washed, consider a removable flower. Check the care requirements of the actual ribbon, thread, glue and backing together; a ribbon's material name alone does not tell you how the assembled flower will behave.
Once one flower holds its shape, change a single detail: a different ribbon texture, a smaller loop or a looser outer petal. Keeping the construction familiar makes it easier to see what that change does.
Discuss a real requirement
Turn the reading into a practical next step.
Send a short note, product reference, photograph, swatch or tech pack. Technical feasibility, sampling, documentation and production terms are confirmed after review.
Start an inquiry