
Introduction
Changing one colour can alter the balance of an entire lace trim. Take the upper strip in the photograph: a yellow straight band, white fan-shaped areas and a green scalloped edge. For example, a buyer could keep the yellow and white, replace the green with navy and apply the trim to a garment. The effect will also depend on which colours remain visible after sewing and where the pattern ends.
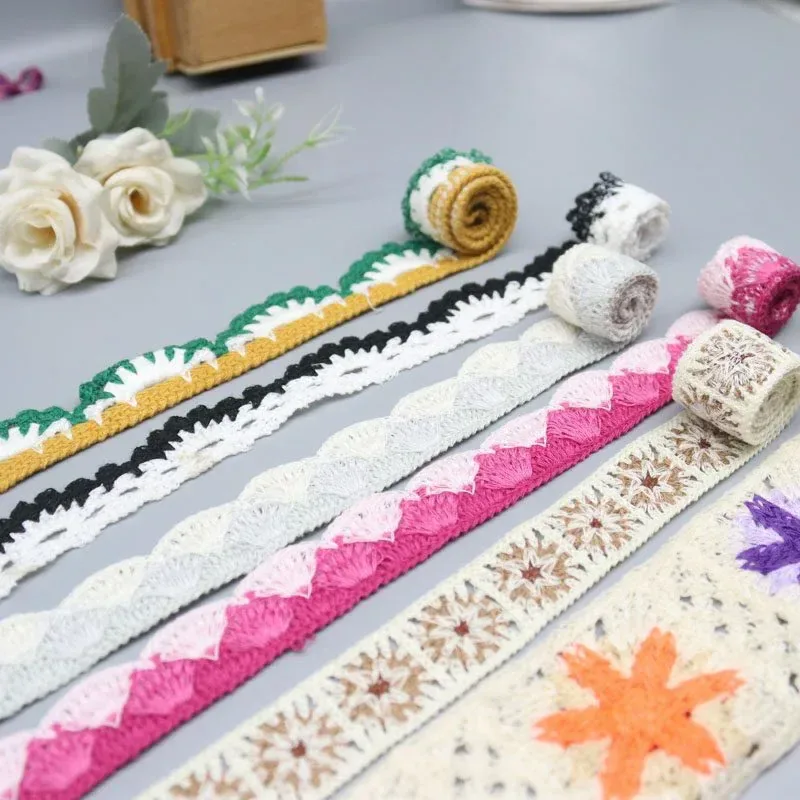
The green–white–yellow strip is rolled at the back, above the black-and-white trim. Its straight yellow band and scalloped green edge give the two sides distinct appearances.
Start with the exact trim
Identify the chosen strip on the photograph and obtain its product or sample code. Look at how the colours follow the structure: yellow forms the straight band, white spreads into fan shapes, and green follows their curved outer edge. A request to “make it navy” leaves too much open. Naming the outer edge tells the supplier which part of the design you want to change.
Ask for a flat view showing several repeats, a reverse view and a ruler across the width. Keep the supplier’s reference, composition, width and supply unit with that sample. A close photograph helps locate the colour change; the recorded product details identify the material to quote and develop.
Choose the colour and placement together
For the navy-edge proposal, retain the yellow band and white fans. Ask the supplier whether that outer area can be recoloured separately on the selected construction. Provide physical references for all three colours, including those being retained, and request a colour sample against them.
Use a sample-room example to put numbers to the choice: a 28 mm-wide trim with a 30 mm pattern repeat. The proposed colourway keeps the yellow and white and changes the outer edge to navy. The first comparison shows that colourway fully on the fabric face, then with 8 mm tucked under the garment hem.
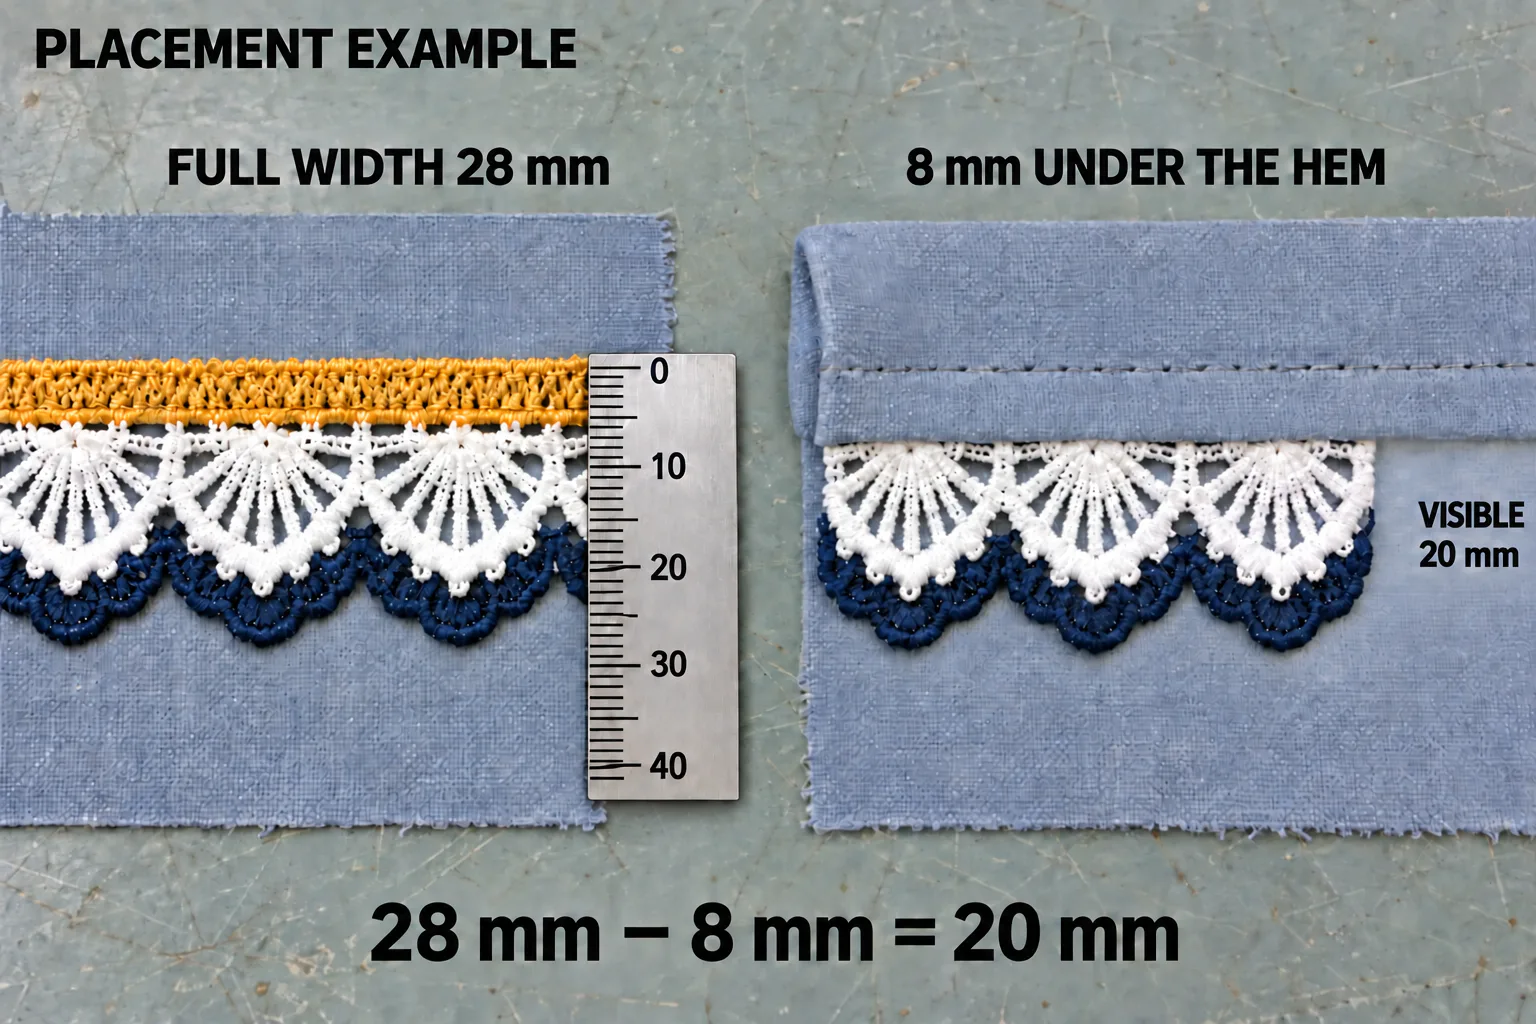
Left: the full 28 mm width is visible. Right: an 8 mm overlap covers the yellow band and the top of the white area, leaving 20 mm exposed. The colourway is the same.
Lay the sample flat without stretching it. Align the ruler’s zero with the straight trim edge and read the width at the deepest scallop. For the sewn version, measure from the garment hem to the deepest exposed point. Here, 28 − 8 = 20 mm: asking only for “28 mm lace” would not tell the garment team how much decoration should show.
If yellow is part of the finished appearance, use the left arrangement and keep that band on the fabric face. For a navy-and-white border extending below the hem, specify both the 8 mm overlap and the 20 mm exposed width. Make the trial on the intended main fabric, including an end or join. On a curve or corner, check the fabric edge and scallops together; changing the overlap to make the curve lie flat also changes the visible width.
Decide what happens at the end of the pattern
Measure a complete pattern repeat between matching positions on the physical sample. In this example, the distance from one gap between fans to the next is 30 mm. Starting at that gap, three complete repeats need 3 × 30 = 90 mm. A 75 mm cut reaches 2½ repeats and stops in the third fan. Alternating colours may create a longer repeat, so include their sequence when measuring another design.
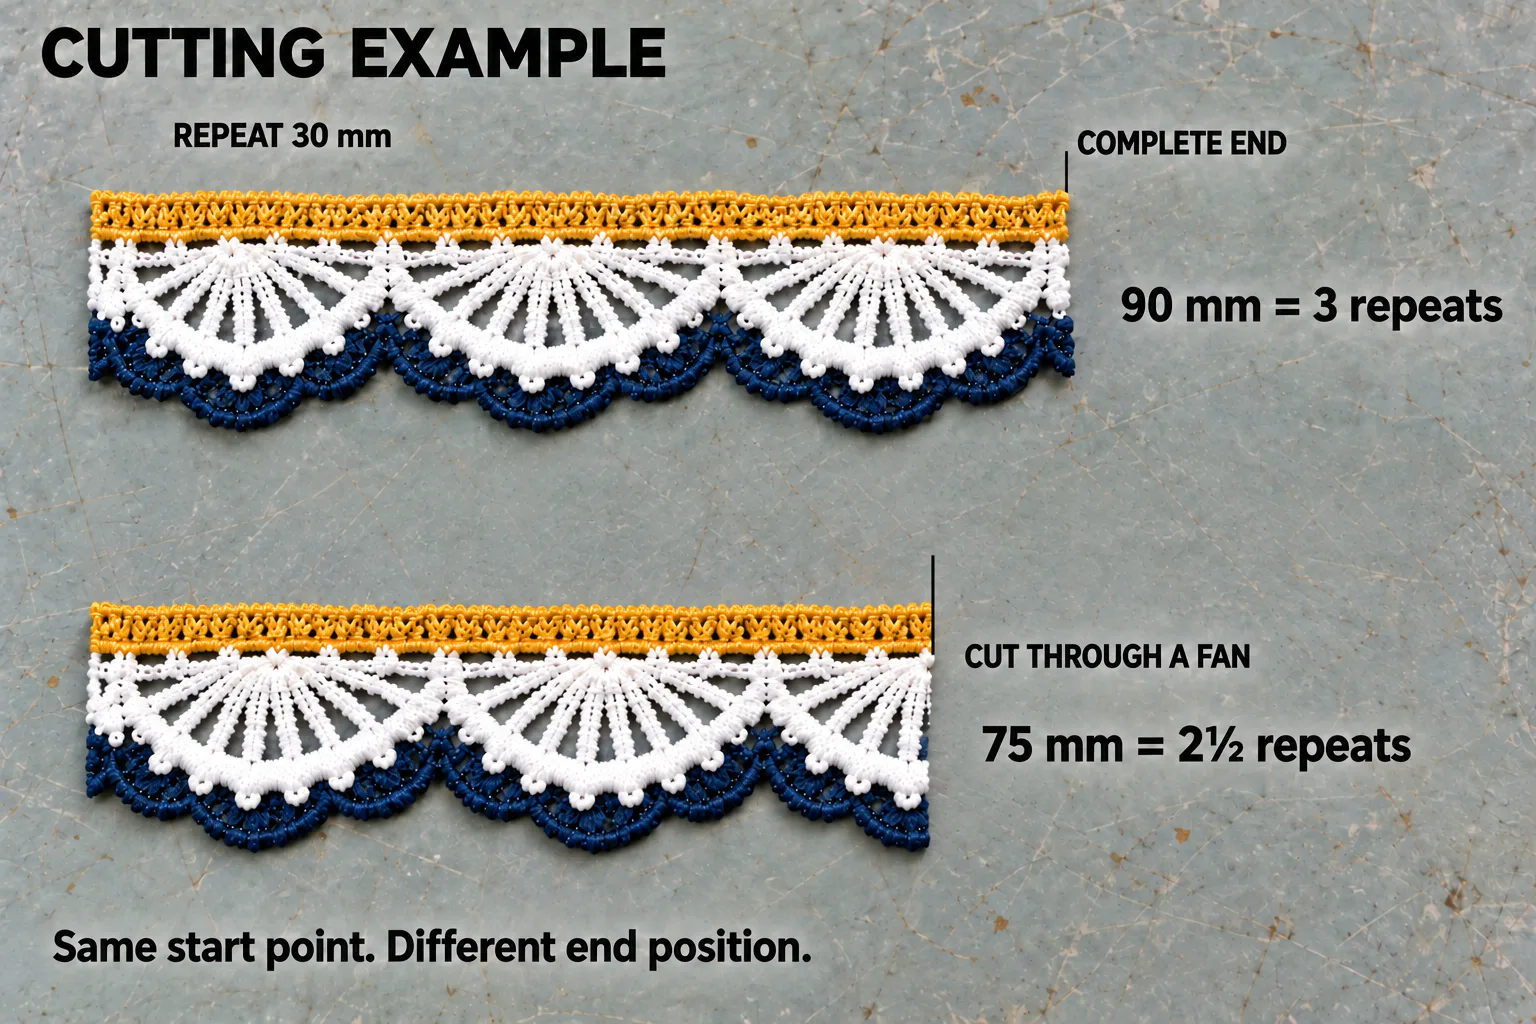
Both pieces start at the same place in the pattern. At 90 mm, the upper piece retains three whole fans; at 75 mm, the lower piece ends halfway through the third fan.
The 15 mm difference changes the end shape. An exposed end may need the complete fan shown above; a cut end inside a seam may be acceptable with the agreed overlap and finish. Mark the start position as well as the length on the cutting reference. Moving the starting point can shift the cut to a different part of the motif even when the length stays unchanged.
For 100 pieces, 75 mm per piece uses 7.5 m before allowances; 90 mm per piece uses 9 m. Keeping three whole fans therefore adds 1.5 m in this example, before extra material for joins, cutting losses or rejected sections. If the garment has only 75 mm of visible space, agree a different placement, concealed overlap or pattern repeat before ordering the longer pieces. The garment dimensions still need to work.
Put the visual choices into one sample request
For the version with all three colours visible and a complete end motif, record the following example brief. Replace the example dimensions with the measured, agreed dimensions of the selected sample when placing the order.
Item | Example requirement | Work to complete |
|---|---|---|
Selected trim | Upper green–white–yellow strip in the original photograph | Supplier identifies the code, composition and supply unit |
Colour | Navy outer edge; retain the yellow band and white fans | Supplier checks feasibility and makes a sample against the physical colour references |
Width and placement | 28 mm full width, all on the fabric face; yellow visible | Garment team makes a sewn trial and records the attachment method and exposed width |
Repeat and cut | 30 mm repeat; start at a gap; 90 mm piece with three whole fans | Sample maker marks the start, cut and finish on a trial piece |
Quantity | 100 pieces: 9 m before agreed allowances | Buyer and supplier confirm whether the order is by length or finished piece and account for cutting losses |
Sample work | One labelled loose colour sample and one sewn trial | Buyer, trim supplier and garment factory agree who provides and makes each item |
The loose colour sample and sewn trial serve different decisions. The trim supplier may supply the material while the garment factory makes the application sample. Name who will provide the main fabric, sew the trial and return it for approval, so both pieces arrive with the information needed to compare them.
Request charges for the base sample, colour development and application work where applicable. Use the selected product’s confirmed supply unit for quantities. Agree the costs, payment arrangements and start conditions, then set the sample schedule around the work included.
Check the sample in the same sequence
First match the product reference and colour sample. Then measure full width, exposed width and repeat, and count the fans in a finished piece. If the colour is right but the hem hides yellow that was meant to show, revise the overlap or placement. If the piece length is right but the end motif is wrong, review the cut’s starting position. Record the accepted sample and the specific change, then complete the care and performance checks agreed for that garment application.
Use the sample and shipment review guide to keep the marked photographs, colour references and approved samples together. When discussing a trim with YiTuo, send the selected design, intended use, colour request and garment placement so the quotation and sample work address the same result.
Discuss a real requirement
Turn the reading into a practical next step.
Send a short note, product reference, photograph, swatch or tech pack. Technical feasibility, sampling, documentation and production terms are confirmed after review.
Start an inquiry