
Introduction
A buyer wants embroidered pillowcases with a matching lace border. The flower pattern looks right and both materials are called ivory. That is a useful shortlist, but it leaves several decisions open: will the filling show through the embroidery, where will the border sit, how will the corners meet, and can the ordered rolls produce complete pairs? Those decisions change both the materials and the quantity to buy.
Start with the finished effect, then work towards the purchase order
When buying wholesale embroidery fabric and matching lace trim, first choose a construction, compare the materials together and make a representative sample. Then record cut dimensions, plan pieces within usable widths and continuous lengths, and allocate compatible colour lots. The worked example below follows 200 pillowcases through all of those steps, including the lining, back opening and packing in pairs.
The catalogue references are real products. The pillowcase design, dimensions, trial observations, prices and order quantities are a teaching example, not a record of a brand’s production or a tested YiTuo combination. Photographic studies show design possibilities; measured drawings define the numerical examples.
One decorative effect can lead to different material orders
H&M HOME’s lace-trimmed pillowcase provides a useful starting point: its official description separates a woven cotton body, decorative edging and an envelope opening at the back. It does not disclose the cutting plan. For our own design, separate those functions before choosing how to reproduce the effect. A border extending outside a pillowcase and a flat frame applied to its face need different pieces.
Construction | Useful when | What to resolve before buying |
|---|---|---|
Embroidered main panel | The whole face should carry a repeated pattern. | Cut around the motif direction; decide whether the openwork needs backing. |
Plain body with a separate lace frame | A quiet centre and a clearly defined decorative border are wanted. | Confirm border width, exposed ends and corner joints. |
Embroidered face plus a separate frame | A layered design is intentional. | Check whether two patterns compete; include lining if the brief requires opacity. |
Placed motifs or appliqués | Decoration belongs at selected positions. | Count left/right pieces and fixing work; a metre total is insufficient. |
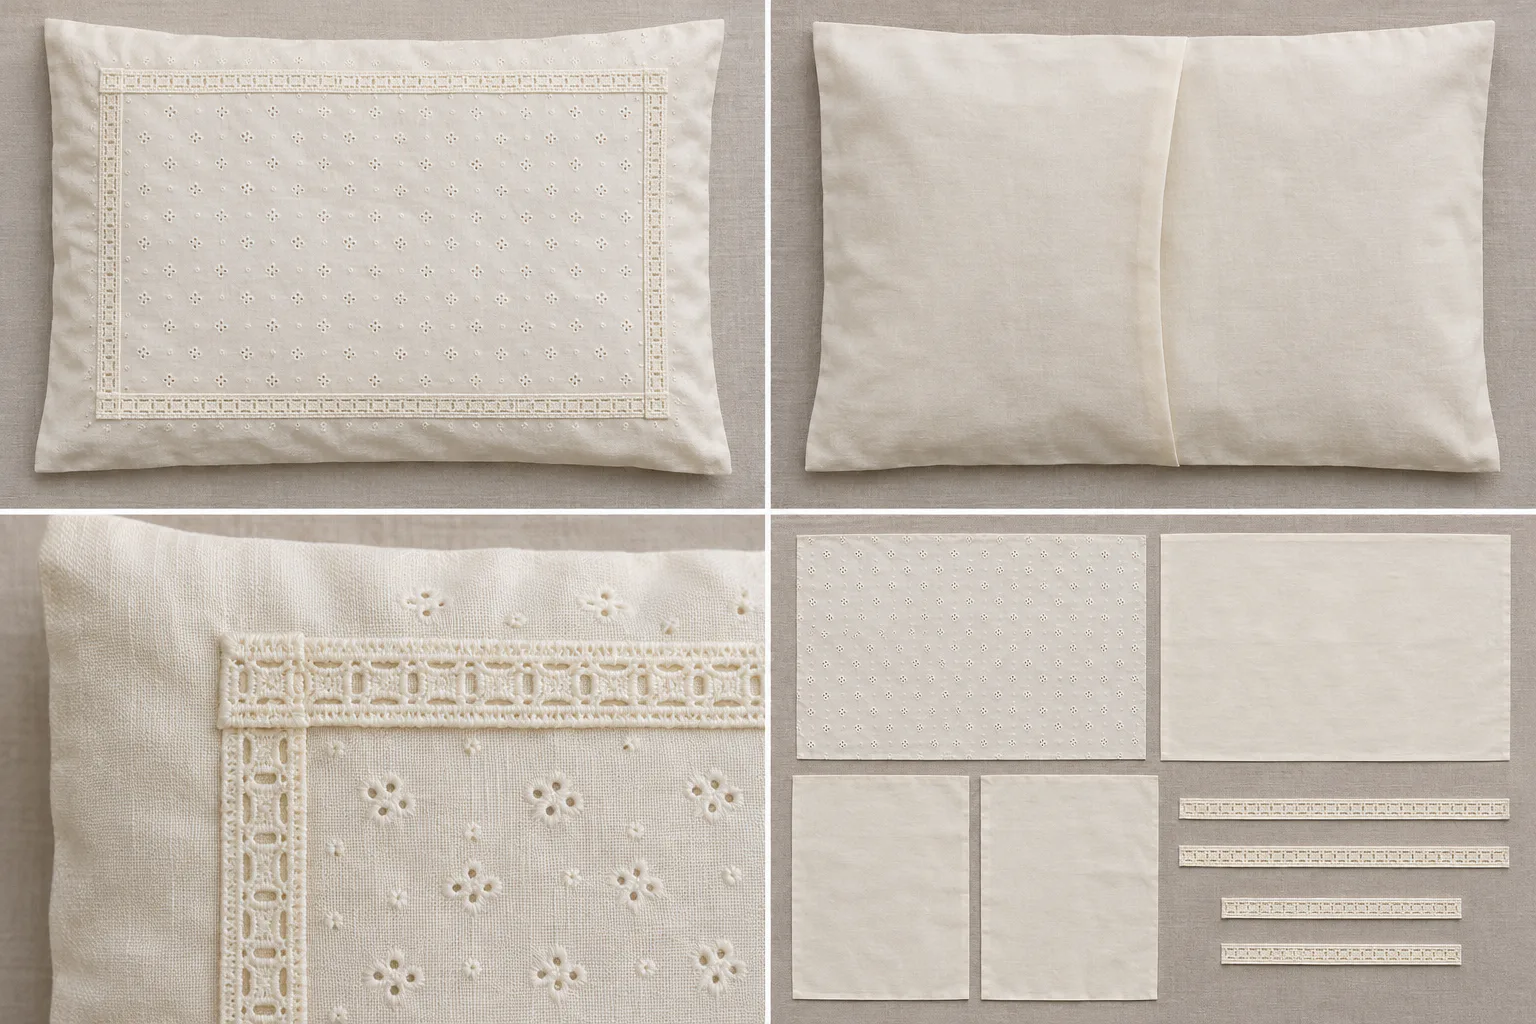
Our example uses a modest embroidered face over a plain lining, plain envelope backs and an inset flat frame. The frame stays within the face; it does not extend beyond the pillowcase seam. This makes the corner and length records explicit. A buyer wanting an outer scalloped flange should keep that different brief and develop its own corner sample.
Give each real material a job in the design
Ivory Daisy and Ring Eyelet YT26009 is recorded as cotton, with a 150 cm full width and a 145 cm cuttable width. The embroidered daisies and small eyelet rings make it a useful starting point for an embroidered pillowcase face. Use 145 cm when testing the layout, rather than assuming the complete 150 cm is available.
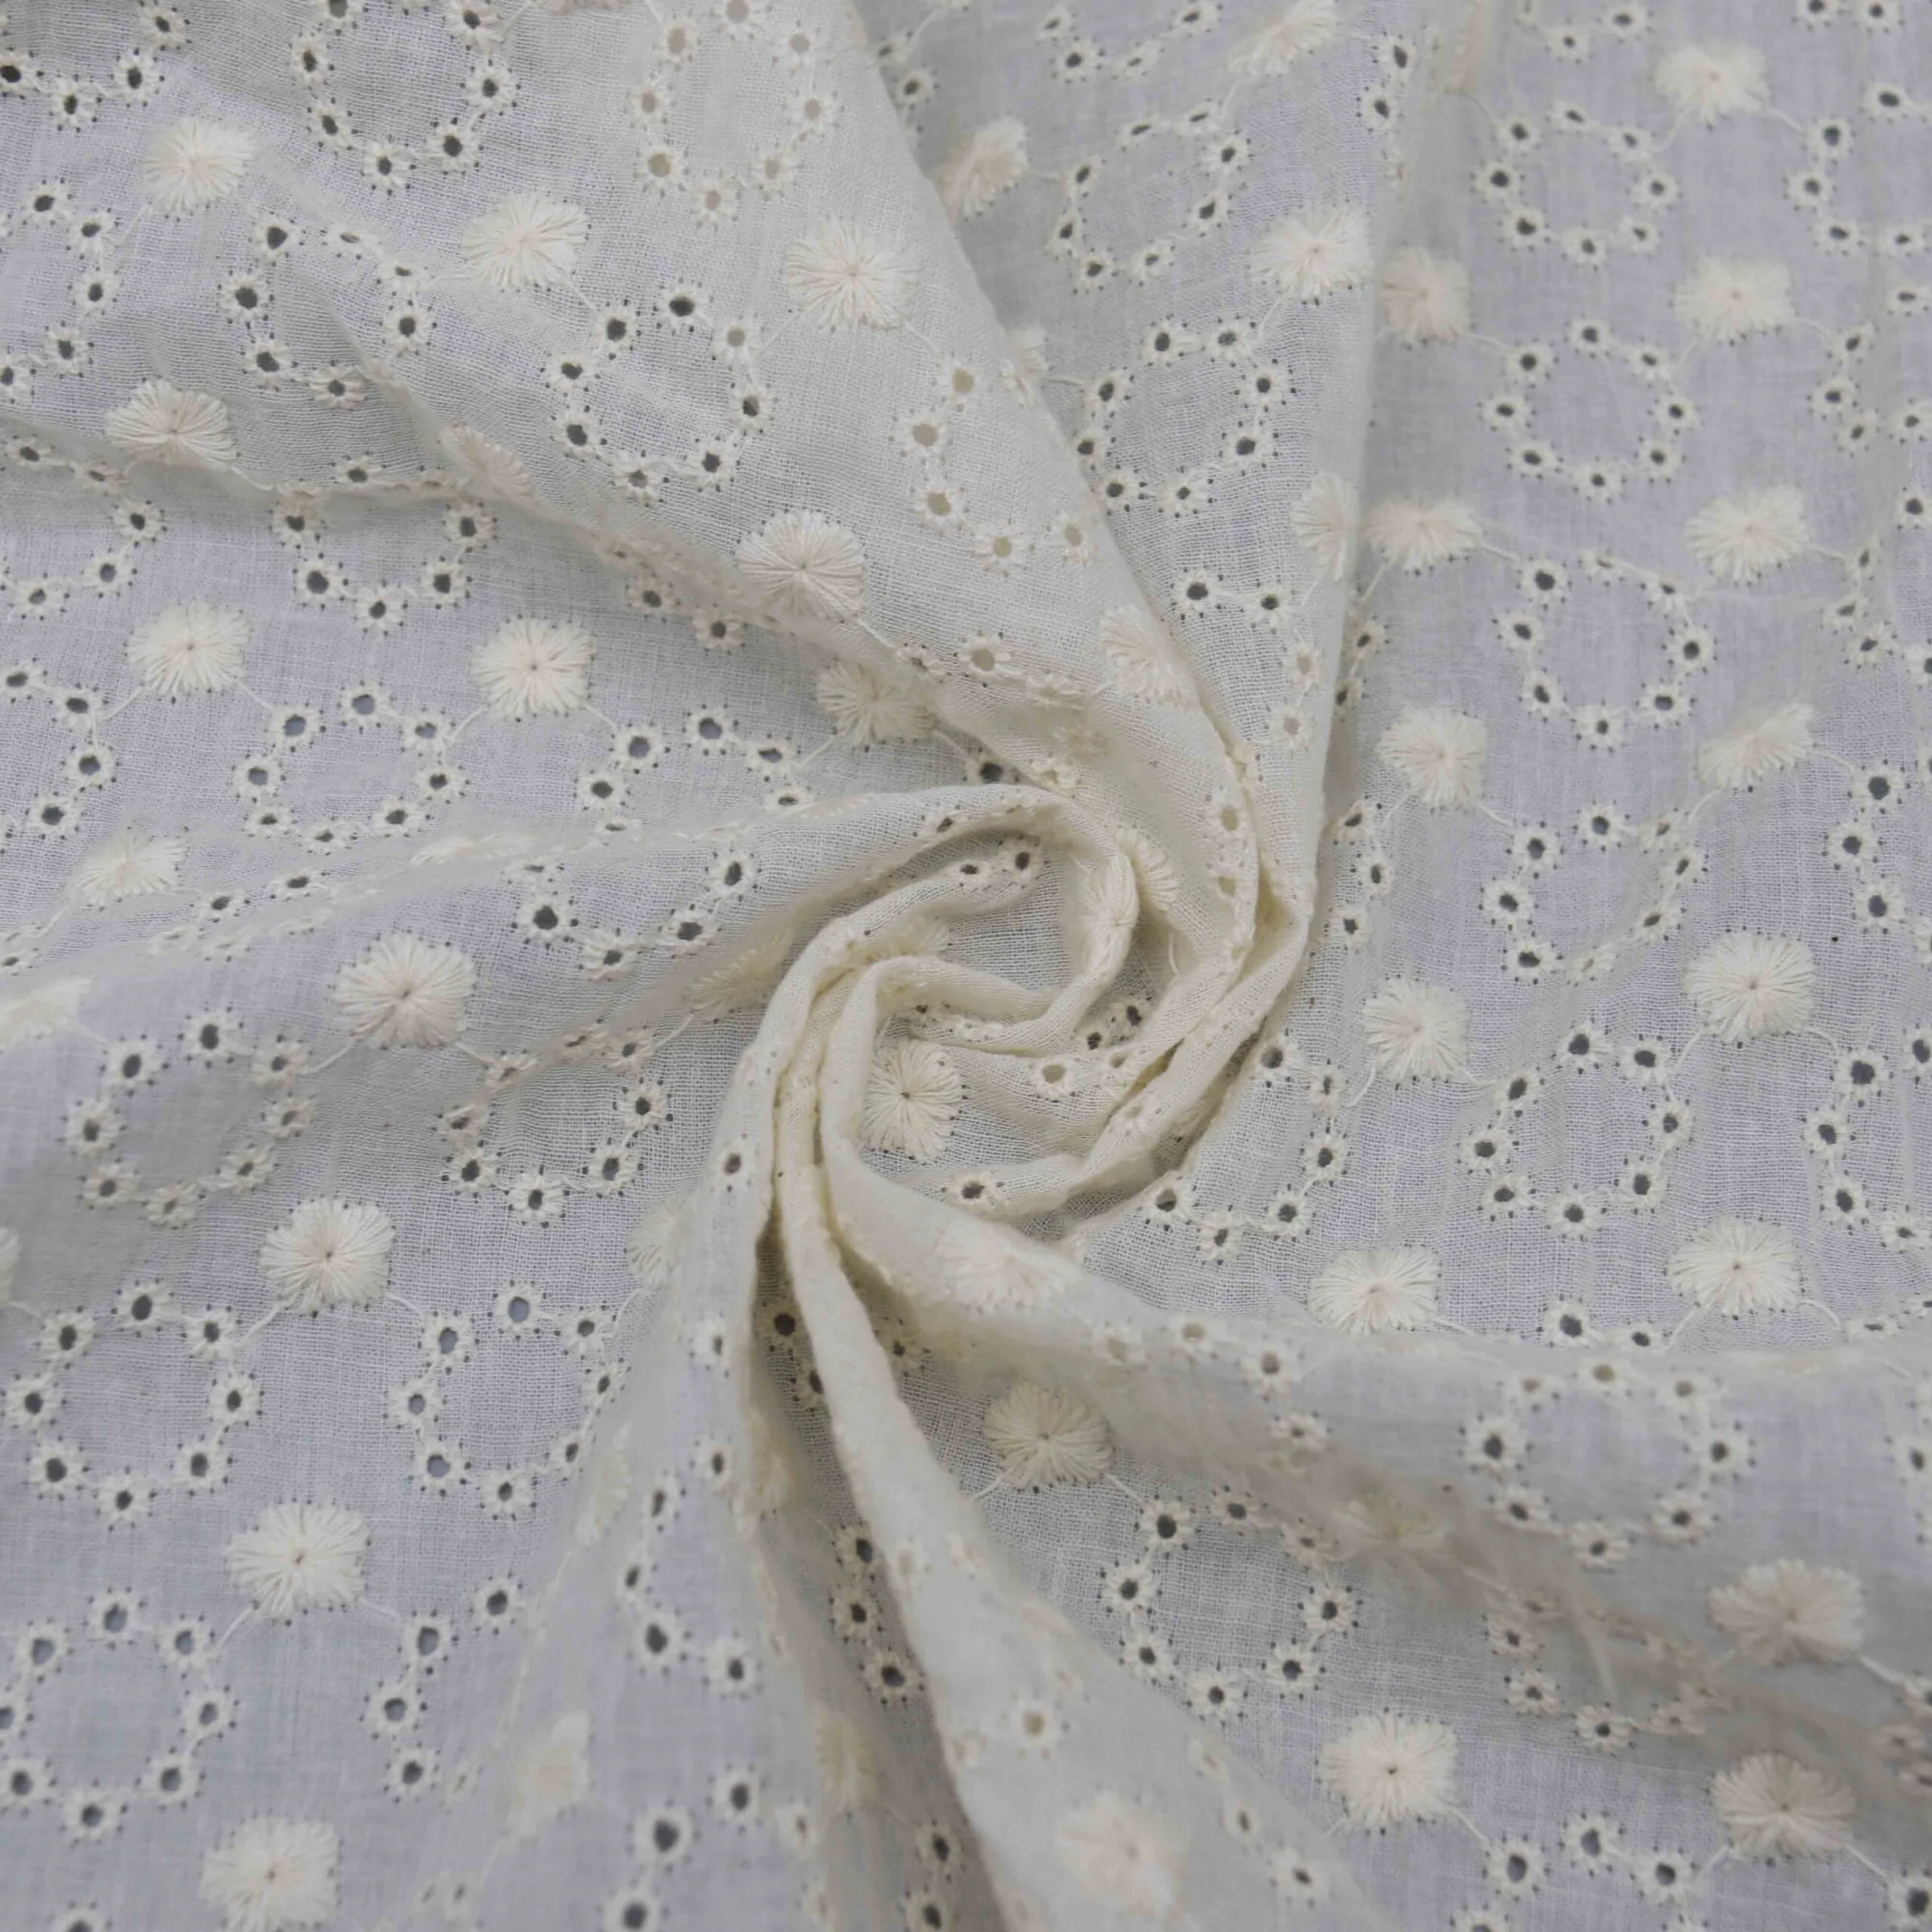
For this type of pillowcase face panel, use the YT26009 sample to compare the flowers against the proposed frame, first over the intended lining and then over the intended filling. A backing can change what shows through the holes. Place the full-size paper pattern on the sample to check whether the border would cover the feature you chose the fabric for. The catalogue width does not settle those choices.
Ivory Daisy Motif Lace Fabric HY-01595 has a more open structure between large flowers. The record lists 45% rayon and 55% nylon, a 150 cm full width, and a separate 22 cm “Pattern width”. For an occasionwear yoke, request a marked sample showing what that 22 cm spans. It is not automatically the fabric width, cuttable width or repeat length.
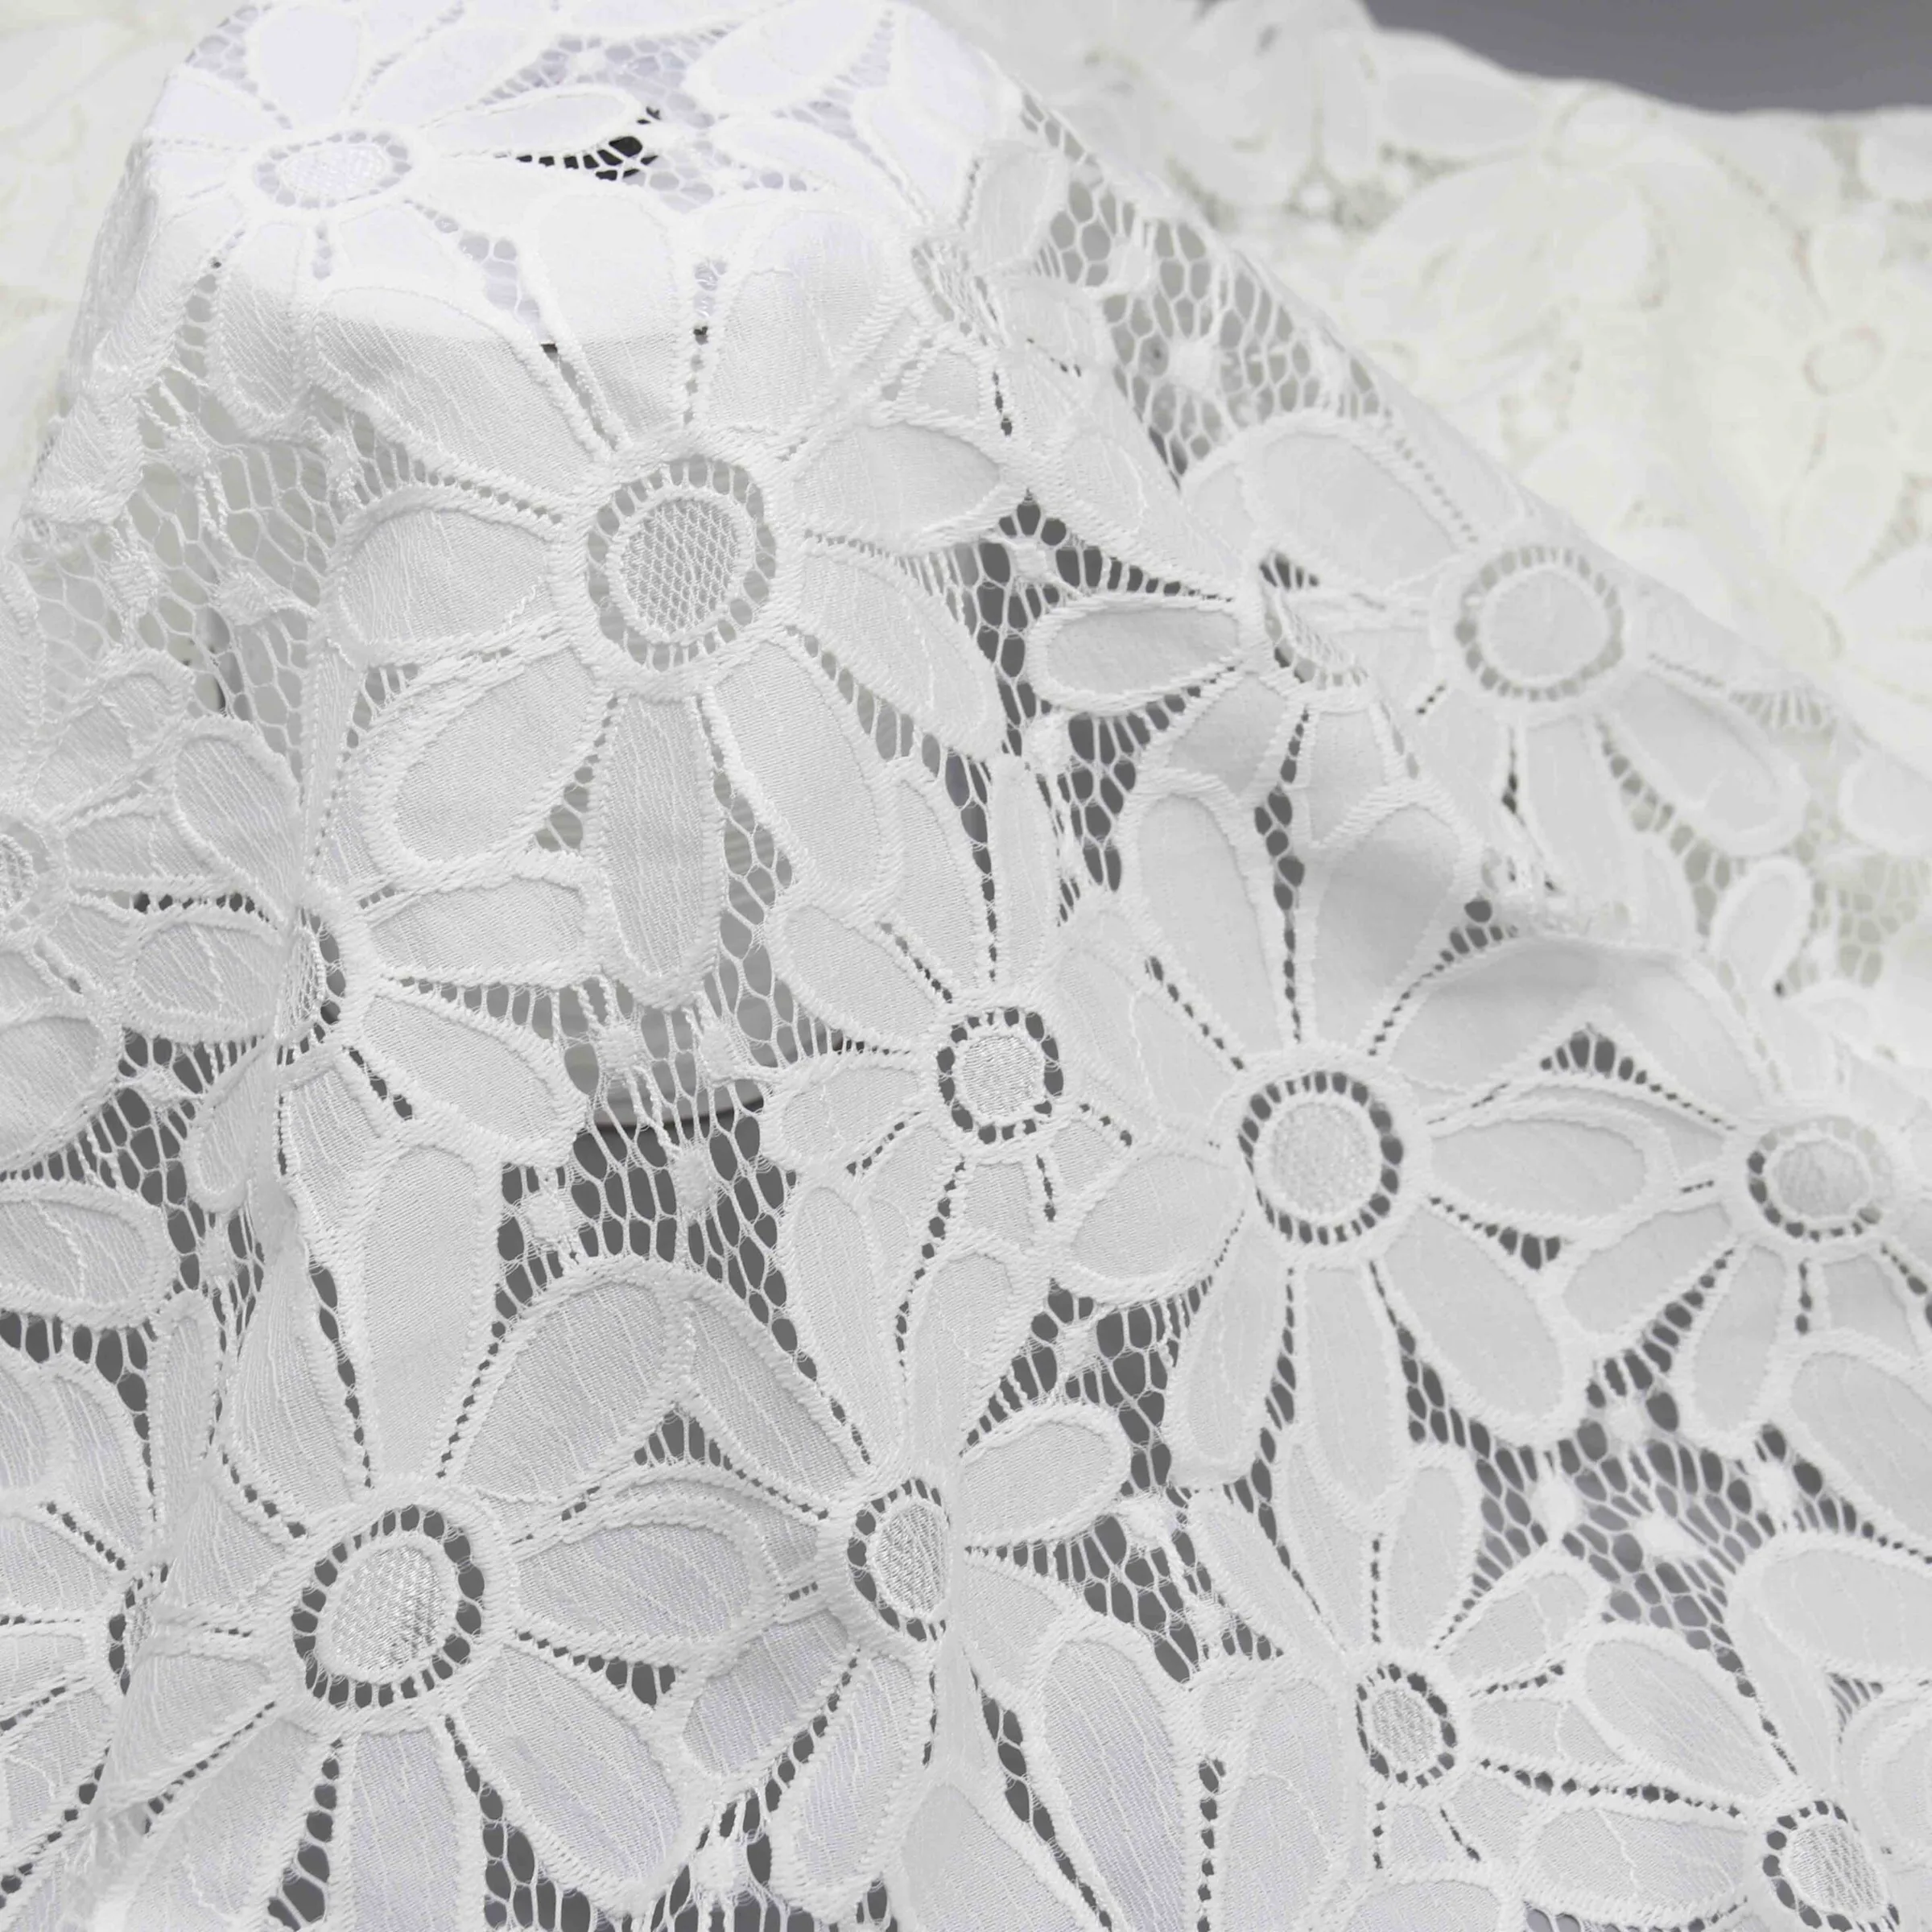
HY-01595 is an alternative visual direction, not an automatic substitute for the smaller eyelet design. Its larger motifs need enough uninterrupted space to read clearly. For a pillowcase with a border close to the centre, first check whether the frame cuts across a main flower. For a sheer dress yoke, transparency may be part of the design instead; the same material can therefore raise a different buying question.
For a decorative cuff or pillowcase opening, Daisy Chain Cotton Eyelet Lace Trim YT-Q02968 shows the narrow-trim approach. It is listed as 100% cotton and 5 cm wide, with a plain attachment band and a scalloped eyelet edge. Determine how much of the plain band enters the seam before approving the exposed depth. The catalogue’s white trim is a separate material from the ivory fabrics above; a shared flower theme does not establish a colour match.
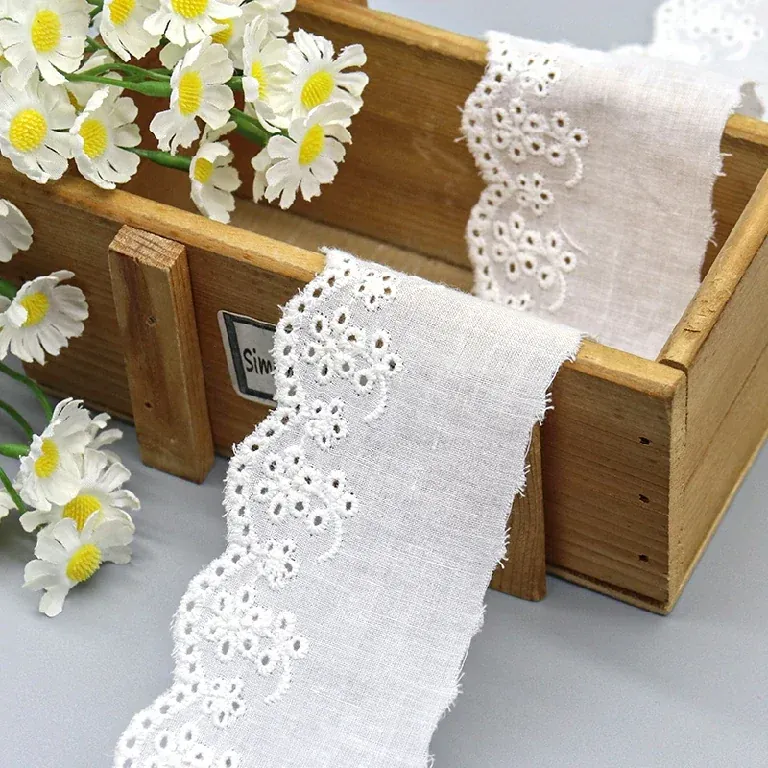
For YT-Q02968, measure from a defined attachment line to both the scallop tip and valley. The listed 5 cm overall width includes the shaped edge; it does not mean that a continuous 5 cm band will conceal another piece underneath. Our frame calculation later uses a separately specified straight-edged 5 cm band. Substituting the scalloped catalogue trim requires a new corner and overlap check.
What does “matching” mean beyond the colour name?
Lay the candidates on one full-size front, with the intended backing underneath. Keep the position and exposed width the same while changing one candidate at a time. First compare the whole face from its normal viewing distance; then inspect the joining area close up. This separates a design that feels too busy from a seam that simply hides too much of the border.
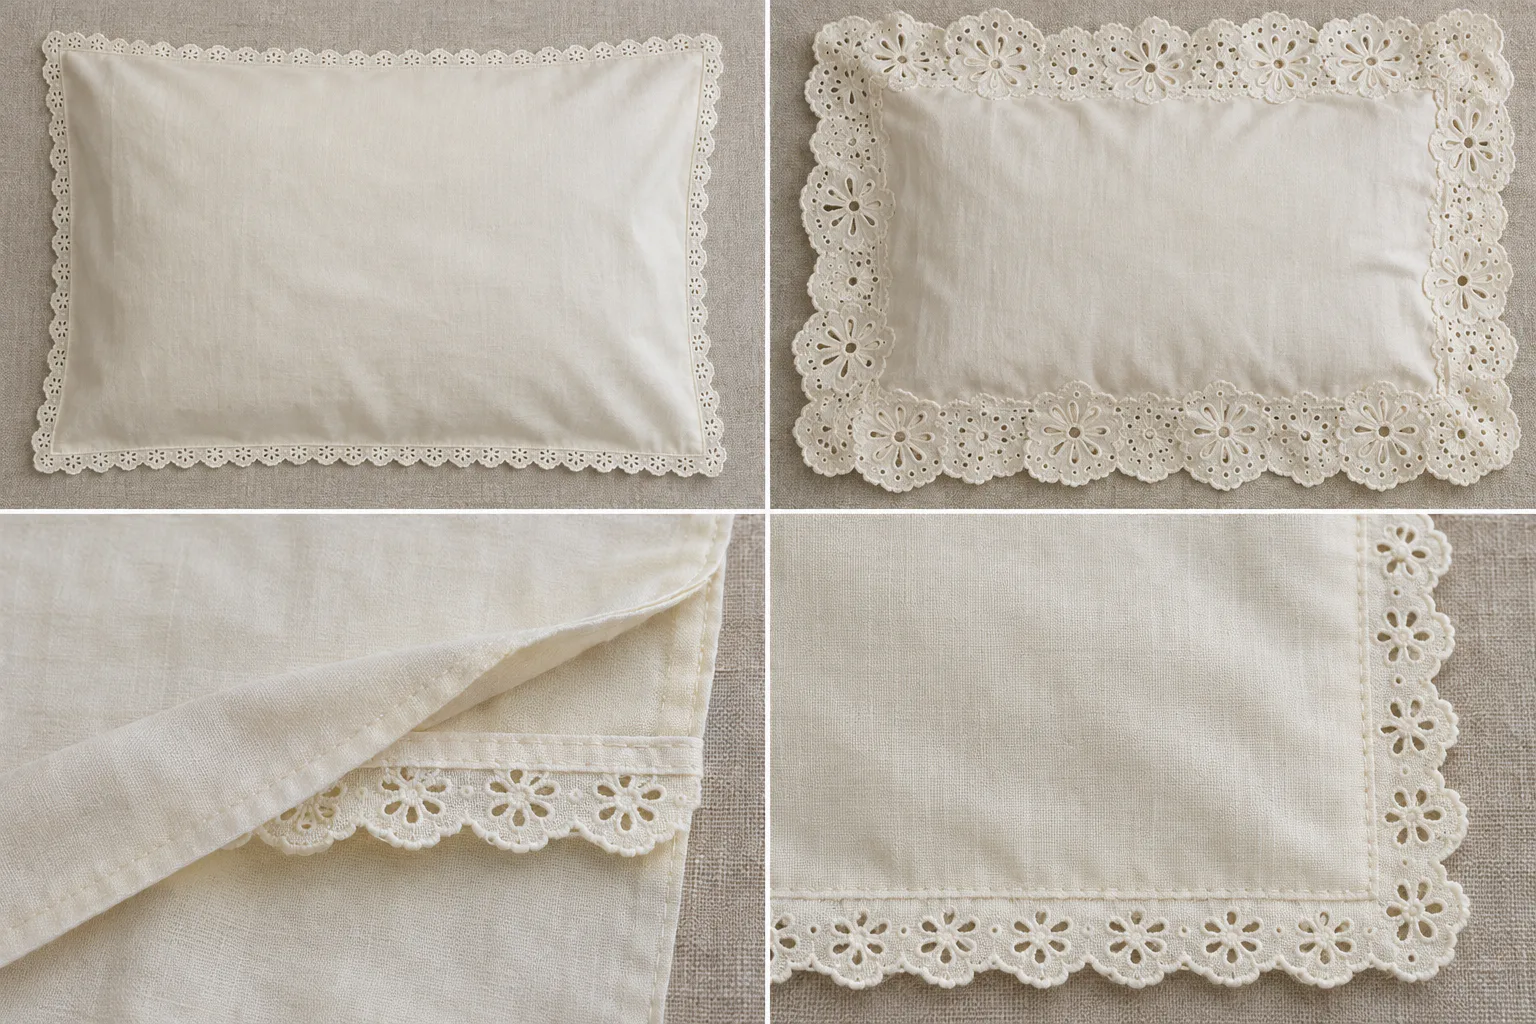
What you see | Try this first | When a different component is needed |
|---|---|---|
Large flowers disappear under the frame | Shift the frame on the full-size panel; compare two exposed widths. | The required placement always cuts the main motif and the design cannot move. |
Both ground and border compete for attention | Hold the ground constant and try a simpler or narrower border. | Reducing exposure hides the border’s recognisable motif. |
The filling or seam allowance shows through | Compare the actual lining colour beneath both layers. | The desired opacity cannot be achieved without an unacceptable change in handle or appearance. |
A white border looks stark beside cream fabric | Compare the assembled candidates under the agreed viewing lights. | The result misses the approved appearance; a shared colour name is not approval. |
The corner becomes thick or distorted | Compare a flat overlap with a separately developed mitred corner. | The selected material cannot form the required corner acceptably. |
For a teaching sample log, write: “The wide border covers the central daisy at the fixed frame position. Moving the frame would reduce the required centre area. Retain the frame position and try the narrower border.” That is a decision someone can act on. “The lace does not match” leaves the supplier guessing whether to change the colour, flower size or construction.
Use the sample to answer a question, not just to obtain a signature
Make the intended joint with the proposed front fabric, lining and border. Include one straight section, one complete corner and the actual border ends. Photograph the face and reverse before and after the agreed care procedure, with the sample laid in the same relaxed condition. Record the material references, seam construction and measured changes so that a replacement sample can be compared fairly.
If a seam ripples, note when it first appears. Rippling immediately after sewing calls for a sewing-room check of tension, feeding and construction; changes after care also call for checks on the components’ dimensional behaviour. Several causes can coexist. Coats’ seam-puckering guidance explains these distinctions. Adding extra order metres does not correct a distorted assembly.
Set the required appearance and measurement method before judging the sample: which flower must remain visible, which seam must lie flat, where the finished size is measured and what care procedure it must withstand. A numerical tolerance belongs to that agreed specification. Do not turn a teaching dimension or a photograph into a universal acceptance limit.
The worked order: 200 pillowcases, packed as 100 pairs
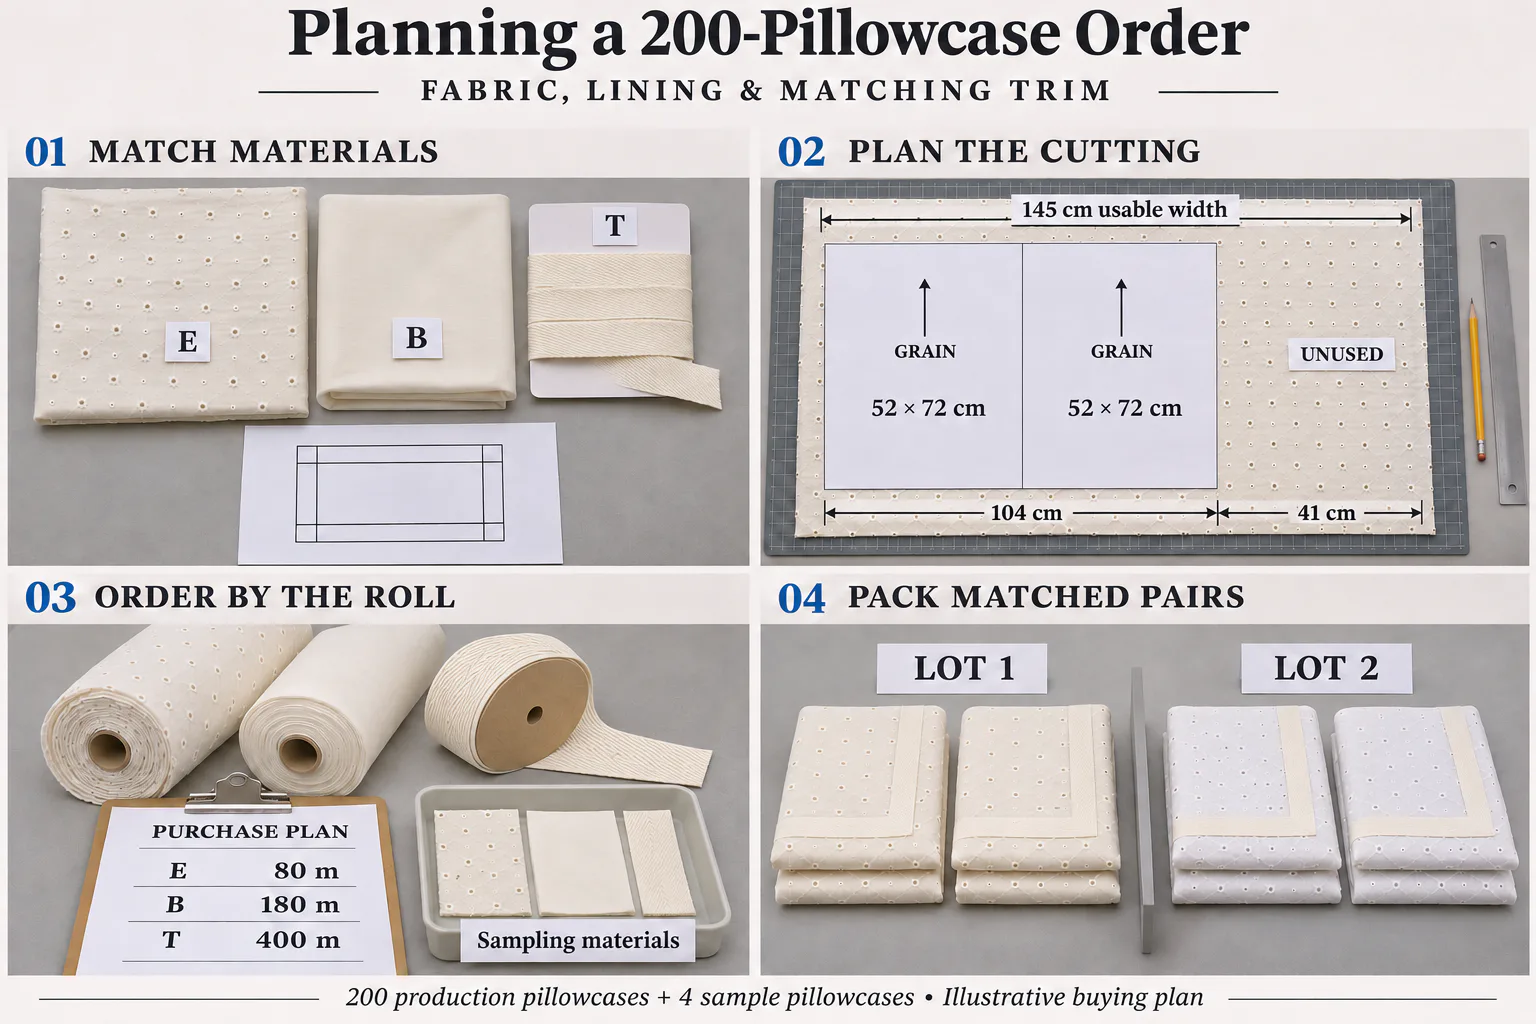
The brief is one colour, a finished body 50 cm high by 70 cm wide, a lined embroidered front, and a plain envelope back. The inset frame has an outside boundary 40 cm high by 60 cm wide, leaving 5 cm to each body edge. We use a straight-edged decorative band with a continuous 5 cm covering width and no requirement to centre individual flowers. All following cuts are specified in the agreed relaxed, cutting-ready condition.
Give the front and its lining a 1 cm seam allowance on all four sides: each becomes 52 × 72 cm. For each back piece, allow 1 cm at the outside seam and a total of 2 cm for the inner opening hem. A 52 × 44 cm cut therefore gives 50 × 41 cm after those allowances. Two 41 cm backs cover 70 cm with a 12 cm overlap: 41 + 41 − 70 = 12. The 12 cm is a chosen feature of this pattern, to be checked with the intended filling.
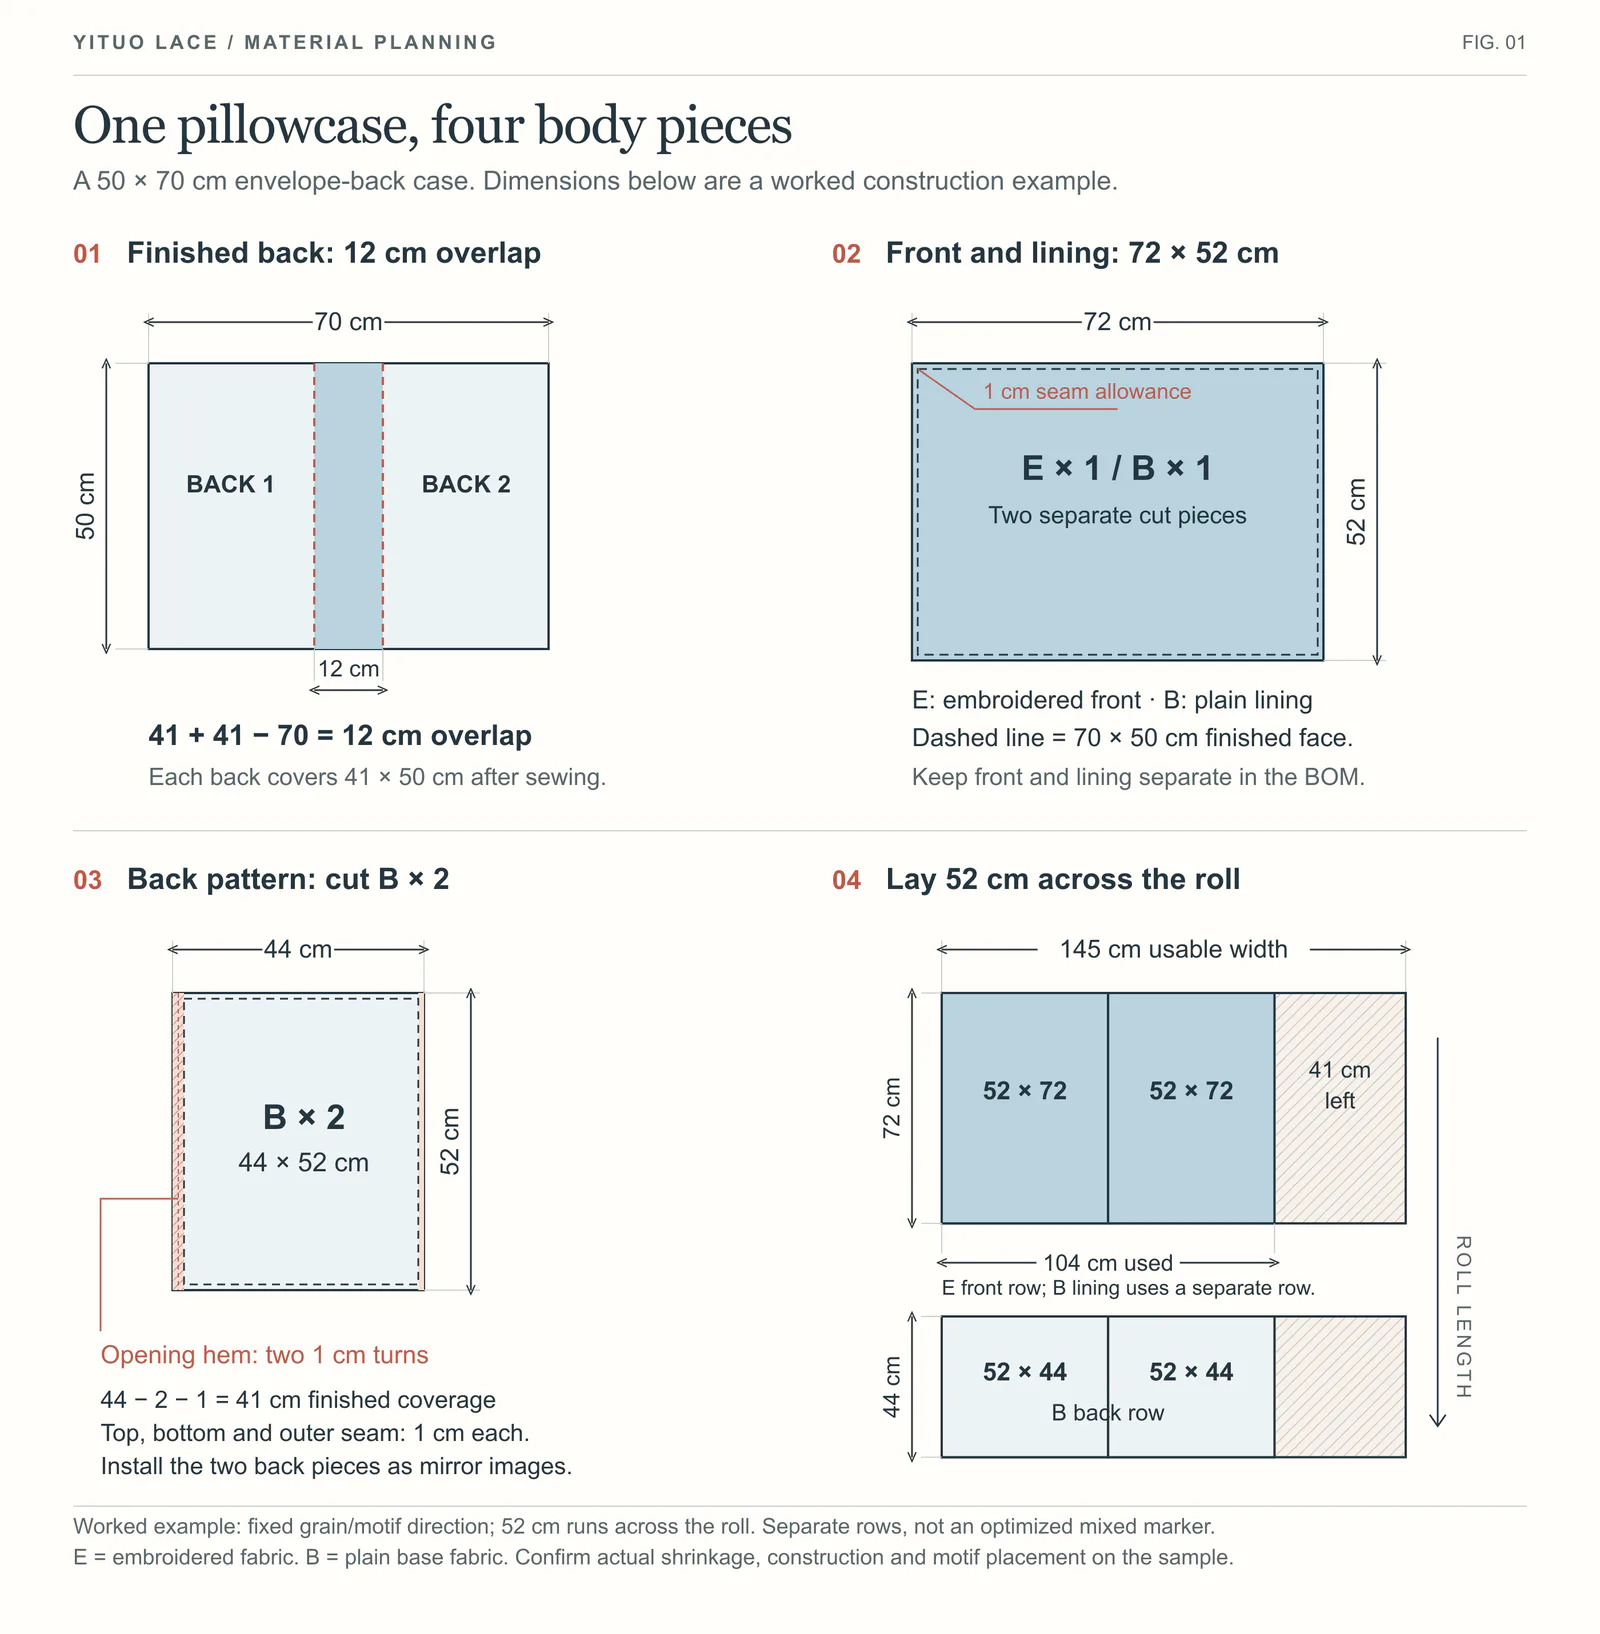
Component | Cut size / pieces per case | Pieces for 200 cases |
|---|---|---|
E — embroidered front | 52 × 72 cm; 1 | 200 |
B — plain front lining | 52 × 72 cm; 1 | 200 |
B — plain back | 52 × 44 cm; 2 | 400 |
T — horizontal frame band | 5 × 62 cm; 2 | 400 |
T — vertical frame band | 5 × 32 cm; 2 | 400 |
Why the frame needs 62 cm strips and 32 cm strips
The two horizontal bands run across the full 60 cm frame width. Turn each end under by 1 cm, so each cut is 62 cm. They cover the top and bottom 5 cm zones of the frame. Between them, the visible vertical length is 40 − 5 − 5 = 30 cm. Hide each vertical end 1 cm beneath a horizontal band, so each vertical cut is 32 cm. One case needs 2 × 62 + 2 × 32 = 188 cm.
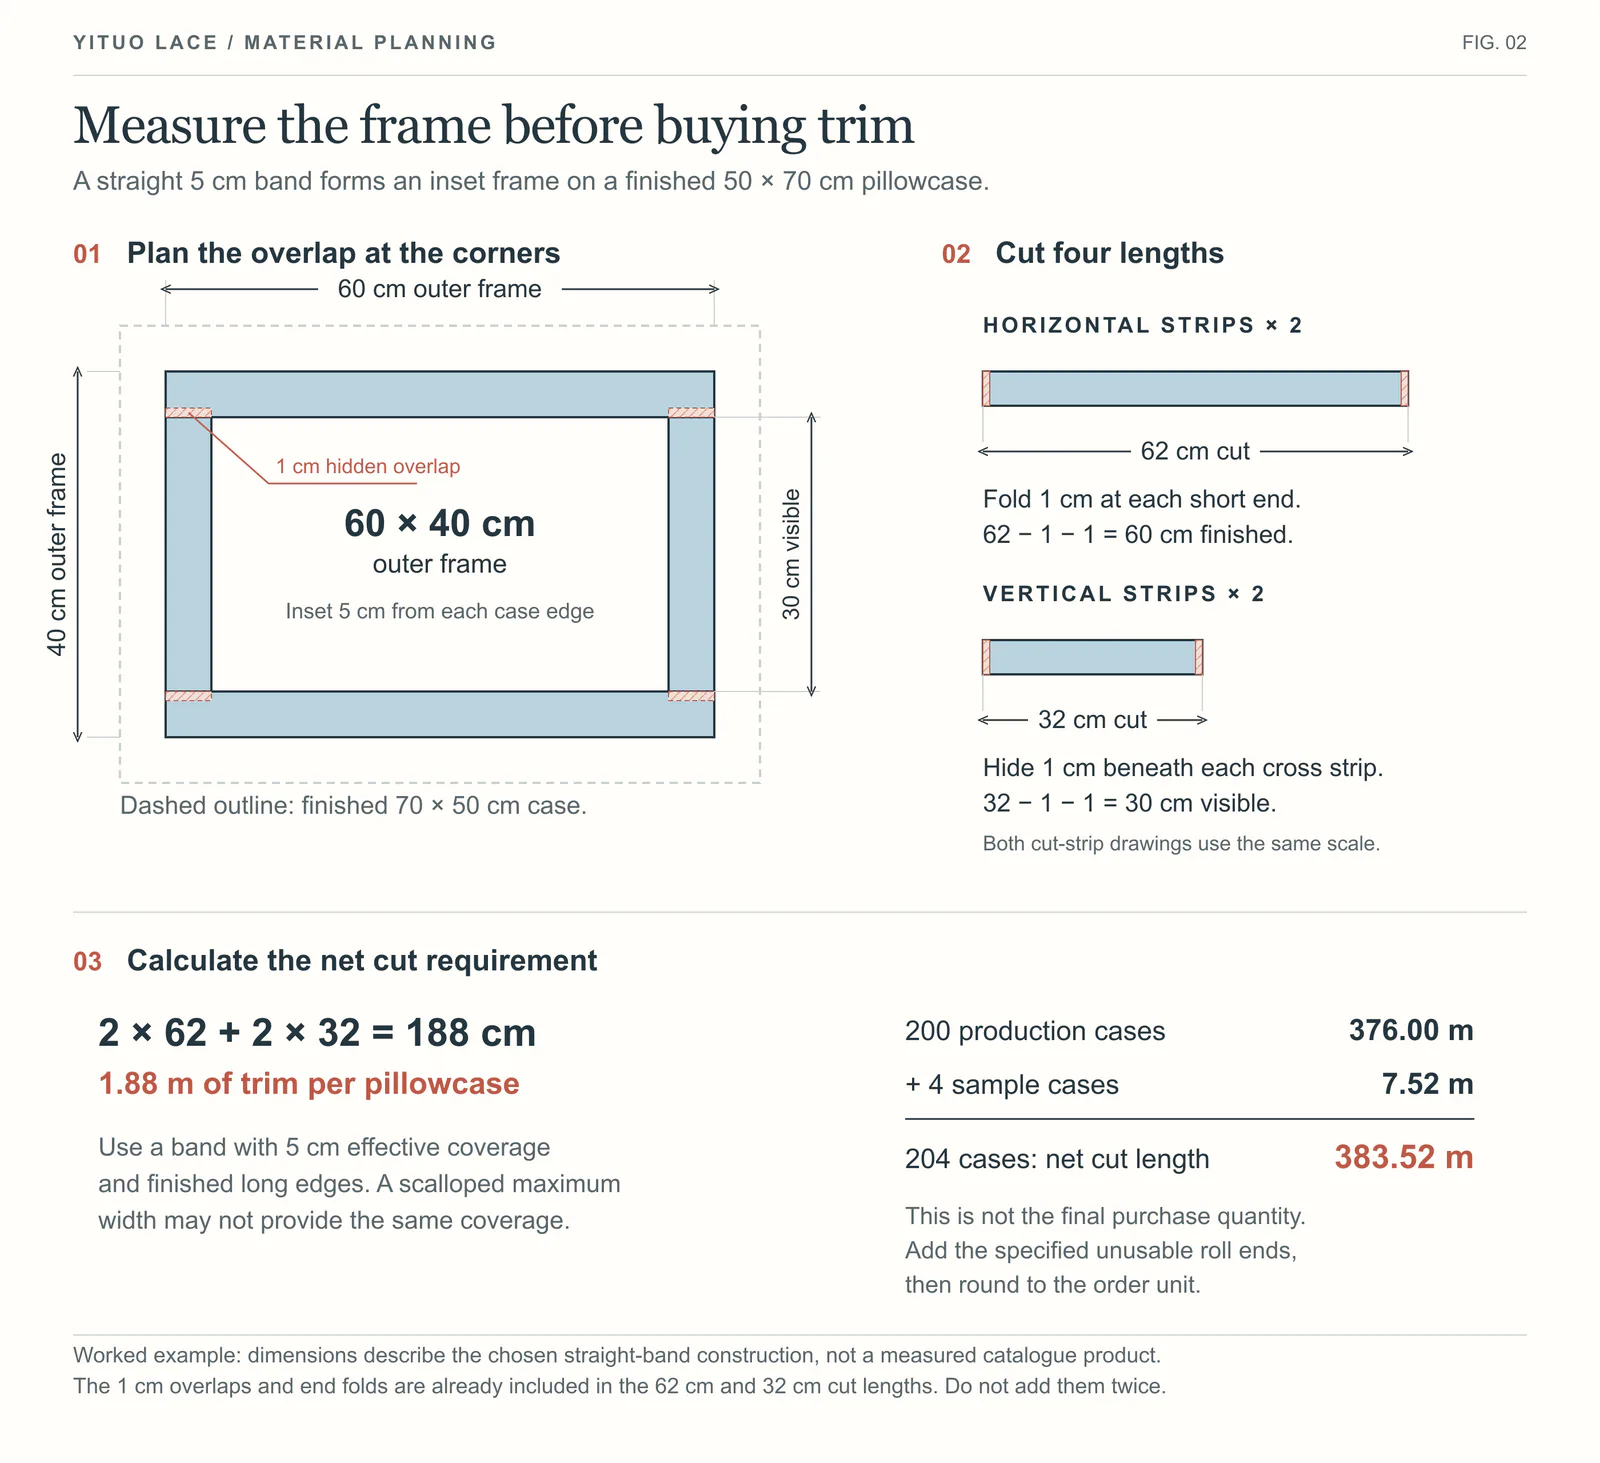
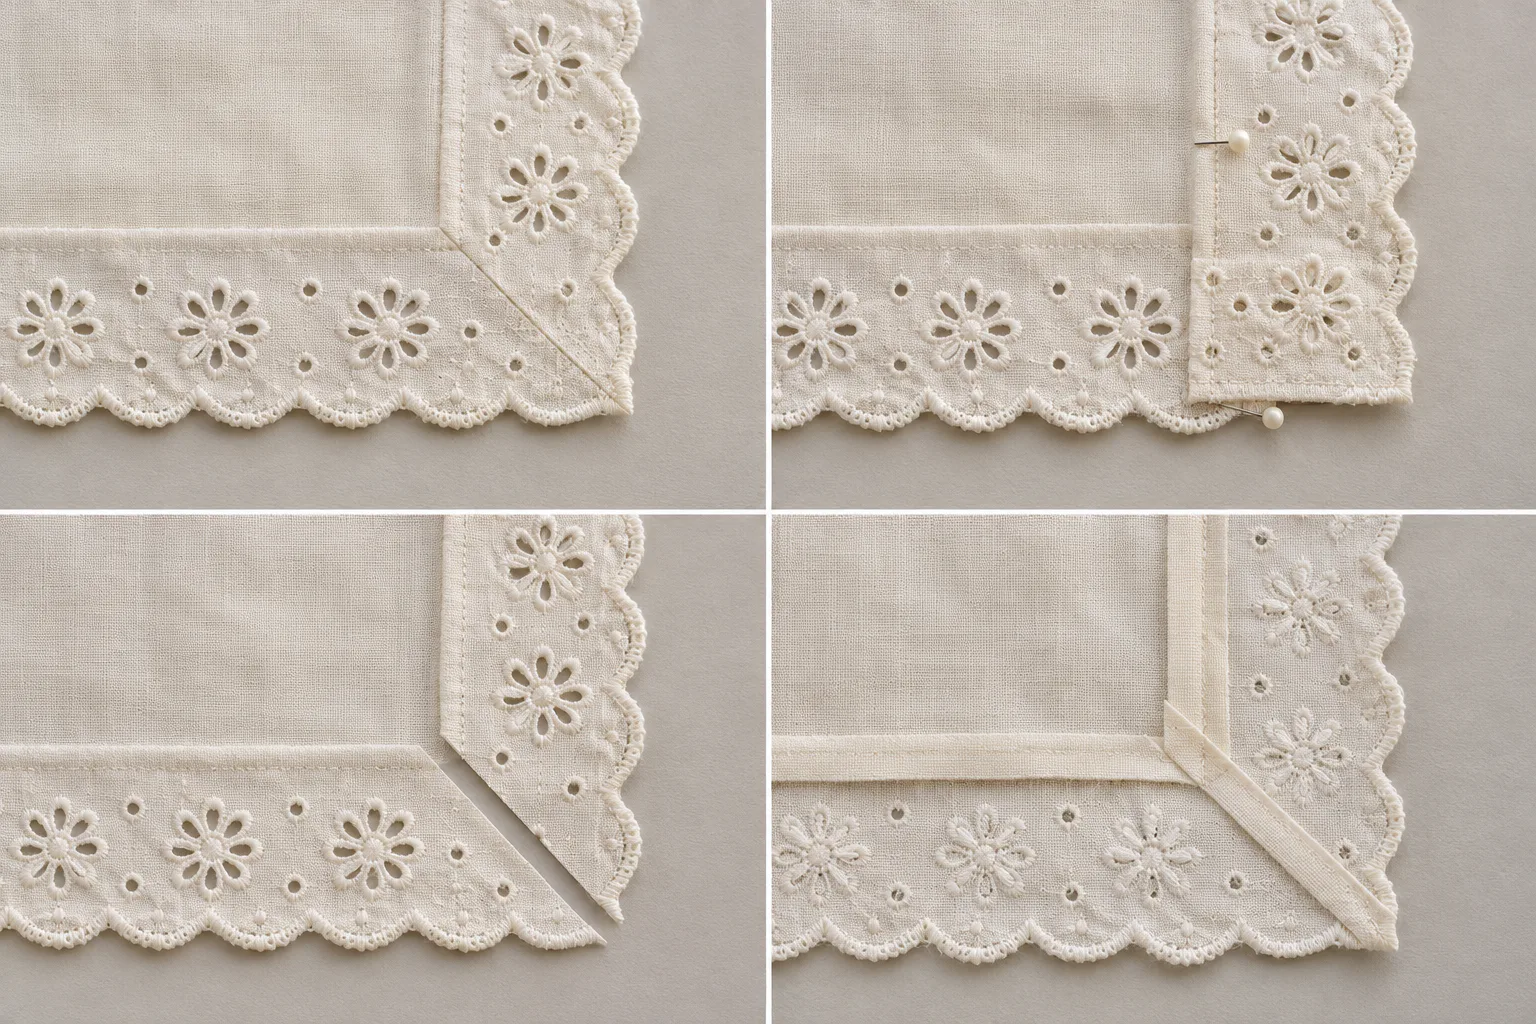
Mark the frame on the flat front. Position the vertical pieces first, then the horizontal pieces over their ends, and secure the bands using the sampled stitch arrangement. Check that the covered cut ends remain enclosed when the corner is handled. In this example the frame is attached before the front and lining are joined at the perimeter; the back opening hems are prepared before the body is assembled. A change in sewing order that catches the lining beneath the frame needs its own sample.
This corner has a visible right-angle overlap and a local double layer. It suits a design that accepts that junction and a material that can cover the ends cleanly. It is unsuitable when the brief demands an uninterrupted motif turning around the corner, an open band that exposes the hidden cuts, or a seamless-looking outer flange. In those cases, change the corner construction before recalculating length.
Turn the component list into metres, with a visible layout
For the example, both E and B have 145 cm confirmed usable width. Keep 72 cm and 44 cm in the roll direction. The embroidered fronts keep the specified motif direction but do not require a flower at a fixed centre point or additional spacing for motif alignment; the plain B fabric has no placement constraint. Across the width, two 52 cm pieces use 104 cm, leaving a 41 cm strip. Three would need 156 cm and do not fit. Front and back rows are planned separately here; the result is a feasible layout, not a claim of minimum possible consumption.
Material / part | Rows and length per row | Base requirement |
|---|---|---|
E: 200 fronts | 200 ÷ 2 = 100 rows; 0.72 m | 72 m |
B: 200 linings | 200 ÷ 2 = 100 rows; 0.72 m | 72 m |
B: 400 backs | 400 ÷ 2 = 200 rows; 0.44 m | 88 m |
B subtotal | Lining + backs | 160 m |
T: 400 long + 400 short bands | 400 × 0.62 + 400 × 0.32 | 376 m |
The 41 cm side strip is already part of these purchased fabric metres. Do not add another percentage because the layout shows an unused margin. Credit that strip against another component only after a second layout shows that the required size, direction and motif fit. The same principle applies to the lining: omitting it would make the bill shorter while changing the product.
From base demand to a roll-by-roll purchase plan
Add four complete pre-production samples, kept outside the 200 saleable cases. That requires another 1.44 m of E, 3.20 m of B and 7.52 m of T. Next add only the specified unavailable roll-end material in this example. These are separate records: sample use is planned consumption; unusable ends cannot be cut into samples or saleable pieces.
Material | Base + 4 samples + listed ends | Purchase / unallocated length |
|---|---|---|
E — embroidered fabric | 72 + 1.44 + 1 = 74.44 m | 2 × 40 m = 80 m / 5.56 m |
B — plain cotton | 160 + 3.20 + 3 = 166.20 m | 9 × 20 m = 180 m / 13.80 m |
T — decorative band | 376 + 7.52 + 4 = 387.52 m | 8 × 50 m = 400 m / 12.48 m |
The teaching delivery list specifies 0.5 m unavailable at the ends of each E roll and each T roll. For B, it lists 0.3 m on each of the first eight rolls and 0.6 m on the ninth. Those figures are invented delivery conditions for this calculation, not standard waste rates. Substitute the actual roll inspection records when placing an order.
A total is not enough: the pieces must fit each continuous roll. E’s two rolls can supply 54 and 48 rows of fronts. For B, rolls 1–3 each supply 27 lining rows; roll 4 supplies 21 lining rows plus 10 back rows; rolls 5–8 each supply 44 back rows; roll 9 supplies 18 back rows. These give exactly 204 linings and 408 backs, within each roll’s usable length.
For T, cut 26 complete case kits from each of the first seven rolls and 22 kits from the eighth. A kit contains two 62 cm bands and two 32 cm bands. The first rolls each use 26 × 1.88 = 48.88 m, within 49.5 usable metres. This supplies 204 kits. It works because this frame has no fixed flower-start requirement; centred flowers would require a different cutting plan.
The material order therefore reads: E 80 m, B 180 m and T 400 m, in the specified formats and approved combinations. Threads, labels and packaging remain separate purchase lines. The balance lengths above are not guaranteed spare pillowcases: some are split across rolls, and a complete spare also needs every other component.
Colour approval determines which pieces may share a set
A hypothetical trial illustrates the decision. F1 is a cream embroidered front; T2 has a cooler white appearance. On the assembled face, that contrast is stronger than the buyer’s selected sample. Moving the frame does not remove it. The buyer retains the tonal design and rejects this combination, while three other pairings meet the selected appearance. This is a stated design judgement, not a claim that contrast is always wrong.
For a separate allocation exercise, suppose complete body kits are F1: 180 and F2: 120, and complete frame kits are T1: 100 and T2: 200. F1 accepts only T1; F2 accepts either trim lot. Reserve all 100 T1 kits for F1, then use 120 T2 kits for F2. This allocates the material kits for 220 cases; sewing and finished-product acceptance remain separate. If T1 is used on F2 first, fewer of the otherwise usable F1 bodies can be completed.
Body material | T1: 100 trim sets | T2: 200 trim sets |
|---|---|---|
F1: 180 body sets | Approved together | Not approved |
F2: 120 body sets | Approved together | Approved together |
Return to the 200-case order. Suppose final inspection leaves 101 cases in appearance group A and 99 in group B, and a pair must remain within one group. Packing yields 50 + 49 = 99 pairs, with one unmatched case in each group. A packing plan should therefore reserve matching pairs while production is allocated, rather than discover the imbalance at the last carton.
When a material runs short, compare the consequences
Imagine the frame inspection leaves material for only 190 of the 200 saleable cases. Ten more kits need 10 × 1.88 = 18.8 m of suitable continuous band. The examples below use teaching prices: existing approved stock costs $2 per metre, and a separately approved alternative costs $2.40. Freight and any tax are excluded so that the material decision remains visible.
Option | Teaching material calculation | Decision condition |
|---|---|---|
Buy one 50 m roll of the approved design | 50 × $2 = $100; 31.2 m remains before any further losses. | Keep the design; confirm the available lot matches and timing is acceptable. |
Use an alternative sold by the metre | 20 × $2.40 = $48; plus a stated $30 trial = $78. | Only if approved, with the same 5 cm covering width, corner method and 62/32 cm cuts, without fixed flower placement. The 20 m is net usable and cuts ten kits; the $30 includes separate trial material. |
Agree a split shipment | 190 cases = 95 complete pairs now; 5 pairs later. | Requires customer agreement and enough matched sets; it defers the missing material rather than removing its cost. |
If one appearance is required throughout the order, the alternative is excluded unless the buyer accepts the change. If distinct groups are allowed and the replacement passes the construction check, its lower immediate outlay may be useful, but the two groups still need separate packing. A cheaper strip is not a saving when it creates unsaleable mixed pairs.
A wider fabric can cost less per usable panel
Here is a separate, deliberately simple insert layout. Each rectangle is 40 cm across by 50 cm along the roll, including allowances, with fixed direction and no placed motif requirement. A 125 cm usable width fits three pieces: 3 × 40 = 120 cm, leaving 5 cm. A 115 cm width fits two, leaving 35 cm; a third would need 120 cm. These dimensions explain the yield rather than assuming it.
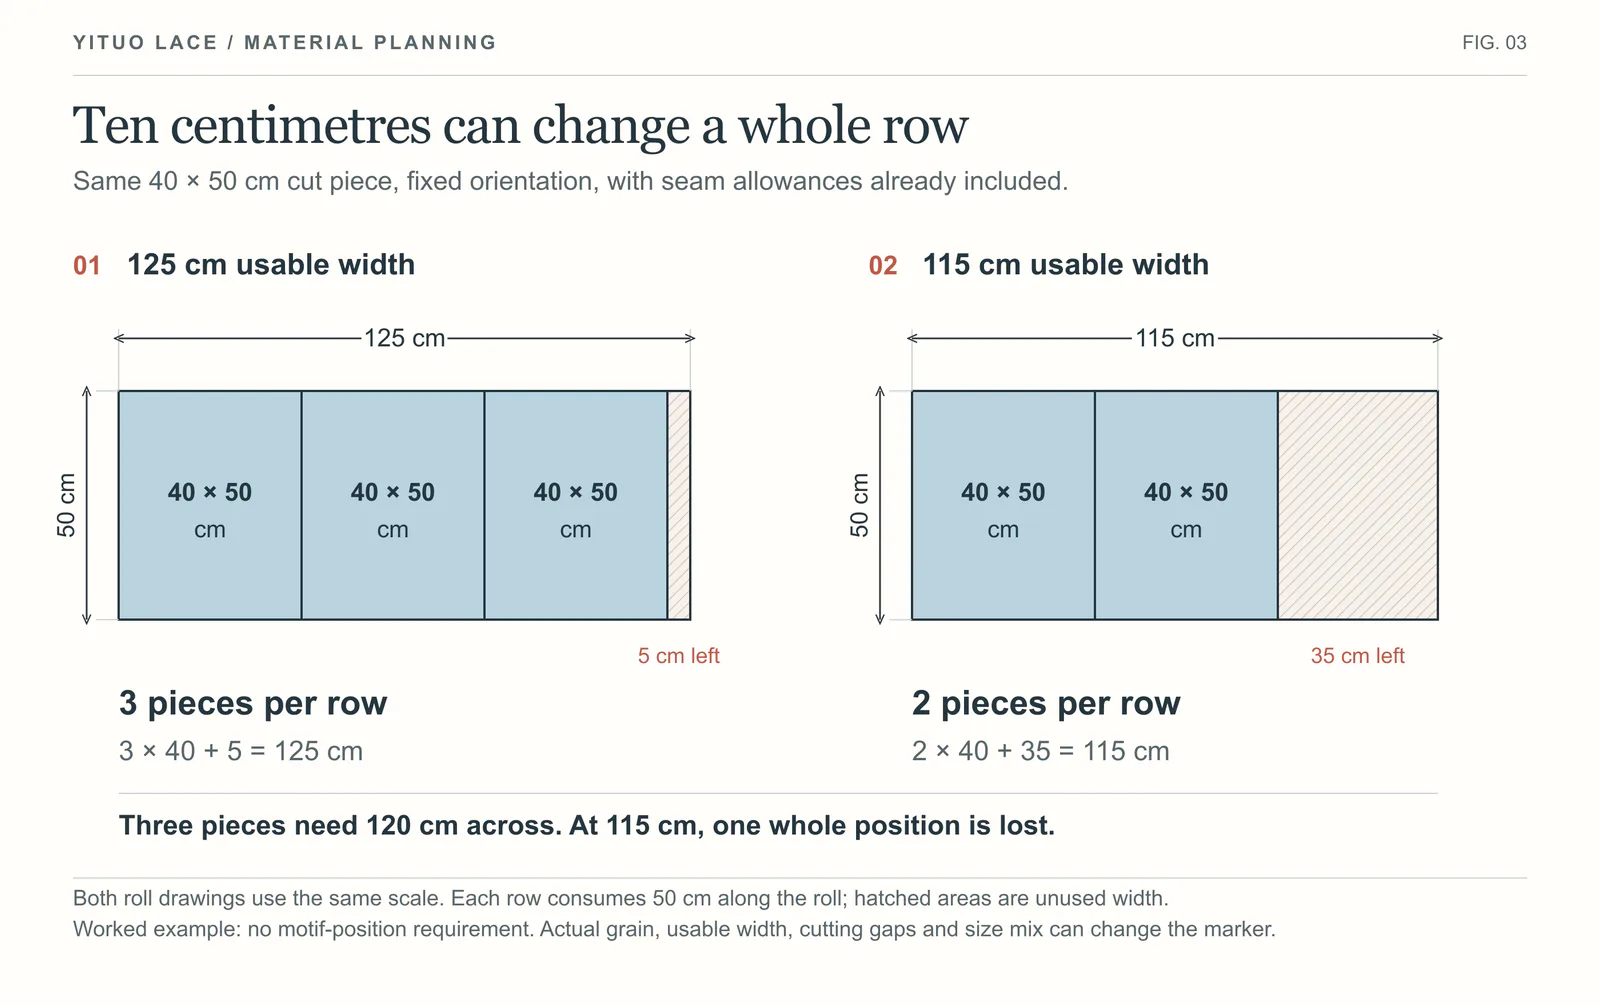
For 400 ivory and 200 black inserts, take whole rows separately by colour. The first material needs (134 + 67) × 0.5 = 100.5 m; the second needs (200 + 100) × 0.5 = 150 m. At illustrative prices of $10 and $8 per metre, their basic material amounts are $1,005 and $1,200. The wider option is $195 lower for this layout. This does not include extra sampling, unusable lengths, supply increments or other charges.
Continuous lengths and flower positions can change the result again
Suppose 40 garments each need one uninterrupted 54 cm neckline strip. The 54 cm cut already includes the approved allowances, and no extra join is permitted inside it. Inspection finds six separate 320 cm usable segments and one 480 cm segment. Defects, splices or roll ends separate them. For this simple case no additional flower centring is required.
Continuous usable segment | Number of segments | Whole 54 cm strips per segment | Total strips |
|---|---|---|---|
320 cm | 6 | 5 | 30 |
480 cm | 1 | 8 | 8 |
Total: 24 m | 7 | — | 38 |
The nominal need is 40 × 0.54 = 21.6 m, yet the inspected stock gives only 38 strips. Its 3.48 m of remainders is scattered into pieces too short for another neckline. Obtain two more acceptable 54 cm pieces, or enough continuous stock to cut them. Changing to a joined neckline is a construction decision that needs approval and its own allowance—not a way to erase the shortage on paper.
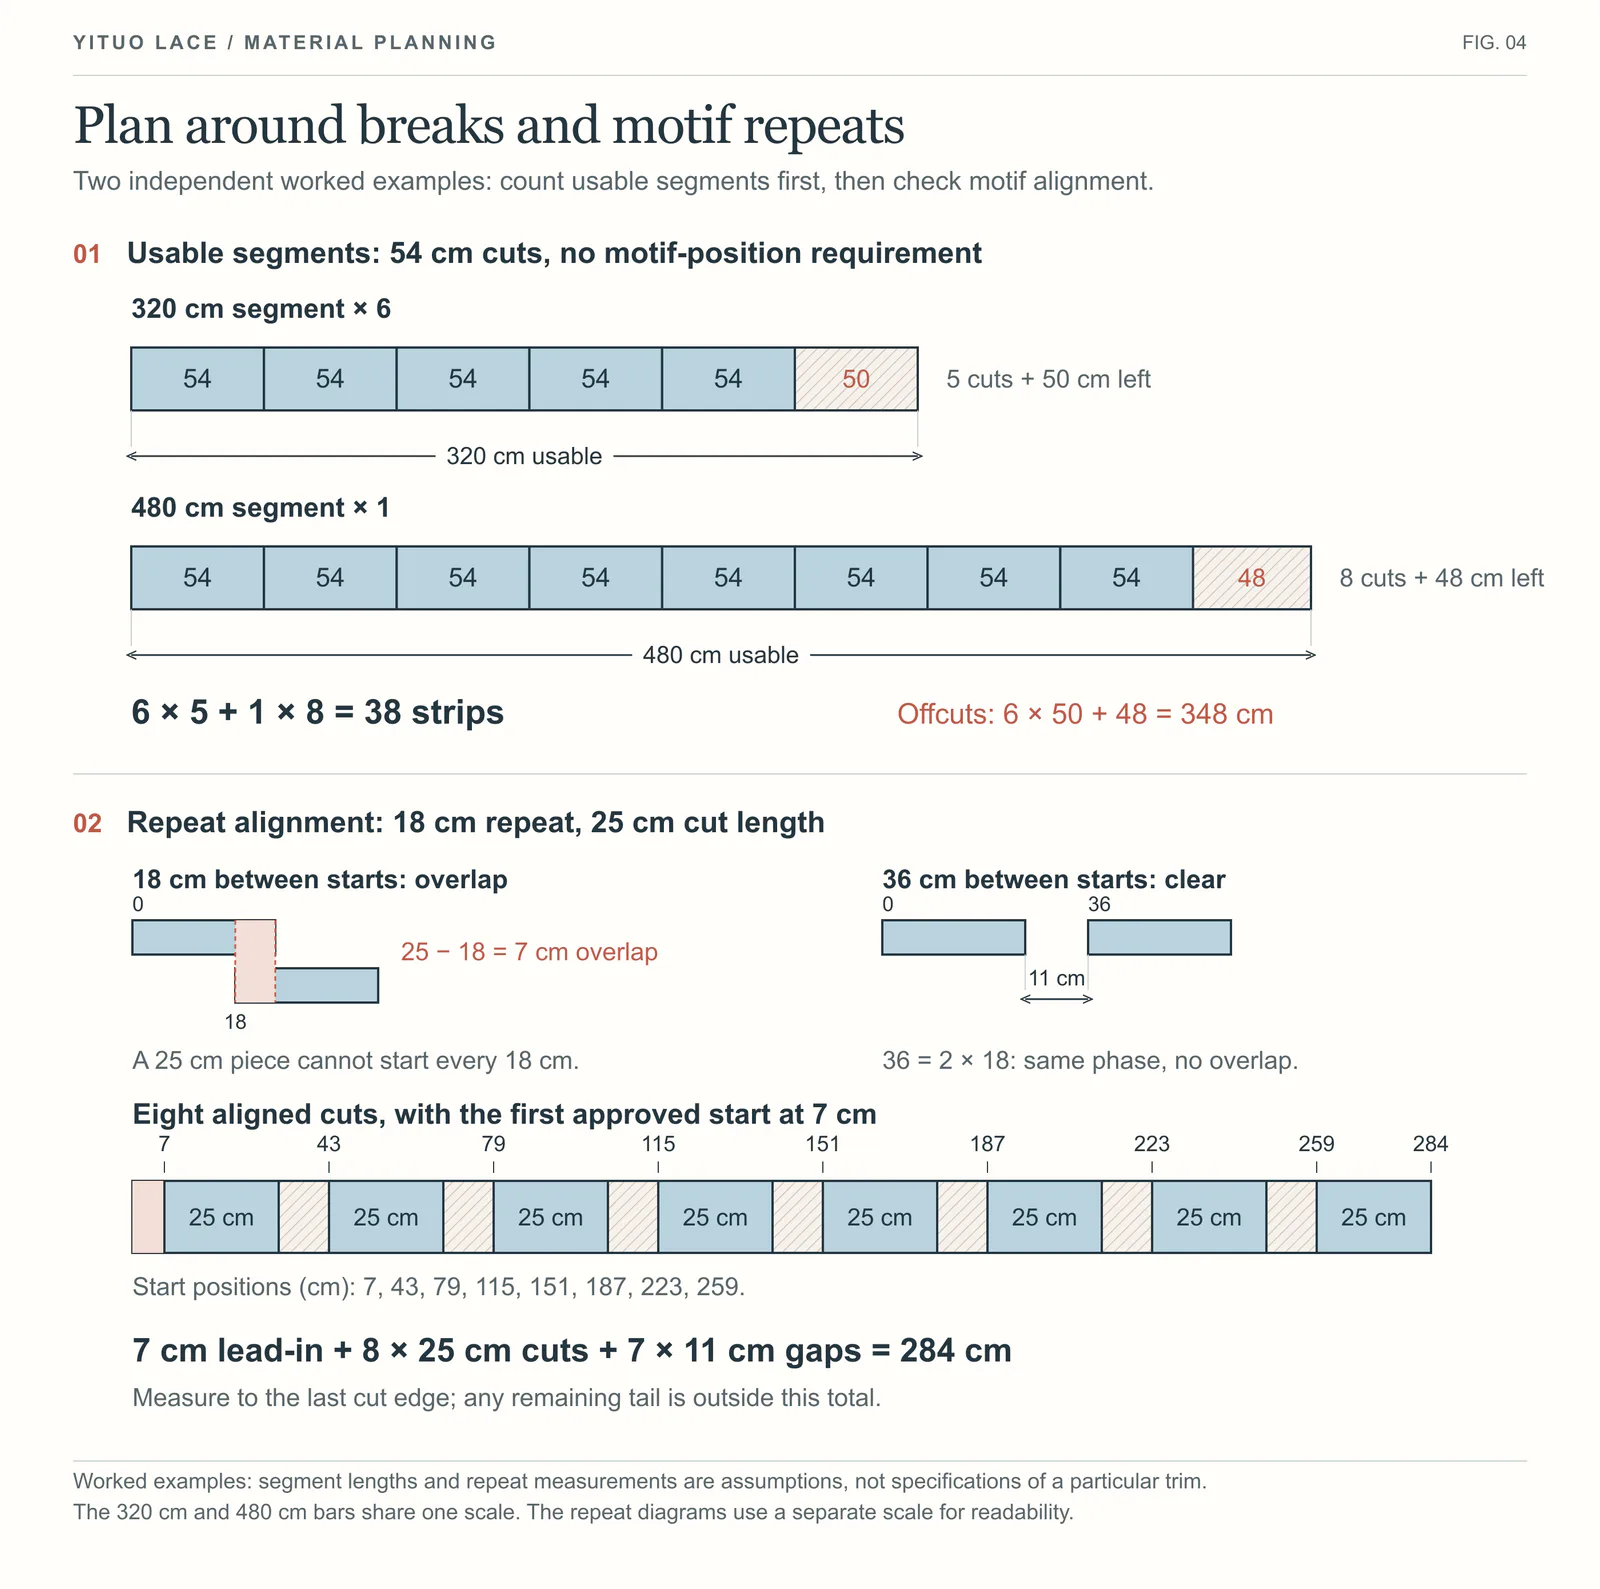
Flower placement adds a different kind of spacing. Suppose eight 25 cm strips must all start at the same flower position on a trim repeating every 18 cm. A checked straight layout starts cuts every 36 cm: 18 cm is too close, while 36 cm is the next matching position beyond the 25 cm cut. If the first acceptable start is 7 cm from the roll end, the span to the last cut is 7 + 7 × 36 + 25 = 284 cm, compared with 200 cm of finished cut pieces. The seven 11 cm gaps and 7 cm lead-in explain the extra 84 cm; they are not an unexplained waste percentage.
If the brief allows the motif to float within the strip, this particular 36 cm start spacing may be unnecessary. If centring is essential, buy for the checked positions. Allocate the gaps to smaller components only when their size, shade and motif also qualify; never credit the same offcut to two different uses.
A garment order adds size and handedness to the same logic. Record the installation line, cut length and end treatment for each cuff size; do not multiply the medium sample length by every garment. For left/right motifs, keep each pair in one kit and count usable pairs, not total flowers. A mirror-image photograph does not prove that a fabric can simply be turned over to supply the missing side.
What the final purchase sheet should let you decide
For the worked pillowcase, the buyer can now order three material lines, identify the exact cut pieces and demonstrate that the rolls can supply the cut components for 200 planned saleable cases plus four samples. Finished-product acceptance is a separate check. Before cutting, attach the approved combination, the pattern revision and the roll allocation. Before packing, verify that there are 100 acceptable pairs. If one check fails, change the affected material, layout or delivery plan and recalculate that part of the order.
For the material structures, see the eyelet lace guide. For a more detailed order breakdown, use the width, size and quantity planning guide, adjusting its stretch-lace examples to your construction. The bulk-production approval guide explains how to keep the final sample and purchase documents connected.
Discuss a real requirement
Turn the reading into a practical next step.
Send a short note, product reference, photograph, swatch or tech pack. Technical feasibility, sampling, documentation and production terms are confirmed after review.
Related products: 5cm Daisy Chain 100% Cotton Eyelet Lace Trim for Casual Dress & DIY Craft · Ivory Daisy and Ring Cotton Eyelet Fabric — 150 cm for Blouses & Dresses · Ivory Daisy Motif Nylon-Rayon Lace Fabric — 150 cm for Dresses & Overlays
Start an inquiry