
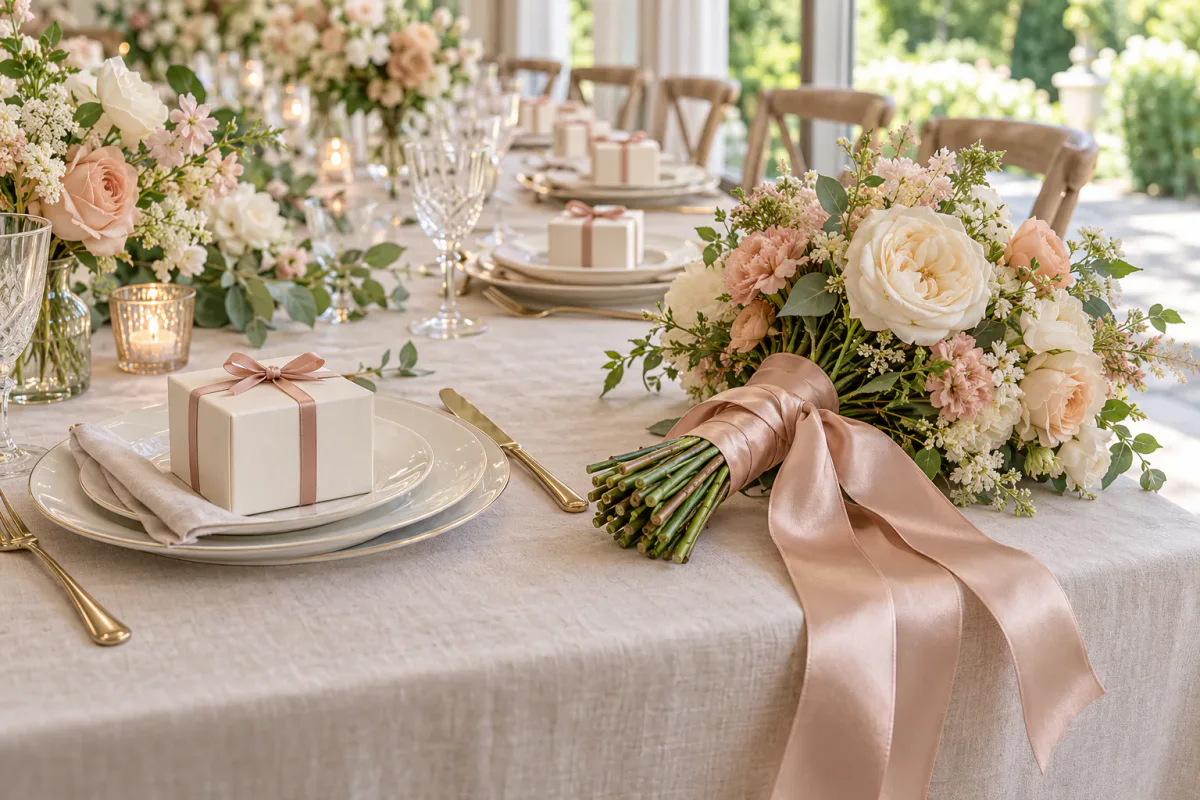
Separate ribbon width, bow size and pattern size
A 25 mm ribbon can make a compact bow or a wide, loose one. It can carry a small logo or artwork that fills nearly the whole band. These are separate dimensions, so name each one when discussing the design.
Measurement | What to measure |
|---|---|
Ribbon width | Across the ribbon, from one edge to the other |
Box or display surface | The visible area that the ribbon will cross |
Finished bow width | From the outermost loop on one side to the outermost loop on the other |
Pattern height | The size of the logo or motif across the ribbon width |
Pattern repeat | The distance along the ribbon from one design to the same point in the next |
Common ribbon widths and where to start
Use this table to pick two or three widths to try. The ranges reflect nearby sizes you may find in different collections—for example, 15 mm satin and 16 mm grosgrain. Order the actual size offered in the chosen material and color.
Widths to compare | Useful starting applications | What to look for |
|---|---|---|
3–6 mm | Gift tags, cards, small bag ties | A fine accent and a knot that fits the attachment point |
9–10 mm | Small favors, jewelry boxes, delicate bows | Enough color to be visible without covering much of the package |
12–16 mm | Invitations, small gift boxes, napkin ties | Space for the ribbon beside names, dates or labels |
22–25 mm | Gift wrapping, bouquet handles, medium bows | A visible band that still leaves room for the rest of the arrangement |
35–40 mm | Gift sets, larger boxes, fuller-looking bows | The band, loops and tails together, especially near a label |
50 mm or 2½ in (63.5 mm) | Hamper bows, wreath accents, larger decorations | Loop shape and support as well as width |
70–100 mm | Large display bows and event styling | The effect from the viewing distance, plus space for the finished bow |
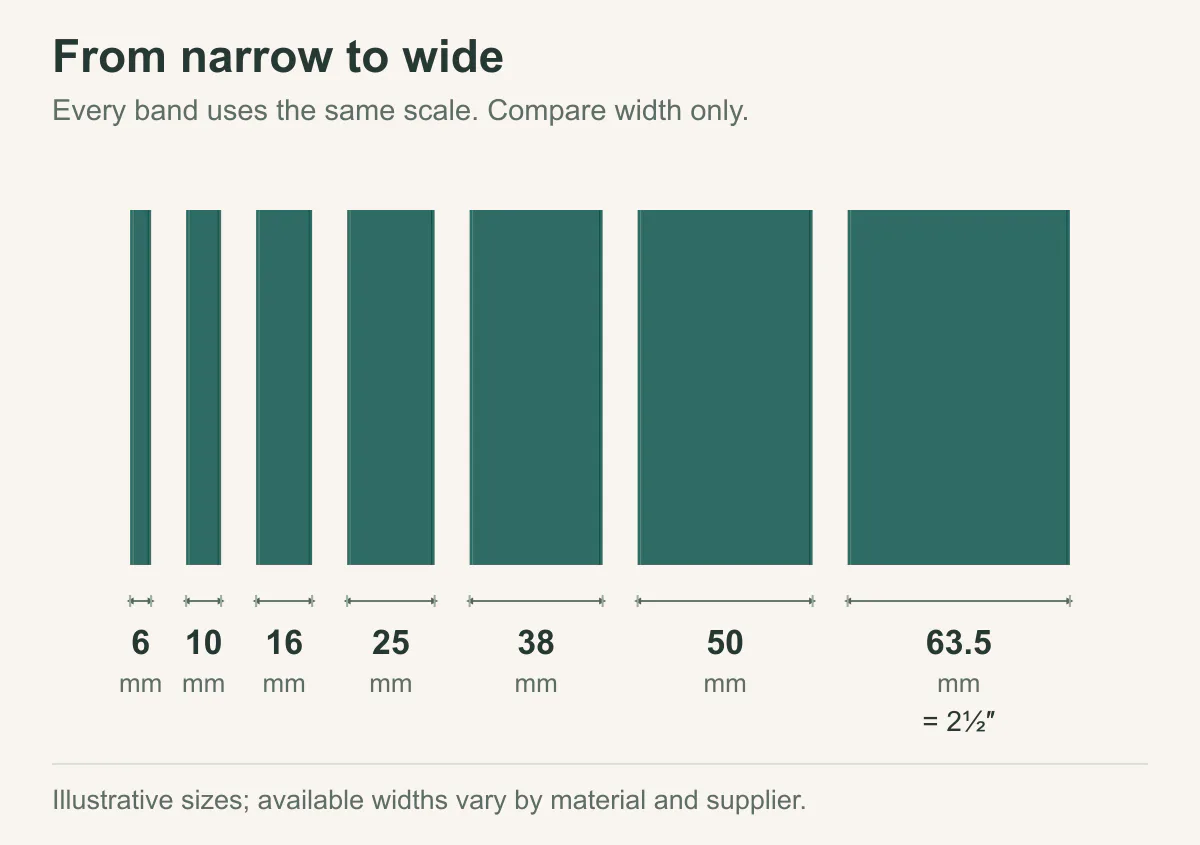
All bands use the same drawing scale. Screen and print size will vary; use a ruler on the actual ribbon.
Reading inch and millimeter sizes
One inch is exactly 25.4 mm. A 25 mm ribbon is close to 1 inch; 38 mm is close to 1½ inches. Keep the supplier’s stated size on the order. In particular, ⅞ inch is about 22.2 mm, so it is noticeably narrower than a 25 mm ribbon.
Inch size | Metric conversion |
|---|---|
¼ in | 6.35 mm |
⅜ in | 9.525 mm, about 9.5 mm |
½ in | 12.7 mm |
⅝ in | 15.875 mm, about 15.9 mm |
⅞ in | 22.225 mm, about 22.2 mm |
1 in | 25.4 mm |
1½ in | 38.1 mm |
2 in | 50.8 mm |
2½ in | 63.5 mm |
3 in / 4 in | 76.2 mm / 101.6 mm |
Match ribbon width to the visible box surface
Look at the part of the lid that the band crosses. On a 300 × 220 mm lid, a ribbon running along the 300 mm side takes up part of the 220 mm width. Keep that route fixed while comparing widths; moving the band can change the whole design even when its width stays the same.
To compare the bands, divide the ribbon width by the lid dimension across it. The percentages below show how much space each option takes; they are not targets to achieve. The examples use proposed box dimensions, with the bow considered separately.
An 8 cm jewelry box: a fine line or a broad band
On an 80 × 80 × 30 mm jewelry box, try 10 mm first if you want a fine accent beside an embossed name. It takes up 12.5% of the lid width. A 25 mm ribbon covers 31.25% and becomes a strong band of color—useful on a plain box where the ribbon is meant to lead the design.
Tie the bow before choosing the broader option. On a small box, the knot and loops may become the biggest part of the package. If it will travel inside a shallow outer carton, close the carton once to see whether that shape survives.
A 30 × 22 cm clothing box: compare three widths
For a 300 × 220 × 50 mm clothing box, start with 25 mm if the lid has an illustration you want to show. On a plain lid, compare 38 and 50 mm for a stronger ribbon-led design. Lay the same color and material along the 300 mm direction so the difference you see is mainly width.
Ribbon width | Share of the 220 mm lid width | Visual effect |
|---|---|---|
25 mm | About 11.4% | A relatively slim band, leaving more of the lid exposed |
38 mm | About 17.3% | A stronger stripe with more room for a motif |
50 mm | About 22.7% | A broad color panel that becomes a main part of the design |
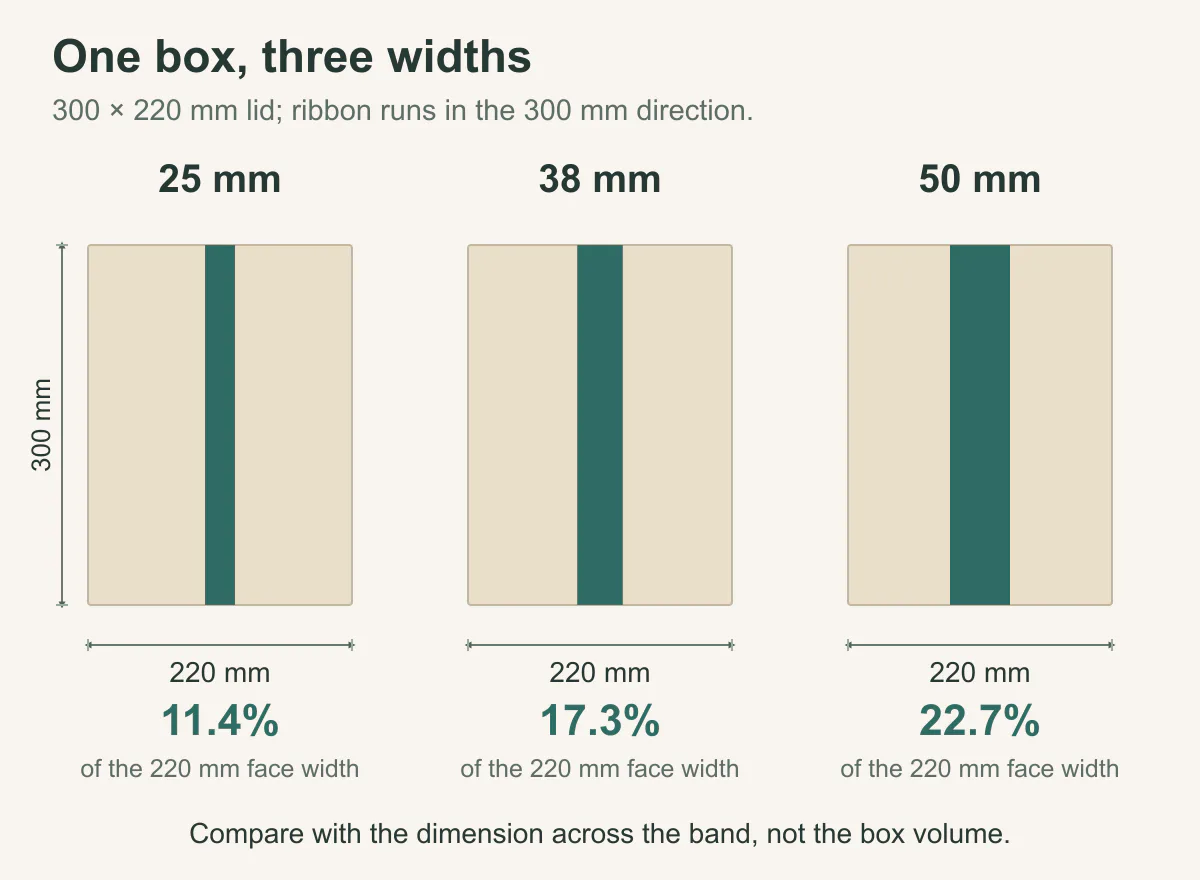
Same lid, same direction, different band widths. Percentages compare a single band with the 220 mm dimension.
Then add the bow in its intended position. A slim band can still carry a large bow, so the strip comparison is only the first part of the choice. If a loop hides the illustration, shorten the loop or move the knot before changing ribbon width again.
A 40 × 30 cm hamper box: check the whole arrangement
On a 400 × 300 mm hamper lid, compare 50 mm and 63.5 mm (2½-inch) bands for a substantial accent. They cover about 16.7% and 21.2% of the 300 mm width. If the lid has a window, place the bands around that opening; a broad ribbon across the center can hide the contents you wanted to display.
For a food hamper where the contents matter most, a narrower side band and small knot may work better than either broad option. Use the large bow when the wrapped gift itself is the display. Box size gives you room to work; it does not require you to fill that room with ribbon.
Leave room for labels, windows and printed details
For a 120 × 120 mm candle-box lid with a centered 70 × 70 mm label, try a 16 mm band beside the label. Running any band through the center would hide the wording. The blank strip on either side is 25 mm wide, calculated as (120 − 70) ÷ 2.
Centered in that side strip, the 16 mm ribbon leaves 4.5 mm on each side. A 25 mm ribbon fills the entire strip, leaving no space between its edge and the label. The narrower choice therefore gives you more room to place the band neatly.
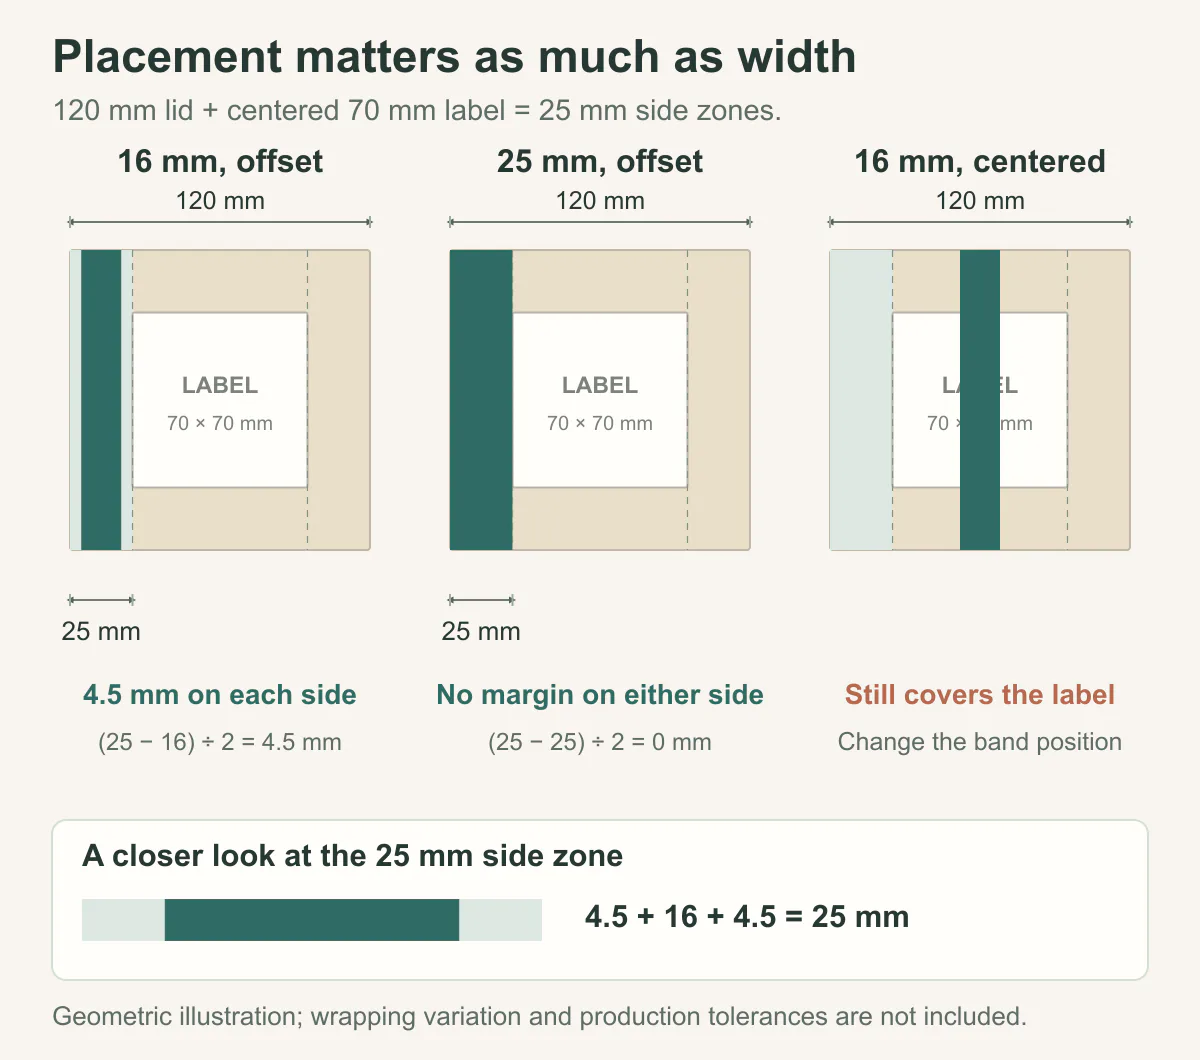
Side placement avoids the label. The 4.5 mm gaps are calculated clearances, not a production tolerance.
Lift and handle the wrapped box to see whether the band stays in place, then add the bow. Its loops and tails need to stay clear too. If 25 mm is important to the design, give it a wider blank area or choose a different route.
Match the finished bow to the box
Ribbon width controls how broad each loop looks. Loop length controls how far the bow reaches across the box. Extra loops add fullness; tails can hang beyond the lid. This is why two bows made from the same 25 mm ribbon can have very different proportions.
On a 200 mm-wide lid, a centered 100 mm bow leaves 50 mm at each side. A 160 mm bow leaves 20 mm, while a 240 mm bow overhangs by 20 mm on each side. Measure across the outermost loops; the tails have their own length.
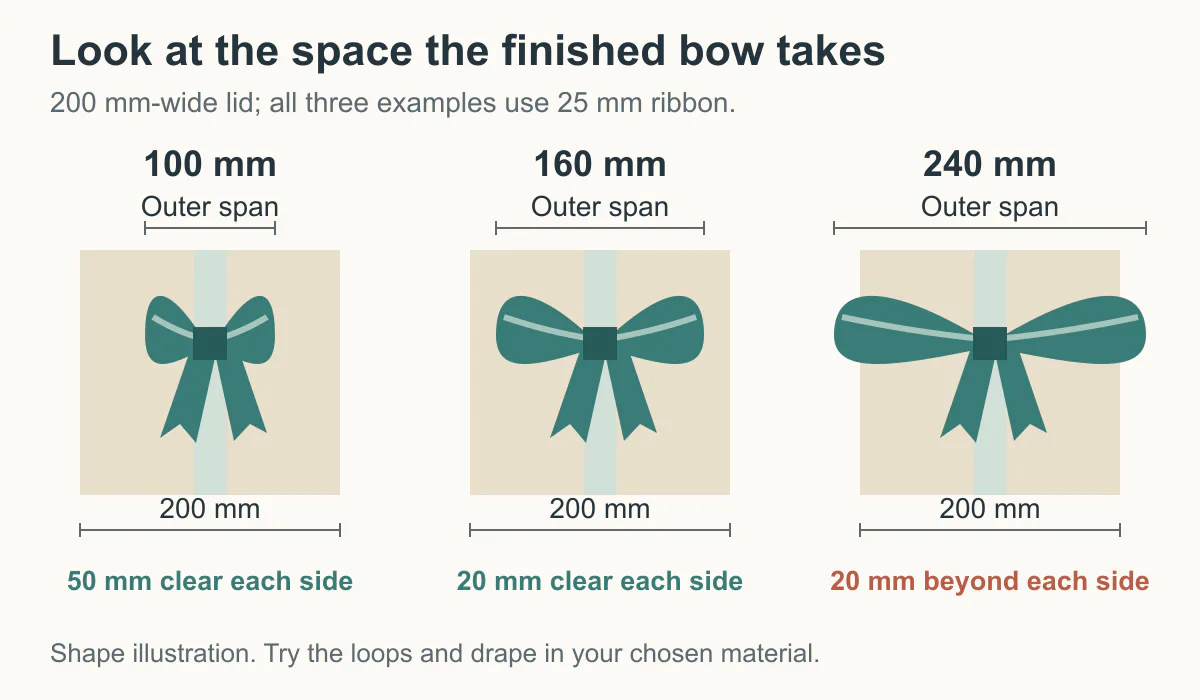
Bow outlines show placement and overall span. The finished shape also depends on ribbon thickness, stiffness and how the loops are formed.
Choose the 100 mm bow to leave the lid design in view, or the 160 mm bow to give the ribbon more presence. The 240 mm bow is an intentionally oversized choice for a display gift. It will need space beside neighboring boxes and may be flattened inside a close-fitting carton.
Long, open loops need enough support to keep the shape you want. A soft ribbon may fall into a loose bow; a firmer ribbon or a wired edge can help you shape a more upright loop. Material names alone do not settle this: compare the actual samples, particularly if you are changing width and fabric at the same time. The guide to ribbon types and their uses explains the material choices.
Look from the side before trimming the tails. Stopping on the lid gives a compact finish; reaching the base or hanging below it makes the ribbon a larger part of the package. For a batch, stand a few finished boxes together and use the version that looks right and can be tied consistently.
Choose ribbon width for your logo and occasion
Choose the ribbon width and artwork height together. Keeping a logo the same size on a wider ribbon makes it a smaller part of the band. That can look discreet and spacious, or leave the name looking lost. The examples below show when to keep that extra space and when to enlarge or simplify the design.
Measure the visible artwork. A single-line name uses its actual letter height, not the font’s point size. Two lines include both letter heights and the gap between them; a round badge includes its border. All names and layouts below are examples.
For a centered design, space above and below = (ribbon width − artwork height) ÷ 2. This explains the visual fit. A printer still needs to check the usable print area and whether the small details reproduce clearly on the chosen ribbon.
Branded gift boxes: a short name with room around it
For the 10 mm-high ALDER & CO. wordmark, start with 25 mm ribbon. The name has enough space around it to remain a distinct part of the design. Compare 16 mm if a small jewelry or candle box needs a more compact band.
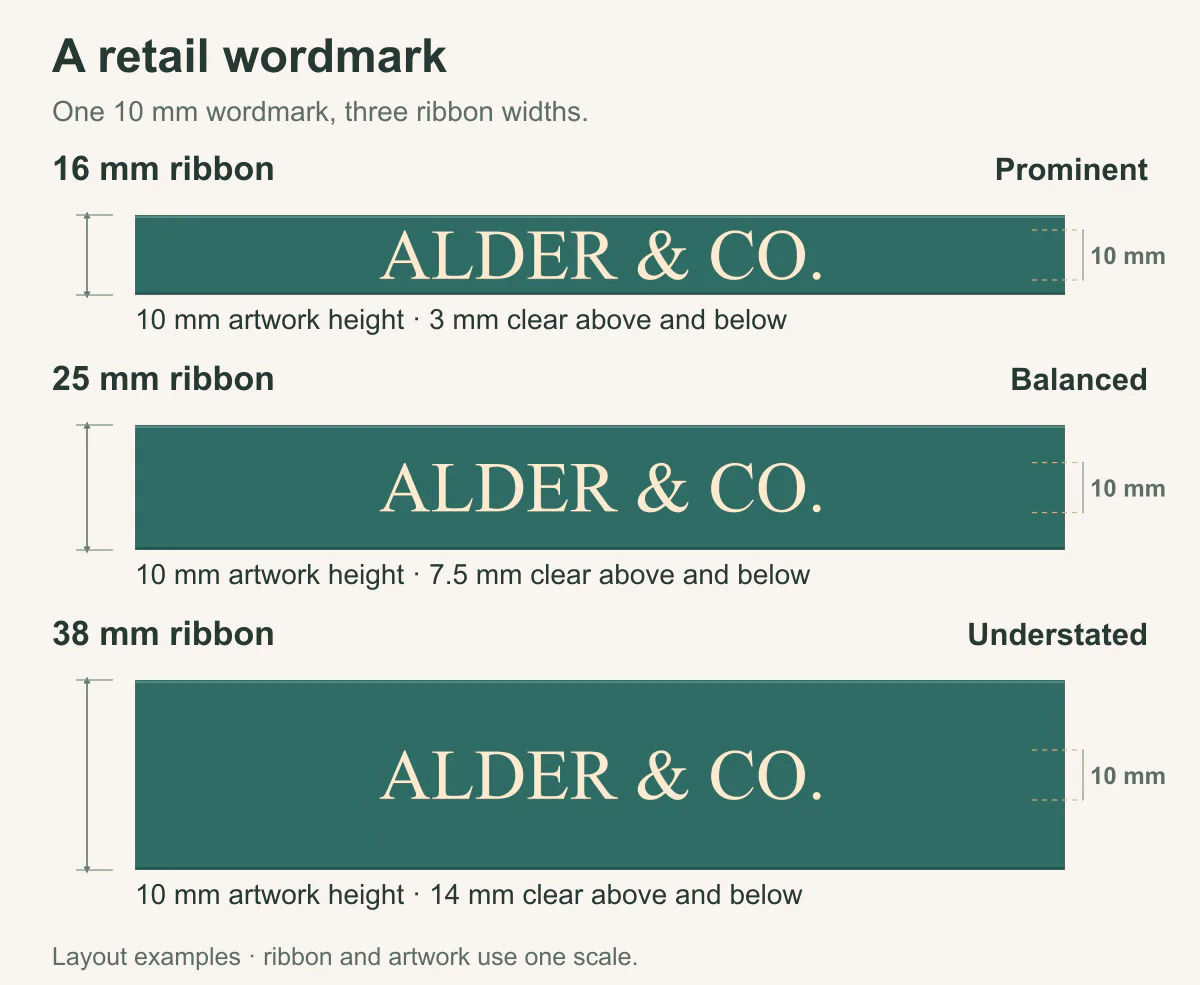
Ribbon width | Space above and below the 10 mm name | How it looks |
|---|---|---|
16 mm | 3 mm each | Prominent name on a compact band |
25 mm | 7.5 mm each | Name and ribbon color both have room |
38 mm | 14 mm each | A discreet name within a broad band |
Keep the 10 mm name on 38 mm ribbon when the wide band of color is the main decoration. If the brand name should lead instead, enlarge it in a second proof. Changing only the ribbon width has not made the lettering any easier to read.
Wedding favors: names and a date need space as a group
For Emma & Liam above a date, try 25 mm ribbon first. In this layout, the names are 8 mm high, the date is 4 mm high and the gap is 2 mm, making the complete group 14 mm high. On 16 mm ribbon, that leaves only 1 mm at each edge, so the two lines look crowded.
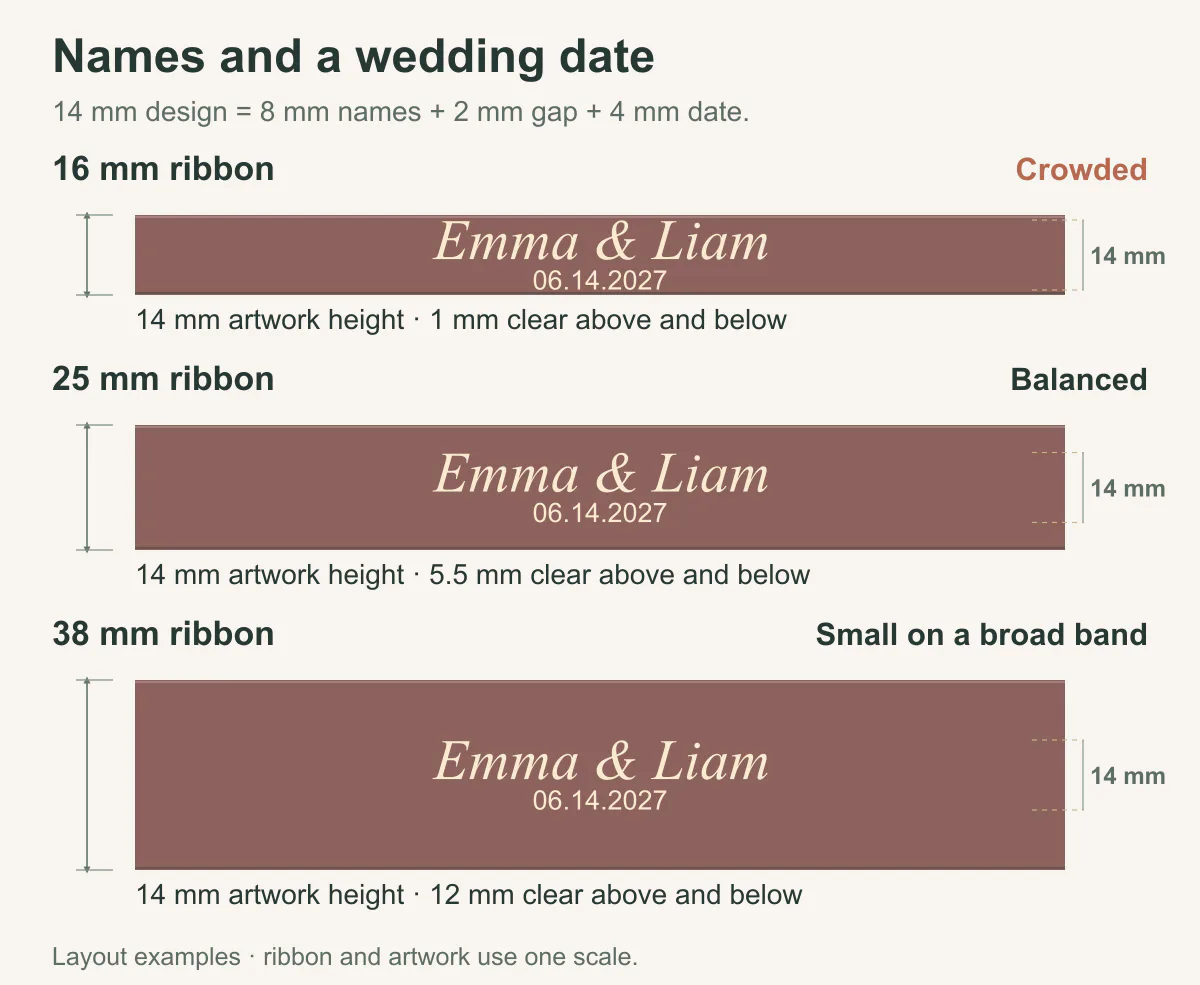
Ribbon width | Space above and below the 14 mm group | How it looks |
|---|---|---|
16 mm | 1 mm each | Crowded near the edges |
25 mm | 5.5 mm each | Enough surrounding space for both lines |
38 mm | 12 mm each | The same message looks smaller within the band |
If the favor box only has room for 16 mm ribbon, use initials or one line and put the date on a tag. Shrinking both lines can make the date hard to read. On broader bouquet tails, a 38 mm band may suit the styling; enlarge the whole group if you want the names to remain prominent.
Florist ribbons: a round badge needs more height
Keep the full 24 mm FLORAL STUDIO badge on 38 mm ribbon as a first choice. A circle needs enough room across the band for its outer border. On 25 mm ribbon, it nearly touches both edges; on 50 mm, it becomes a smaller detail on a broad tail.
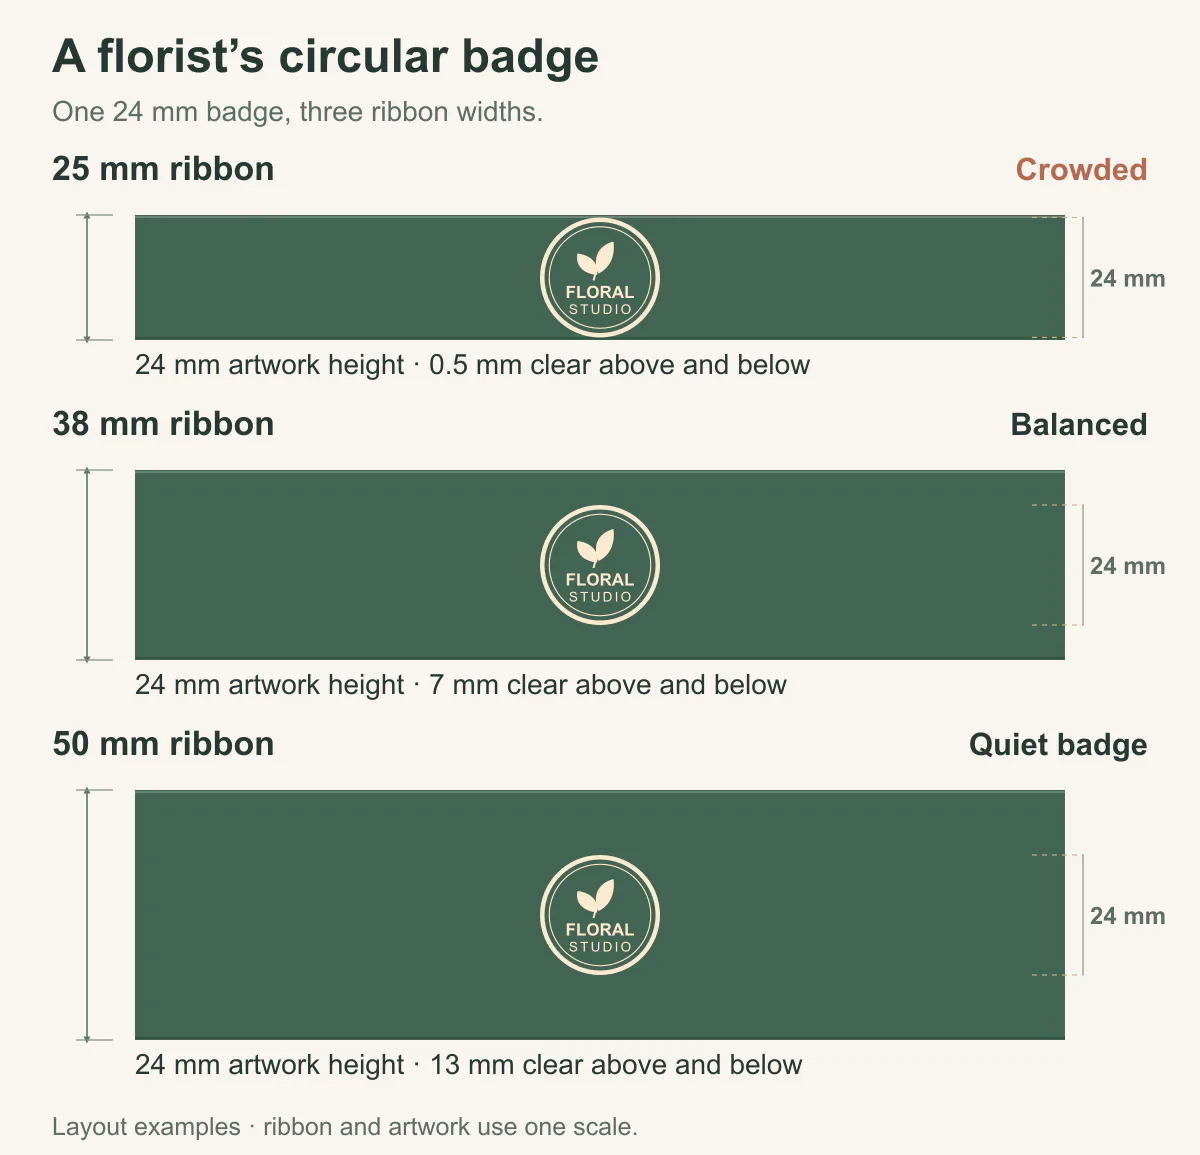
Ribbon width | Space above and below the 24 mm badge | How it looks |
|---|---|---|
25 mm | 0.5 mm each | Border nearly touches the edges |
38 mm | 7 mm each | Complete circle with clear space around it |
50 mm | 13 mm each | More ribbon around a quieter badge |
For a narrow bouquet-handle wrap, use the shop name or a simple leaf mark along the ribbon and leave the full badge on a card. A badge that fits across the width can still disappear around the stems or inside a knot. Give it a flat visible section, and check the small lettering inside the circle as well as the border.
Event gifts and displays: a wider band does not enlarge the message
The SUMMER GALA lettering below stays 18 mm high on 25, 38 and 50 mm ribbons. The wider bands add color around it, but the message itself has not grown. Compare 25 and 38 mm for a hand-held event gift; for an entrance display, compare the size of the letters as well.
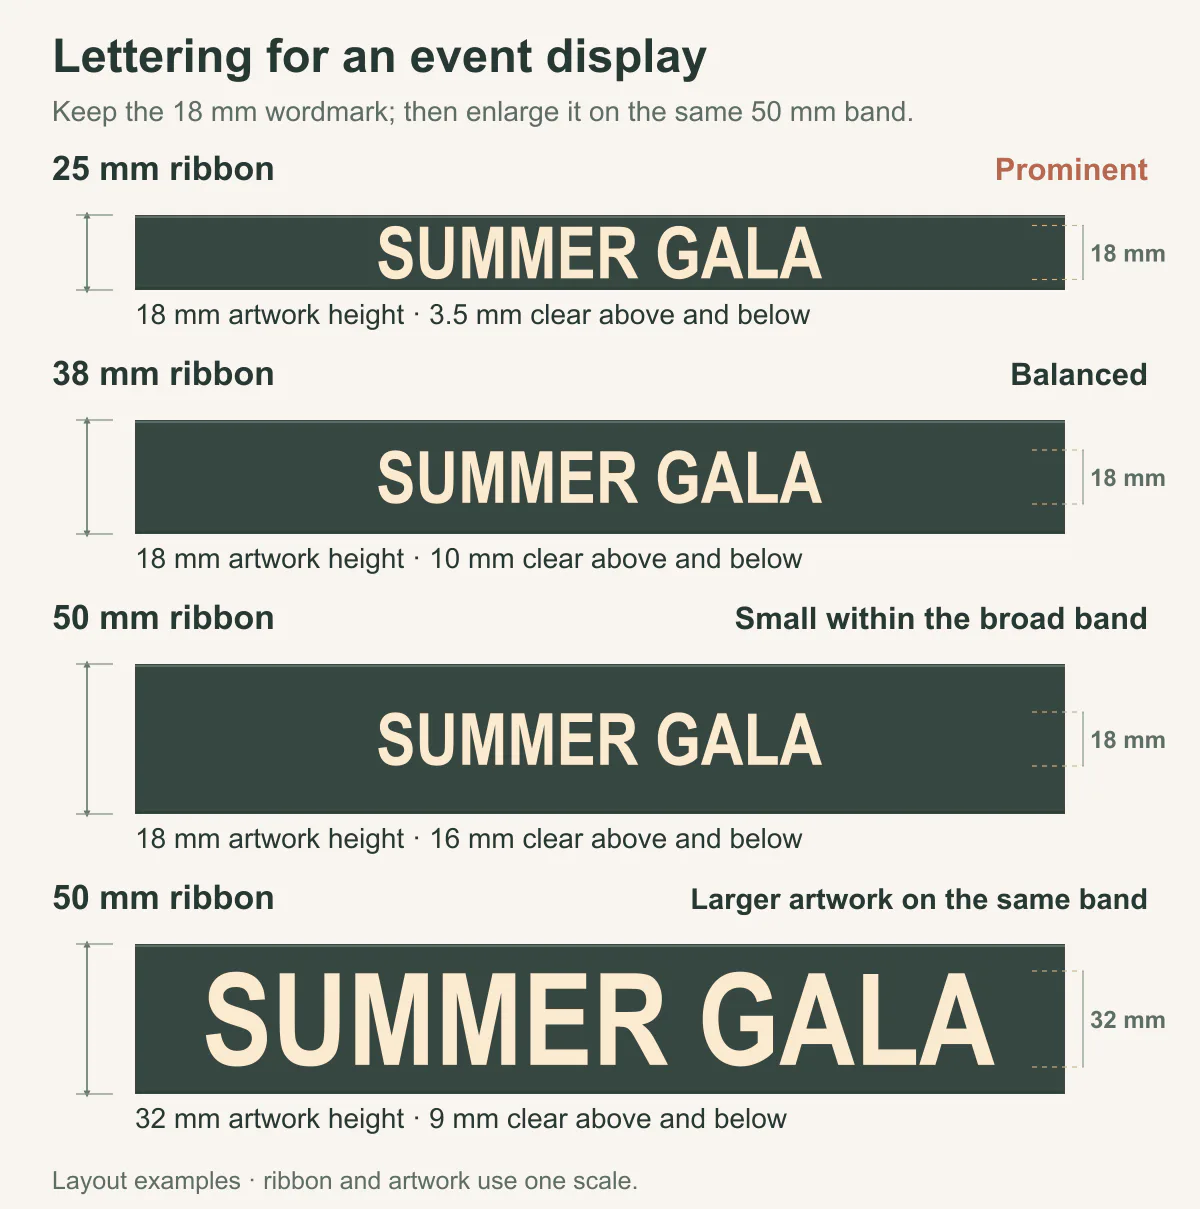
The fourth layout keeps the 50 mm band but enlarges the letters to 32 mm, leaving 9 mm above and below. Now the wording is larger too. Keeping its proportions makes the name about 1.78 times as long, so it needs a longer visible section. A short name is easier to enlarge than a full event title.
Print the layout at full size and stand where guests will see it—for example, 2 meters from the entrance arrangement. If folds, low contrast or a long title make it difficult to read, change those details before simply increasing the ribbon width. A separate sign may carry the full event title better.
Length can rule out a design even when its height fits. A 90 mm-long wordmark cannot sit entirely within an 80 mm visible section. Shorten the wording, resize the design or change the wrapping position. Ribbon width alone will not solve that conflict.
For repeated printing, choose the spacing along the ribbon after settling the artwork size. A mark near a fold can be partly hidden, even in a generous layout. The printed ribbon design guide explains how repeats, cut lengths and wrapping positions work together.
Choosing widths for weddings, bouquets and displays
Small favors and invitations
On a 60 mm-wide favor box, start with 10 mm to leave room for names or a tag. Try 16 mm when the plain box needs a stronger bow. The knot matters as much as the band here: a little favor can quickly become all ribbon.
For an invitation, use the blank area in the printed layout. A 150 mm-wide card with a 20 mm-high blank strip can take a centered 15 mm ribbon, leaving 2.5 mm above and below. A 25 mm ribbon would cover neighboring print, however large the card is. Check the envelope with the complete invitation and tie inside.
Bouquet handles and flowing tails
For the handle, try 16 or 25 mm around the actual wrapped stems. The narrower ribbon makes smaller steps around the bundle; the broader one covers more stem length with each turn. If the handle area is 100 mm long, that is the height to cover, not a request for 100 mm-wide ribbon.
For loose tails, compare 25 and 38 mm at the same length. The broader strip gives more visible color beside the flowers. Then compare 300 and 600 mm tails while holding the bouquet at waist height: the longer version falls much farther against the clothing. Choose the width for the band of color and the length for where you want it to end.
Entrance flowers, wreaths and celebration displays
On a 600 mm-diameter floral wreath, a 200 mm-wide bow leaves much of the flowers in view; a 400 mm-wide bow becomes a major part of the arrangement. For the smaller bow, compare 38 or 50 mm ribbon. Broader loops may call for wider ribbon, but their shape also depends on the material and edge support.
Stand where guests will first see the display, then move closer. A band that is easy to see on the worktable may disappear among flowers at the entrance. Contrast, layering and placement can help as much as width. If the arrangement is outdoors, confirm how the selected ribbon behaves in that setting; extra width does not make a material weather-resistant.
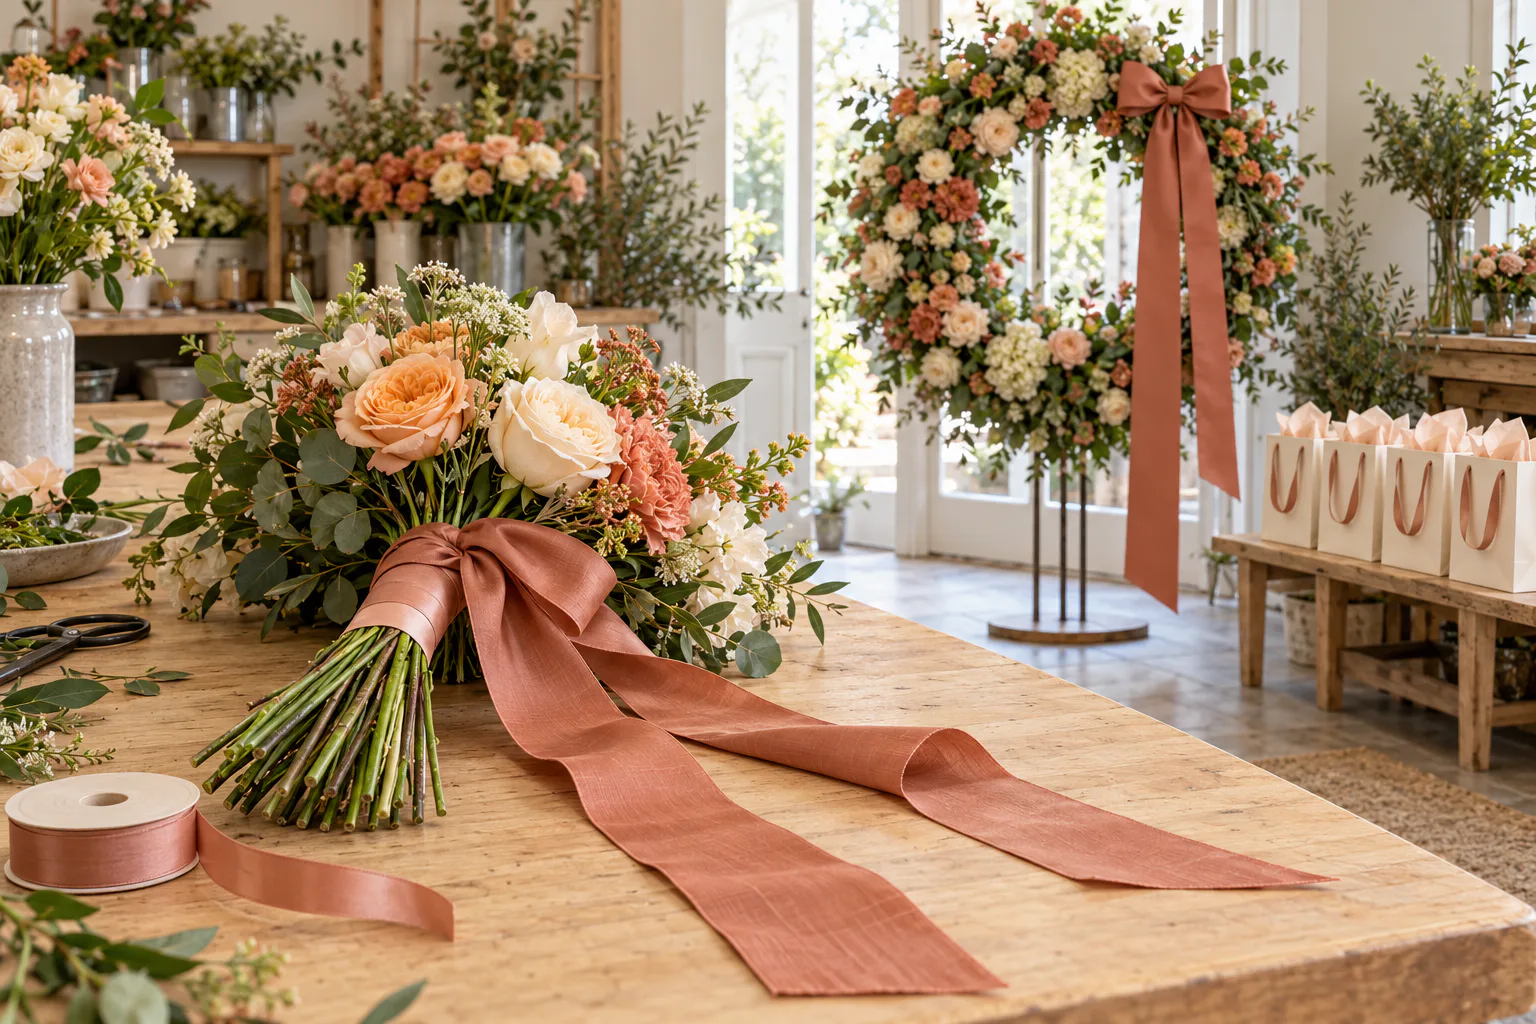
Floral styling illustration: compare the ribbon where it will be used and from the distance it will be seen.
Can one width work across a whole gift range?
A 25 mm band covers nearly a third of an 80 mm jewelry-box lid, but only about a ninth of a 220 mm clothing-box lid. It will look bold on one and much slimmer on the other. Put the finished packages together before choosing a single width for the range.
Keep one width when different bow sizes and positions give all the packages a finish you like. Use two widths when the smallest box looks overwhelmed or the largest looks underdressed. The extra size gives you more control, but it also adds a separate material for the packing team to sort and replenish.
Make one complete sample before choosing
Cut paper strips in the widths you are considering and lay them on the box or card along the same route. This is a quick way to reject a band that covers the label or leaves too little space. It saves tying several unsuitable widths just to discover a layout problem.
Replace the paper with the proposed ribbon and finish the package, including the bow, tag and trimmed tails. This is where you judge shine, drape and loop shape. When comparing widths, keep the color and material the same where possible. Before approving the bulk order, check the ribbon sample on your package and record any changes you need.
Lift the package, set it beside the rest of the range and place it inside its outer carton. Photograph the version you choose. Then measure the ribbon used for that complete wrap; the quantity guide shows how to turn it into the number of rolls to buy.
What to record for the next sample or inquiry
Detail | Example of a useful note |
|---|---|
Box dimensions | 300 × 220 × 50 mm; ribbon runs along the 300 mm direction |
Ribbon candidates | 25 mm and 38 mm; compare the same material and color |
Areas to keep visible | Product name on the lid; photograph attached |
Finished bow | Desired outer span and tail length; photo of the arrangement |
Print layout, if needed | Logo height, direction and repeat spacing to review |
Decision still open | Width, loop support, color or print positioning |
If you are still choosing, send YiTuo a photograph or drawing of the packaging, its dimensions and the widths you would like to compare. Add a bow reference or logo layout if either affects the choice. That gives us a clear starting point for discussing suitable ribbon options and a sample arrangement.
Discuss a real requirement
Turn the reading into a practical next step.
Send a short note, product reference, photograph, swatch or tech pack. Technical feasibility, sampling, documentation and production terms are confirmed after review.
Related products: Christmas Trees and Snowflakes Printed Grosgrain Ribbon for Gift Wrapping · Christmas Snowflake and Typographic Printed Ribbon for Gift Wrapping · Christmas Theme With Snowflakes Trees and Velvet Ribbon for Gift Wrapping
Start an inquiry