
Introduction
The two blue cuffs below use the same lace. On the left, the cuff covers most of the flowers and only the petal tips hang below it. On the right, a whole row of flowers is visible. If your buyer wants the right-hand cuff, mark the finished fabric edge on the lace sample so the supplier knows how much needs to show.
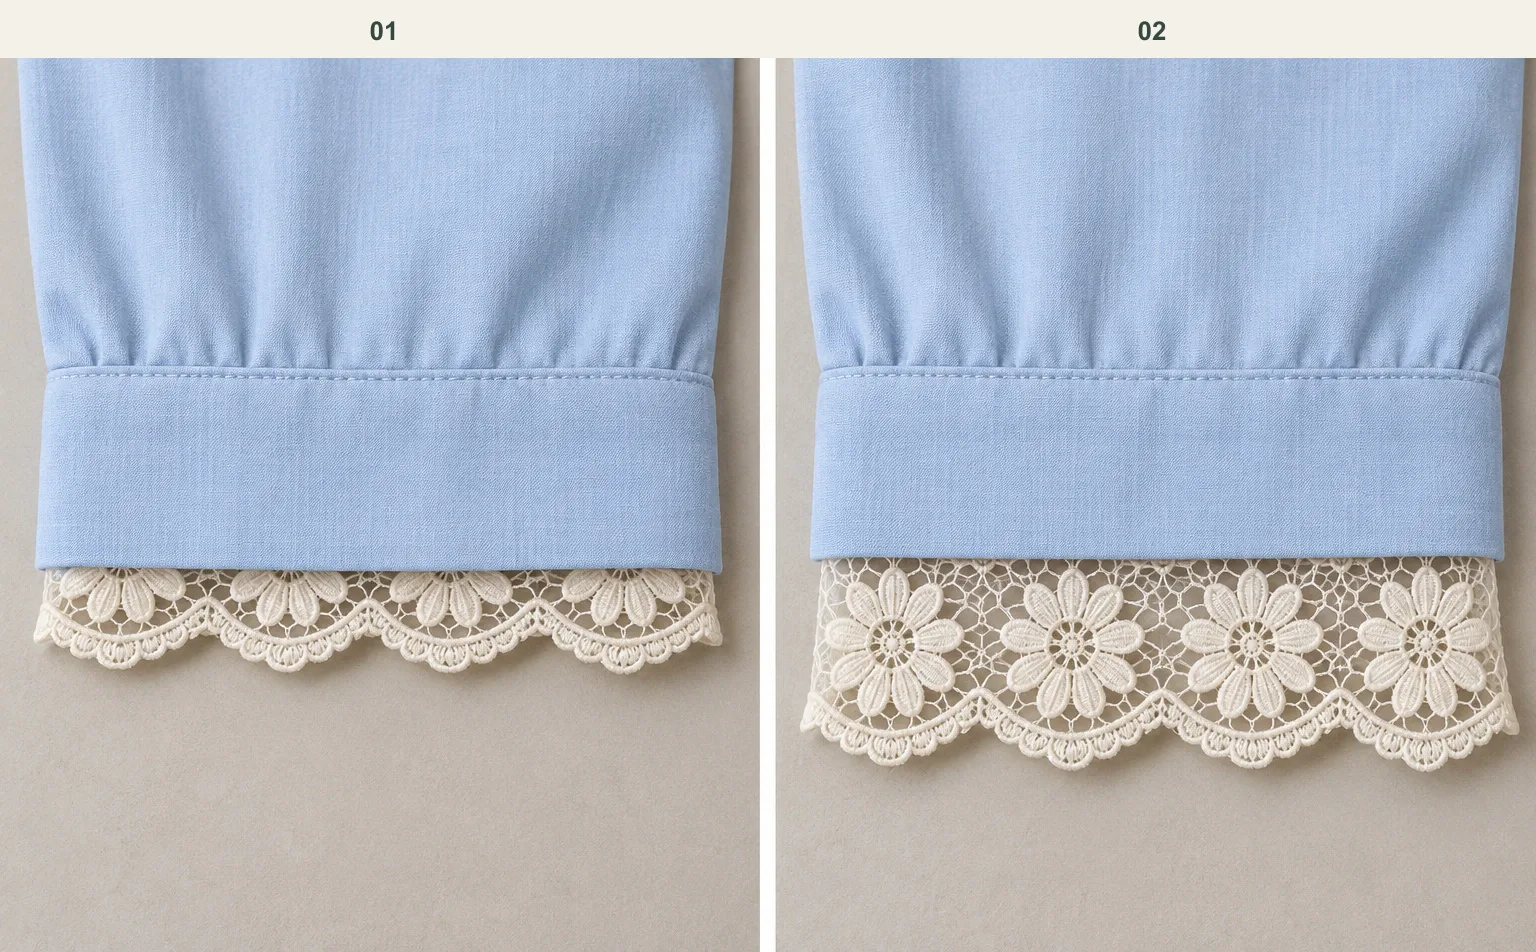
Pick a flower centre and follow the blue cuff edge across it. The depth hidden behind that edge determines whether the centre shows on the finished cuff. 01 shows less lace below the cloth; 02 shows a full row of flowers.
To get the effect on the right, make the sample request specific: “We want a complete row of flowers below the cuff. Please suggest a suitable width and mark the part that will sit behind the fabric.” That gives the supplier more to work with than a width number alone. The examples below show how to measure the exposed lace, choose the edges and allow material for matching the pattern.
Start with the width that will remain visible
Lay a candidate sample flat and place a strip of the base fabric over the part you plan to hide inside the cuff. Adjust it until the flowers show as intended, then measure from the fabric edge to the outermost lace tips. With a scalloped edge, also measure to the inward curves: the exposed depth is not the same all along the border.
Imagine a sample with one straight attachment edge and a scalloped outer edge. It measures 40 mm from the straight edge to the scallop tips. The design covers 8 mm of that width, leaving 32 mm visible at the tips. If the valleys sit 6 mm inside the tips, the visible depth at the valleys is 26 mm. These are teaching dimensions, not measurements of a YiTuo product.
Measurement in this example | Result |
|---|---|
Full width to scallop tips | 40 mm |
Width covered by the main fabric | 8 mm |
Exposed depth at tips | 40 − 8 = 32 mm |
Exposed depth at valleys | 32 − 6 = 26 mm |
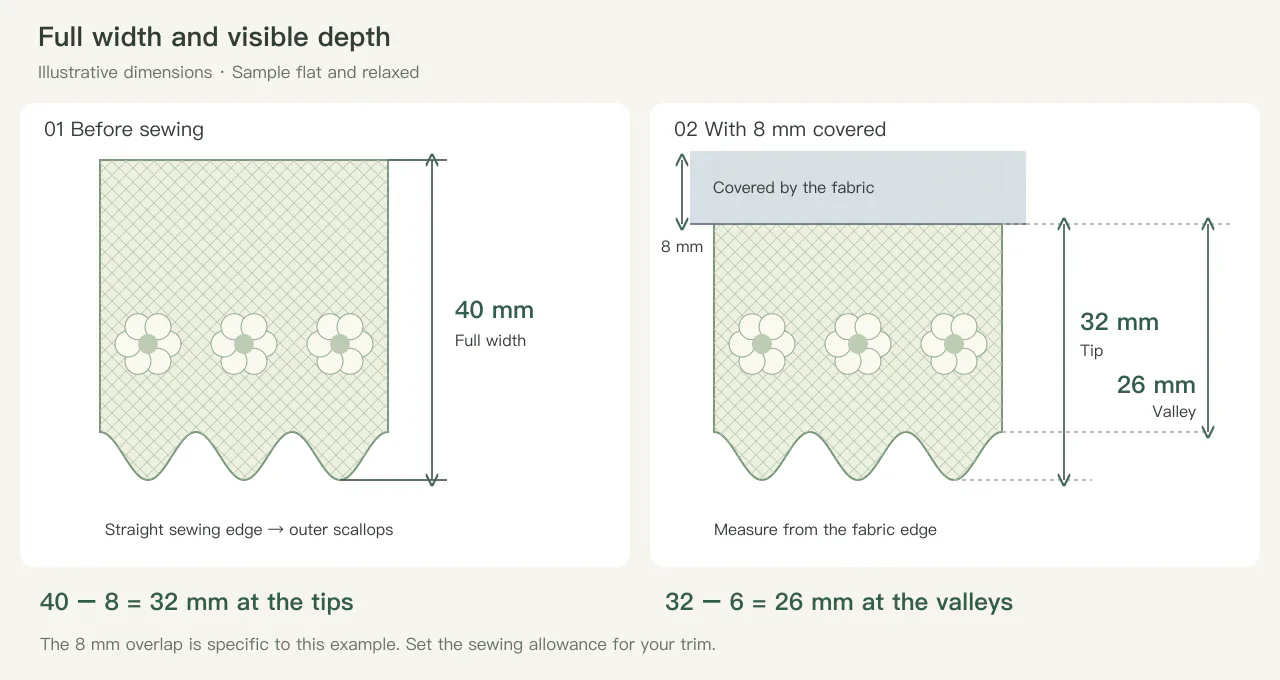
Illustrative dimensions for this example only. The drawing explains where to measure; it does not set a standard seam allowance or a product tolerance.
Suppose the buyer wants at least 30 mm showing everywhere. The 32 mm tip clears that mark, but the 26 mm valley falls 4 mm short. Ask the sample maker to pin the trim with 4 mm less hidden and check whether the remaining band can still take a secure stitch. If it cannot, try a shallower scallop or a wider band and measure the valley again.
Read the ruler photo, then check the actual sample
The YT-251121-2 Rose Garden band is listed at 18 cm wide. The YT-8779 floral eyelash trim is listed at 19.5 cm. In these ruler photographs, first locate the flowers you want to show, then look at the material between them and the outer edge. On the actual sample, cover the proposed hidden area with a paper strip. That helps you compare the visible pattern, rather than just 18 cm against 19.5 cm.
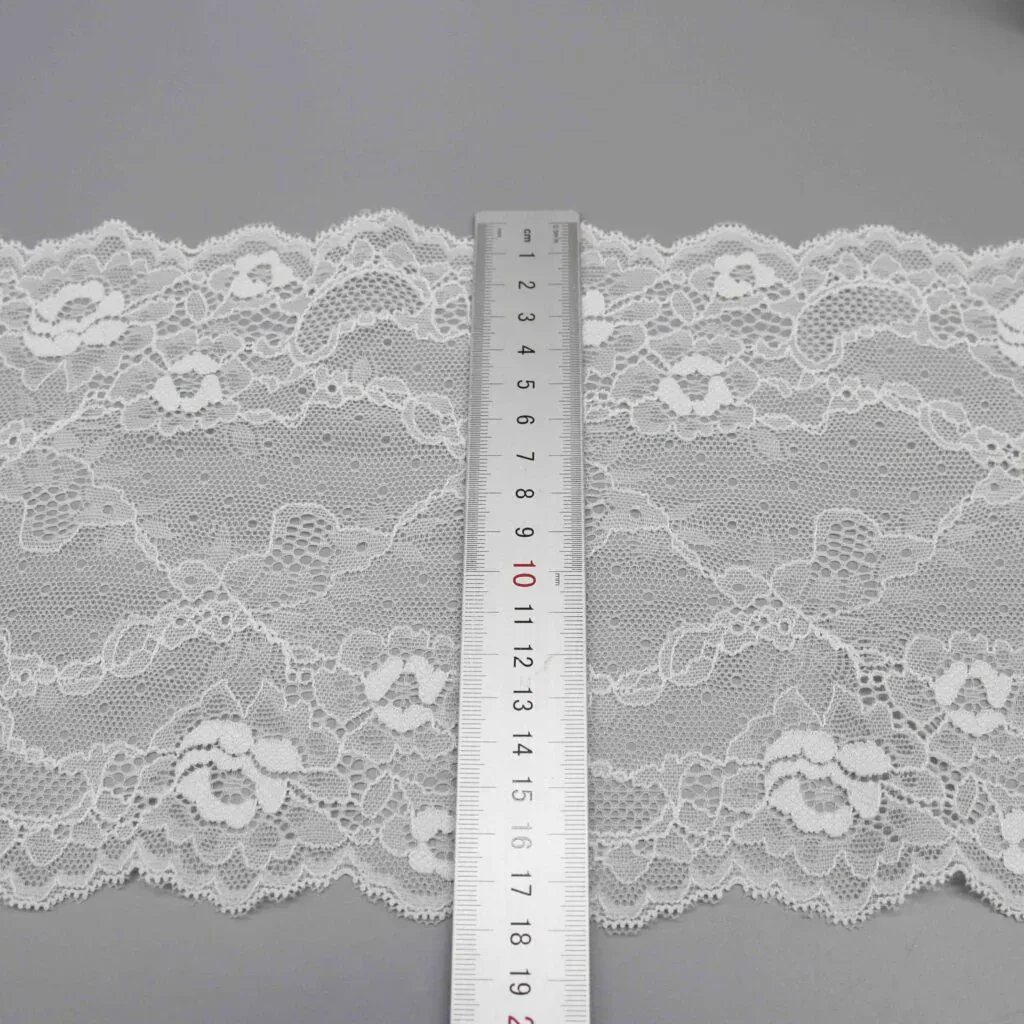
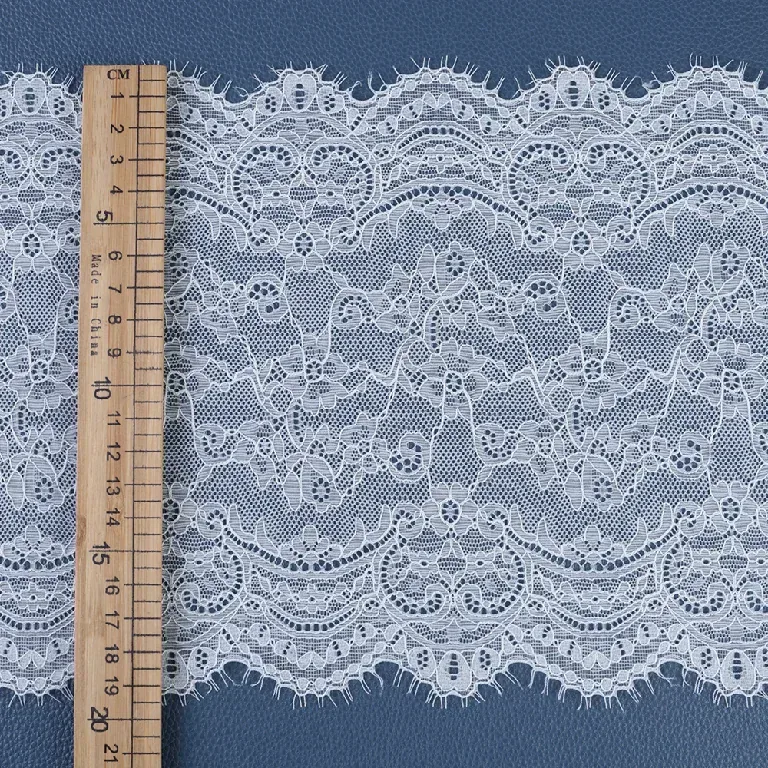
Unchanged YiTuo catalogue photographs: first, Rose Garden; second, YT-8779. The captions use the listed widths; the images help identify the edges and the ruler position.
First locate the scale markings and both material edges. If the starting edge is not at zero, subtract the two readings. Then check whether the photo measures to the scallop tips, the valleys or an eyelash fringe. For a trim with fine fringe, specify whether the fringe is included in the quoted width. A soft fringe can affect the outline without providing the same coverage as the patterned body.
For YT-8779, the listing does not define whether the fine eyelash tips are included in 19.5 cm. Ask the supplier to mark that boundary. If the trim must cover a seam, also identify the edge of the patterned body; the outermost fringe is not a continuous cover line.
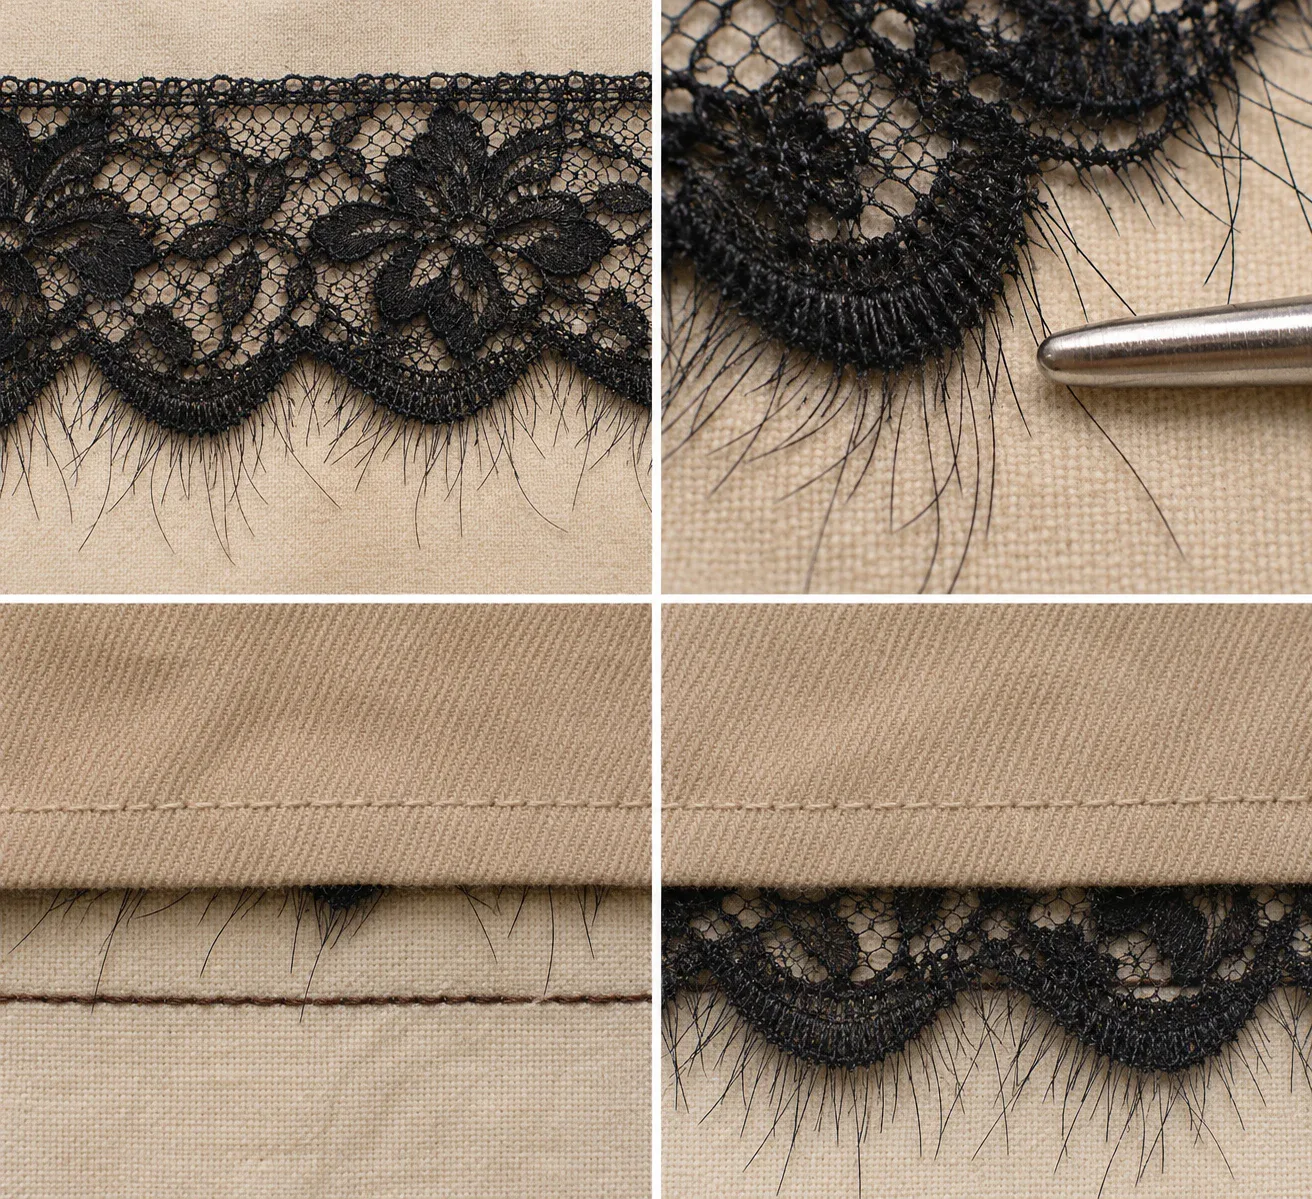
The metal tip sits beside the fine lashes. In the lower left, the lash tips reach down but the brown stitch line still shows. In the lower right, more of the dense scallop extends past the cloth. When the job is to cover a seam, mark the edge of the lace body on the approval photo.
Compare samples laid flat in the same relaxed state, with the roll direction marked. Pulling a stretch trim while measuring can change the reading and the flower shape. Agree the measurement points and acceptable variation with the supplier for the selected reference; a different style may need different points.
Choose edges for the way the trim will be attached
“Scalloped lace trim” describes a shaped edge, not one fixed construction or a promise of stretch. Look at the actual long edges and the area available for attachment. A label such as single scallop or double scallop is useful for finding candidates; the sample decides how they can be used.
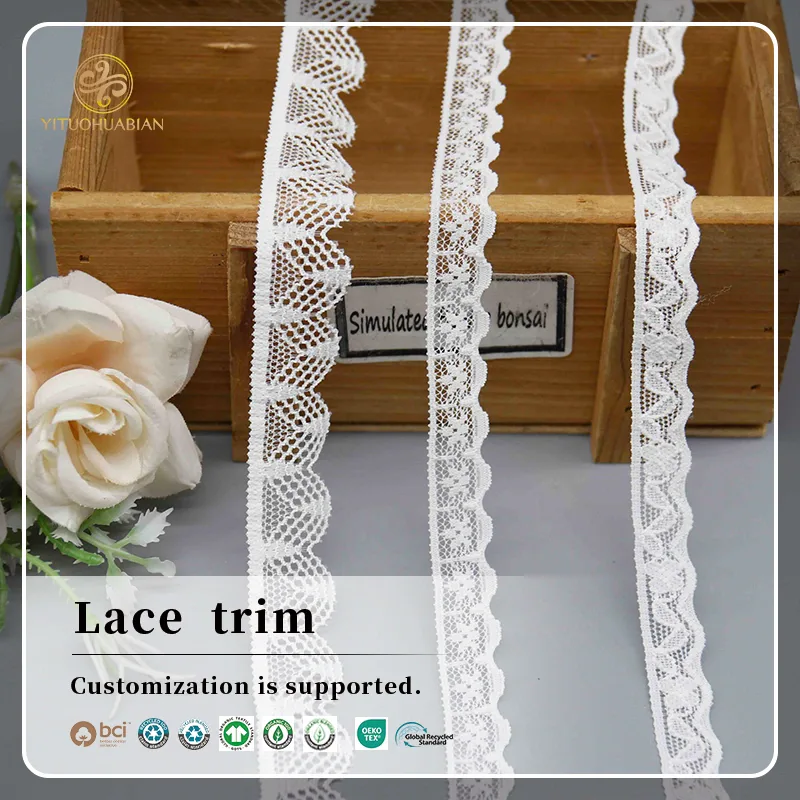
Original YiTuo international-store photograph. Each strip has a relatively straight side and a more pronounced decorative edge. Use the shapes to shortlist designs; confirm the selected item reference and relaxed width with a sample. The store banner identifies the item as lace trim and offers customisation.
Intended effect | What to look for |
|---|---|
One decorative edge projecting from a cuff or hem | A suitable attachment zone on one side, with the chosen scallop left visible on the other. |
A band laid on the surface of fabric | Attractive visible edges on both sides, plus a way to secure the band without obscuring the main pattern. |
An open insertion between two fabric sections | Two usable joining zones and enough pattern remaining between them after attachment. |
A band folded around an edge | A sample that suits the proposed fold and fastening; symmetry in a flat photograph is not enough. |
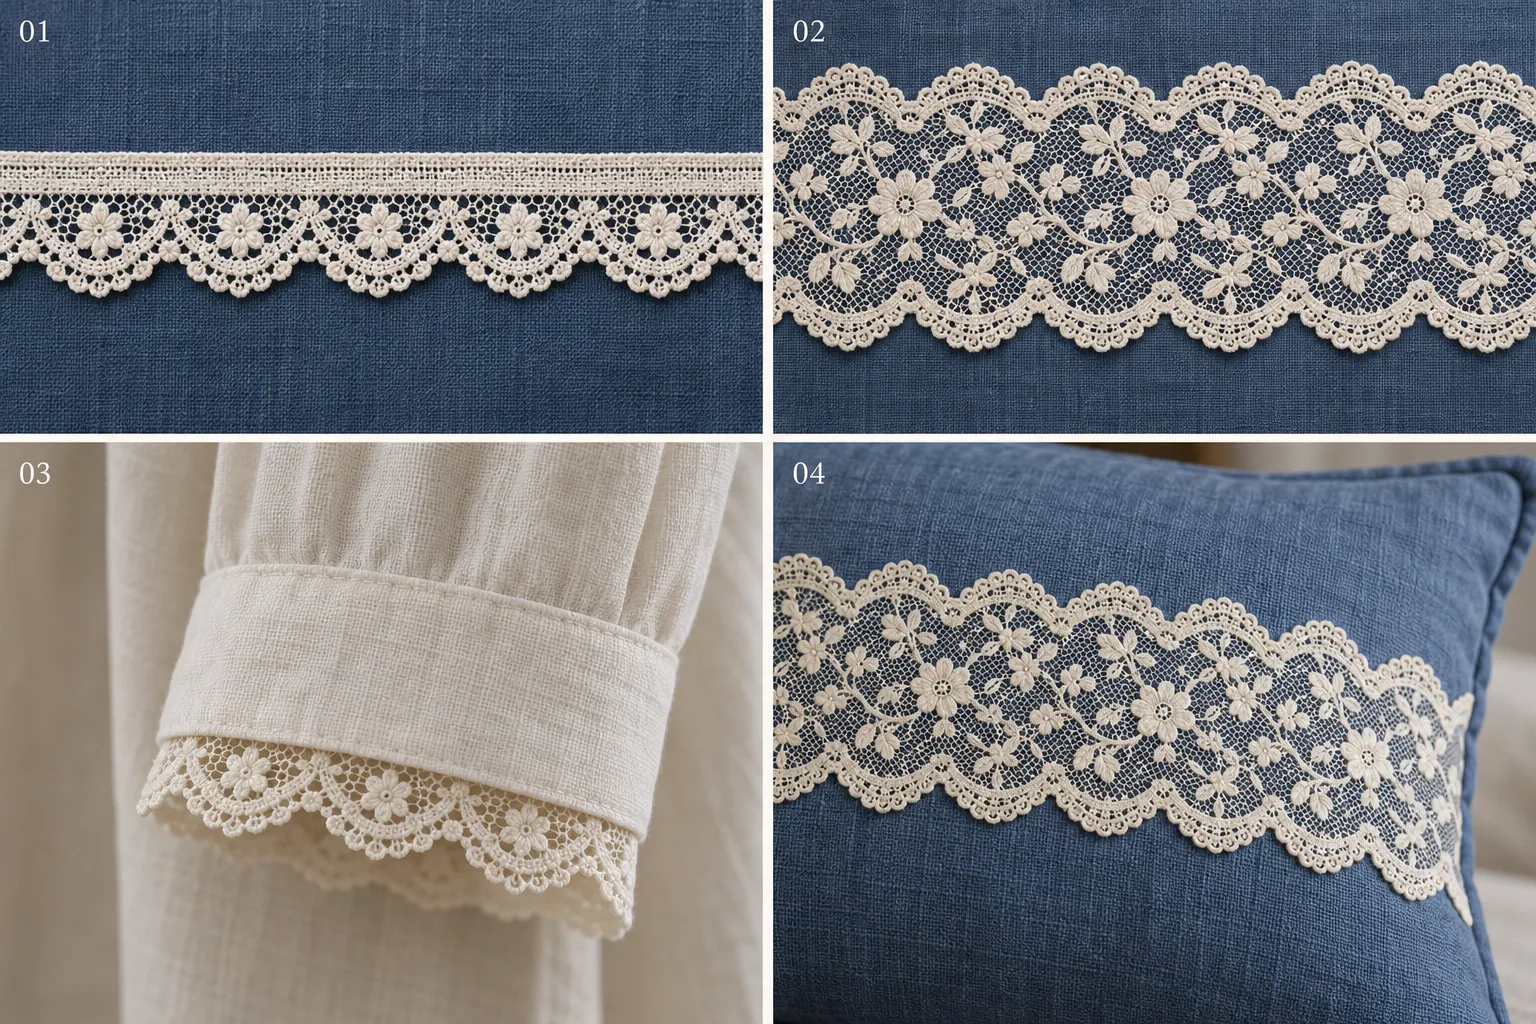
At the upper left, one long edge is decorative. At the upper right, both are. The bottom row shows why that matters when a cuff covers the top edge or when the band sits entirely on top of cloth.
For a pillowcase border, decide whether you want a free scallop beyond the opening or a flat band on the fabric. The second option can show both decorative edges; the first normally hides one attachment area. If a double-scalloped candidate only works after cutting away an edge, ask for a better-matched reference first. Cutting through the pattern creates a new edge whose stability and finishing need their own trial.
Match the flower size to the visible space
A large flower can become the feature of a wide cuff or a table band. On a narrow neckline, the same flower may be mostly hidden or cut off. Smaller repeated motifs often make placement less conspicuous across a short strip, but they are not automatically better. Choose whether the viewer should notice the outline, individual flowers or one continuous textured band.
Place a strip of paper or the actual base fabric over the sample to represent the hidden attachment area. View it at the intended size, not enlarged on a screen. For a skirt hem, step back far enough to see the whole garment; for a wedding table, also view the sample from a guest’s seated position. A close-up and a wider view answer different purchasing questions.
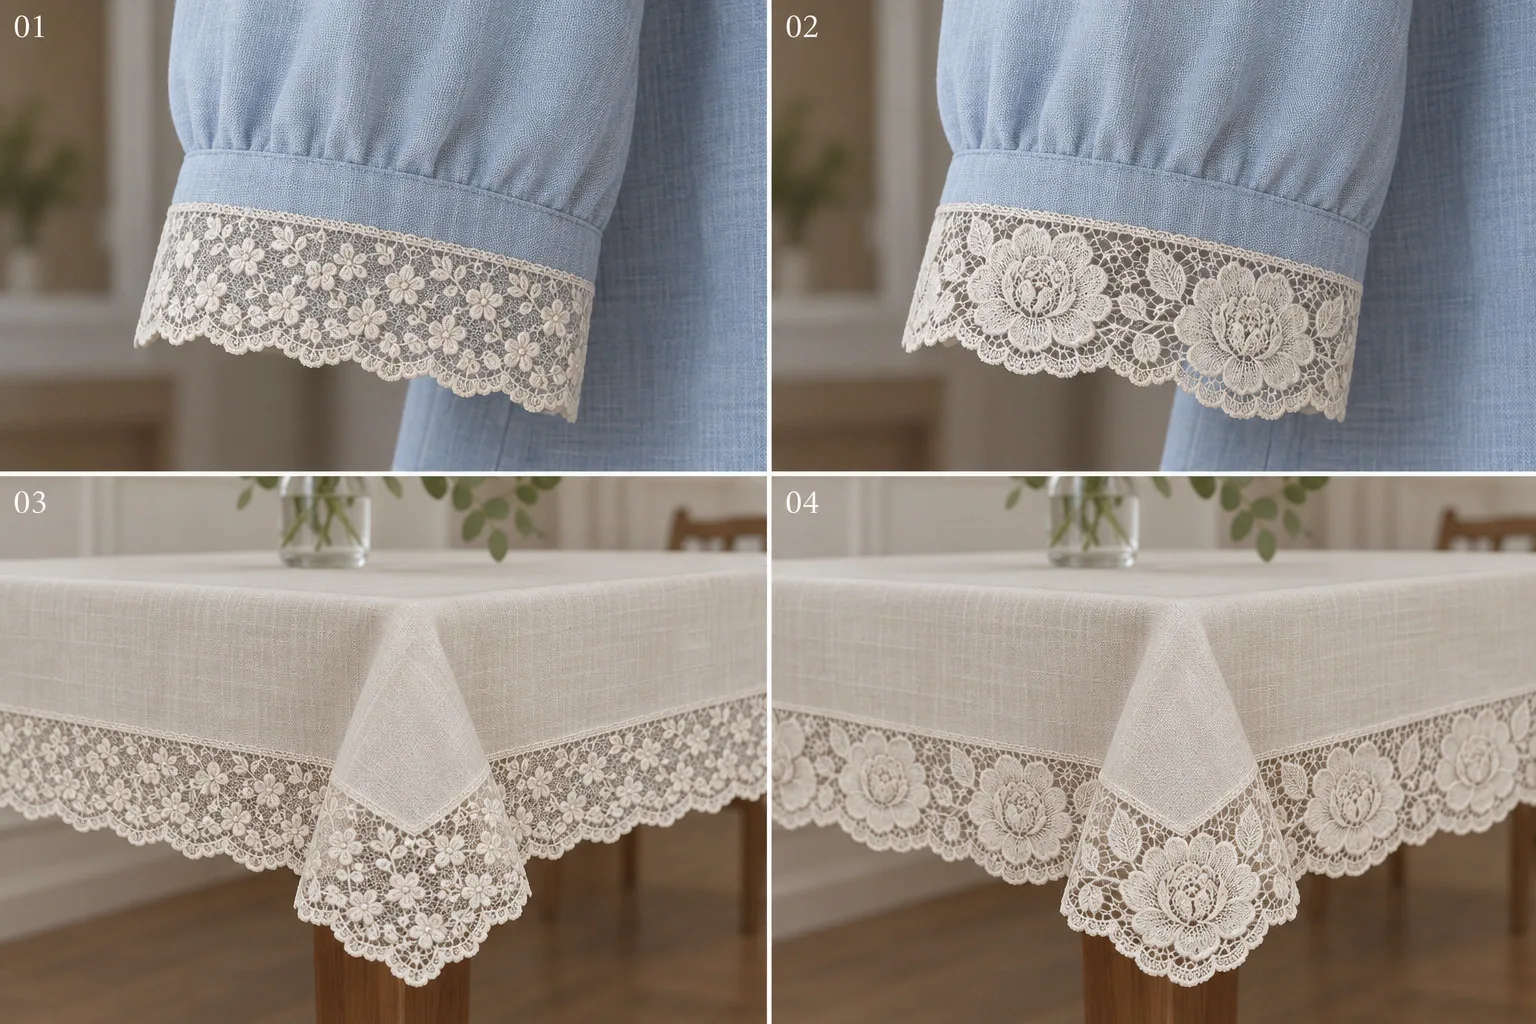
The upper pair shows how many small or large flowers fit across a cuff. In the lower pair, compare the same difference along a table edge from the distance a guest would see it.
For coordinated items, matching the colour and general floral theme may be enough. If you need a large flower centred on every cuff, or a narrow trim to match a wider band precisely, say so before ordering. Similar catalogue names do not establish a matching set. Compare the actual references together on the intended base colours.
A flower, a scallop and a full repeat are different things
Pattern repeat is the distance along the trim after which the complete pattern returns to the same position. Adjacent scallop tips may be closer together than that full repeat. A flower may also alternate with another motif. Ask the supplier to mark the same identifiable point at two consecutive full repeats, rather than estimating repeat length from the nearest two peaks.
This matters when several pieces must start at the same flower. Buying enough length for the finished pieces may still leave too little material for positioning. It also matters at a closed cuff: the two cut ends do not automatically meet at matching parts of the pattern. Choose the join position with the maker before promising an uninterrupted floral ring.
Teaching example: five flat decorative strips each need a 22 cm cut length, including the agreed end allowances. Suppose the full repeat measures 8 cm with the trim laid flat and relaxed, and every strip must start at the same marked flower. Begin the cuts at 0, 24, 48, 72 and 96 cm. Each start is three repeats after the previous one. Leave a 2 cm positioning gap between each pair of pieces.
Planning method | Length used in this example |
|---|---|
Five cut pieces only | 5 × 22 = 110 cm |
Five pieces starting at the same repeat position | 4 × 24 + 22 = 118 cm |
Positioning gaps between pieces | 4 × 2 = 8 cm |
The 118 cm starts at an already aligned mark. Add any initial alignment loss, sample pieces and unusable sections separately. This layout makes the five starts match; it does not prove that either end will form a matching closed-loop join. Use the repeat measured on the selected sample, not this assumed 8 cm value.
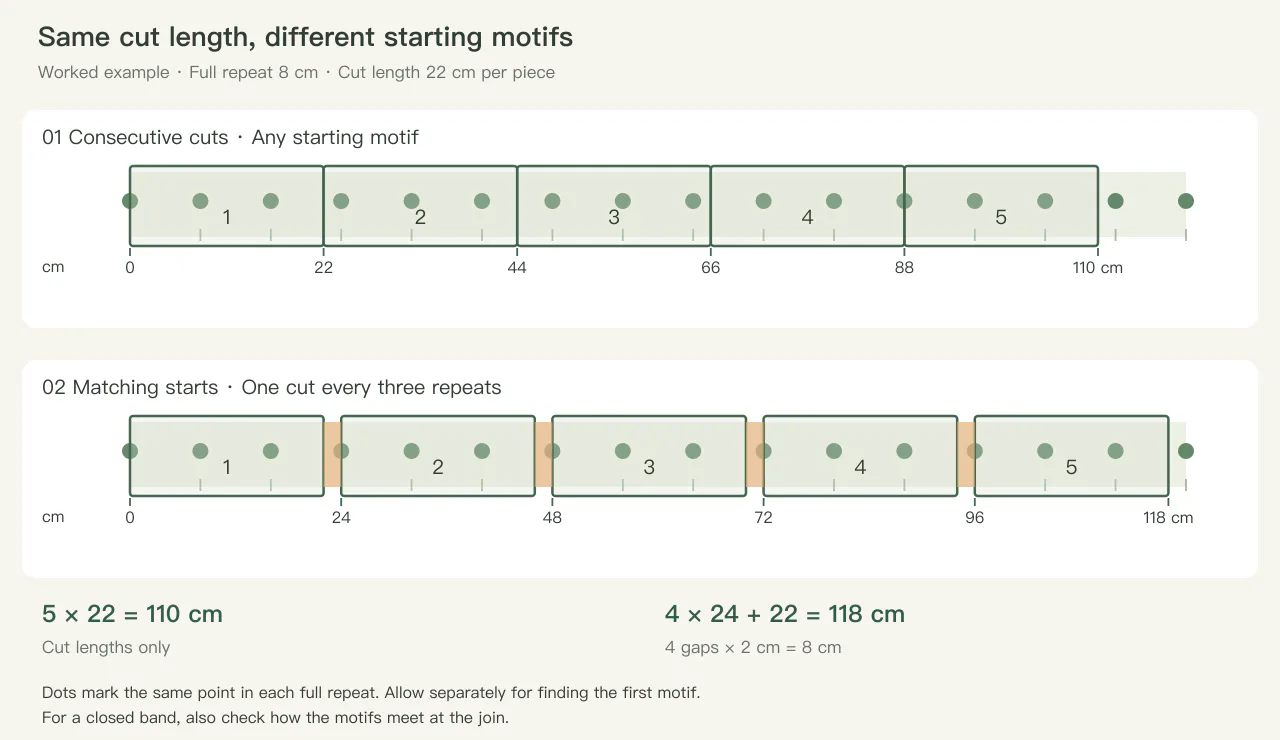
A fictional cutting example. Aligning a chosen flower can use more length than adding the cut lengths alone. It is not a production cutting plan for the catalogue products shown above.
Check pairs, corners and joins before choosing the roll
For two cuffs, decide whether their flowers should simply look related or sit in mirrored positions. Turning a strip over may reveal the reverse face; rotating it can change the direction of the motifs. Ask the maker to lay out the actual left and right pieces together. An attractive single cuff is not enough to confirm the pair.
At a pillowcase corner or a tablecloth edge, sketch the intended turn. A butt join, overlap, mitred corner or separate corner motif gives a different appearance and uses material differently. A straight ruler photo cannot tell you which solution will sit flat. Request a corner sample when that corner is a visible feature, and use a straight border elsewhere if the design does not need a continuous turn.
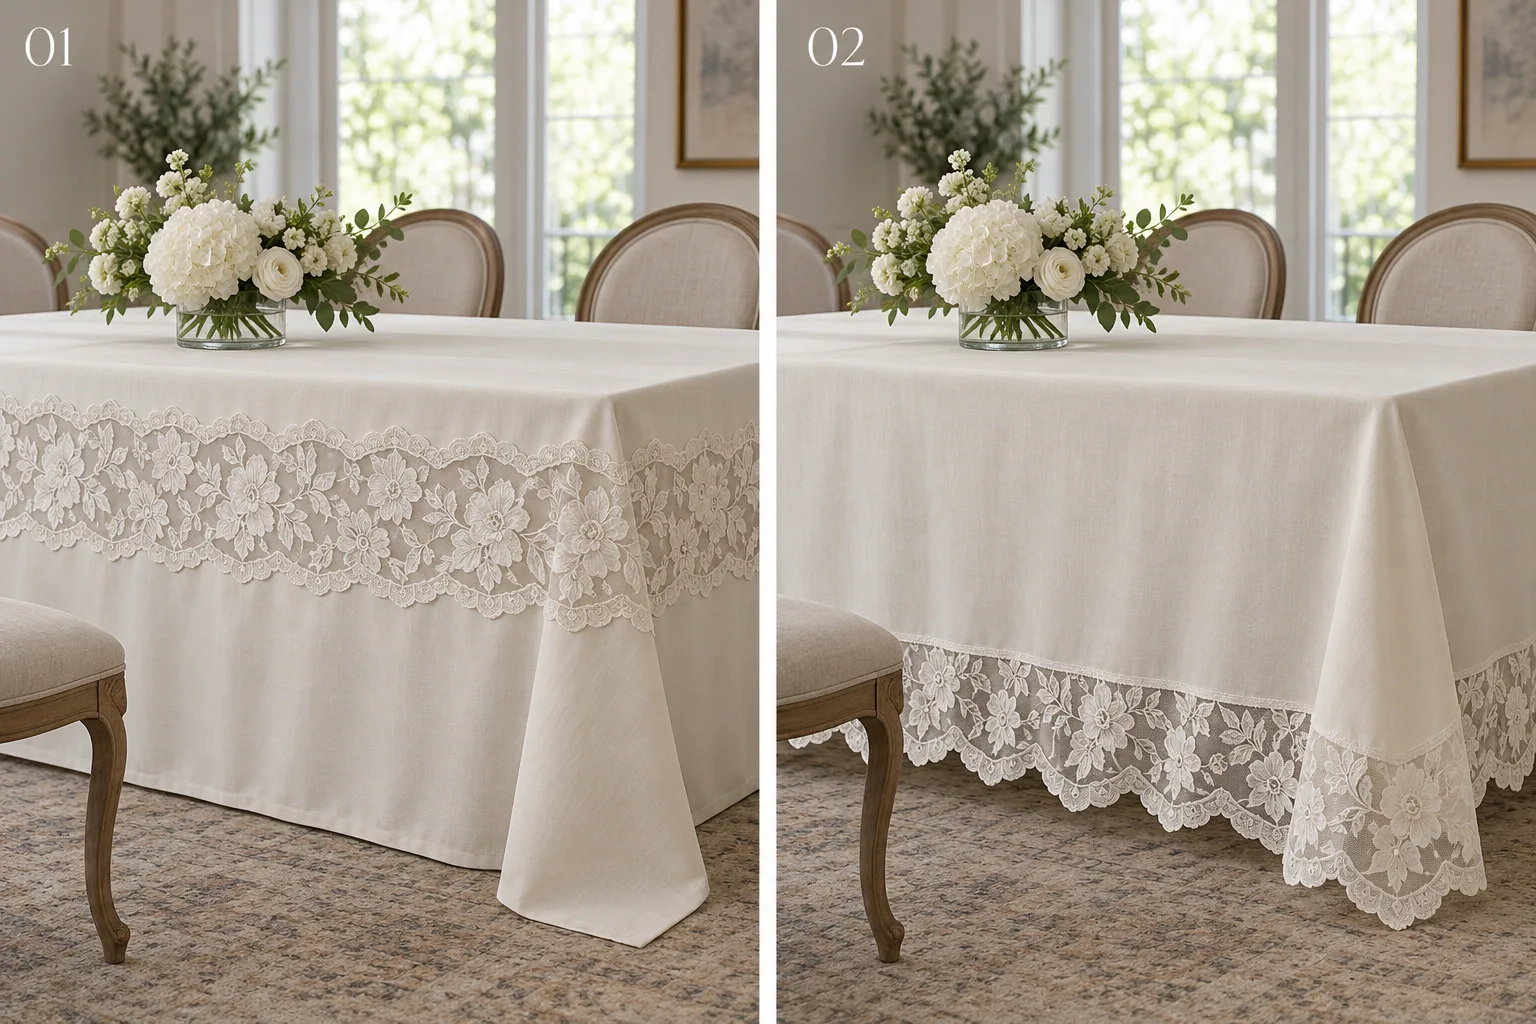
On the left, cloth continues behind the lace and both edges show. On the right, the cloth conceals the attachment and the scallops hang below the hem. Mark which version you want on the sample request.
For a band on the face of a tablecloth, select a width that suits the visible drop and show both finished edges in the brief. For an extension below the hem, reserve the attachment area before deciding the exposed depth. These two treatments can use similar-looking lace but require different sample drawings.
For wedding tables, mark where each border section begins and ends, where joins may be hidden and which sides guests will see. Compare the proposed lace on the actual tablecloth, especially when the colours are close. If the goal is a stable outline, include a non-stretch candidate. Stretch is not a substitute for missing length or an agreed corner detail.
A lingerie edge is one further application of these same choices. Its visible scallop and attachment area must fit the design, while movement, fit and skin-contact details need a separate assembled sample. Width and flower placement alone cannot approve that use.
What goes on the cuff approval drawing?
Draw the finished cloth edge across the sample photo. Mark one scallop tip, the next valley and the flower centre the buyer wants to keep. Beside the drawing write where the measurement starts, whether loose fringe counts, and the shortest depth the design will accept. Ask the sample maker to record the actual depths on the sewn cuff.
Send with your sample request | What it helps the supplier understand |
|---|---|
Candidate reference, colour and intended position | Which actual trim and application you are discussing. |
Required visible depth at tips and valleys | Whether the pattern and edge can provide the desired outline and coverage. |
Covered attachment area and base-fabric sample | Which part of the lace remains visible after assembly. |
Edges to show; edges to attach | Whether one or both decorative edges must be retained. |
Flower placement, full repeat and join location | Whether positioning or matching affects sample length and bulk quantity. |
Number of trial pieces, pairs and corners | Enough material to judge the whole construction. |
For the 30 mm minimum in the example, the first cuff drawing would read “tip 32 mm, valley 26 mm, attachment covers 8 mm”. Mark that version for another trial. Sign the revised pair only once the valley reaches 30 mm, the marked flowers sit where agreed on both cuffs and the sample maker has enough band for the seam. Keep the pair with its drawing.
How long a sample should you request? In the separate 22 cm cutting example above, two pieces starting at the same point of an 8 cm repeat occupy 24 + 22 = 46 cm, measured from the first usable starting motif. Each 22 cm already includes the end allowance. Ask for extra length to find that first motif on the roll and any separate colour swatch. Confirm the cut plan before moving on to a stretch comparison.
For a change of material, use the approved drawing again with the new sample. Compare lace trim and fabric formats · Browse stretch lace trim.
Discuss a real requirement
Turn the reading into a practical next step.
Send a short note, product reference, photograph, swatch or tech pack. Technical feasibility, sampling, documentation and production terms are confirmed after review.
Start an inquiry